Best Sony Camera for Video Podcasting: How to Create a Cinematic Look
As an Amazon Associate, Pod Sound School earns from qualifying purchases made through the links provided on this website. This means we may receive a small commission at no additional cost to you if you choose to purchase through these links. Your support helps keep the content coming. Thank you!
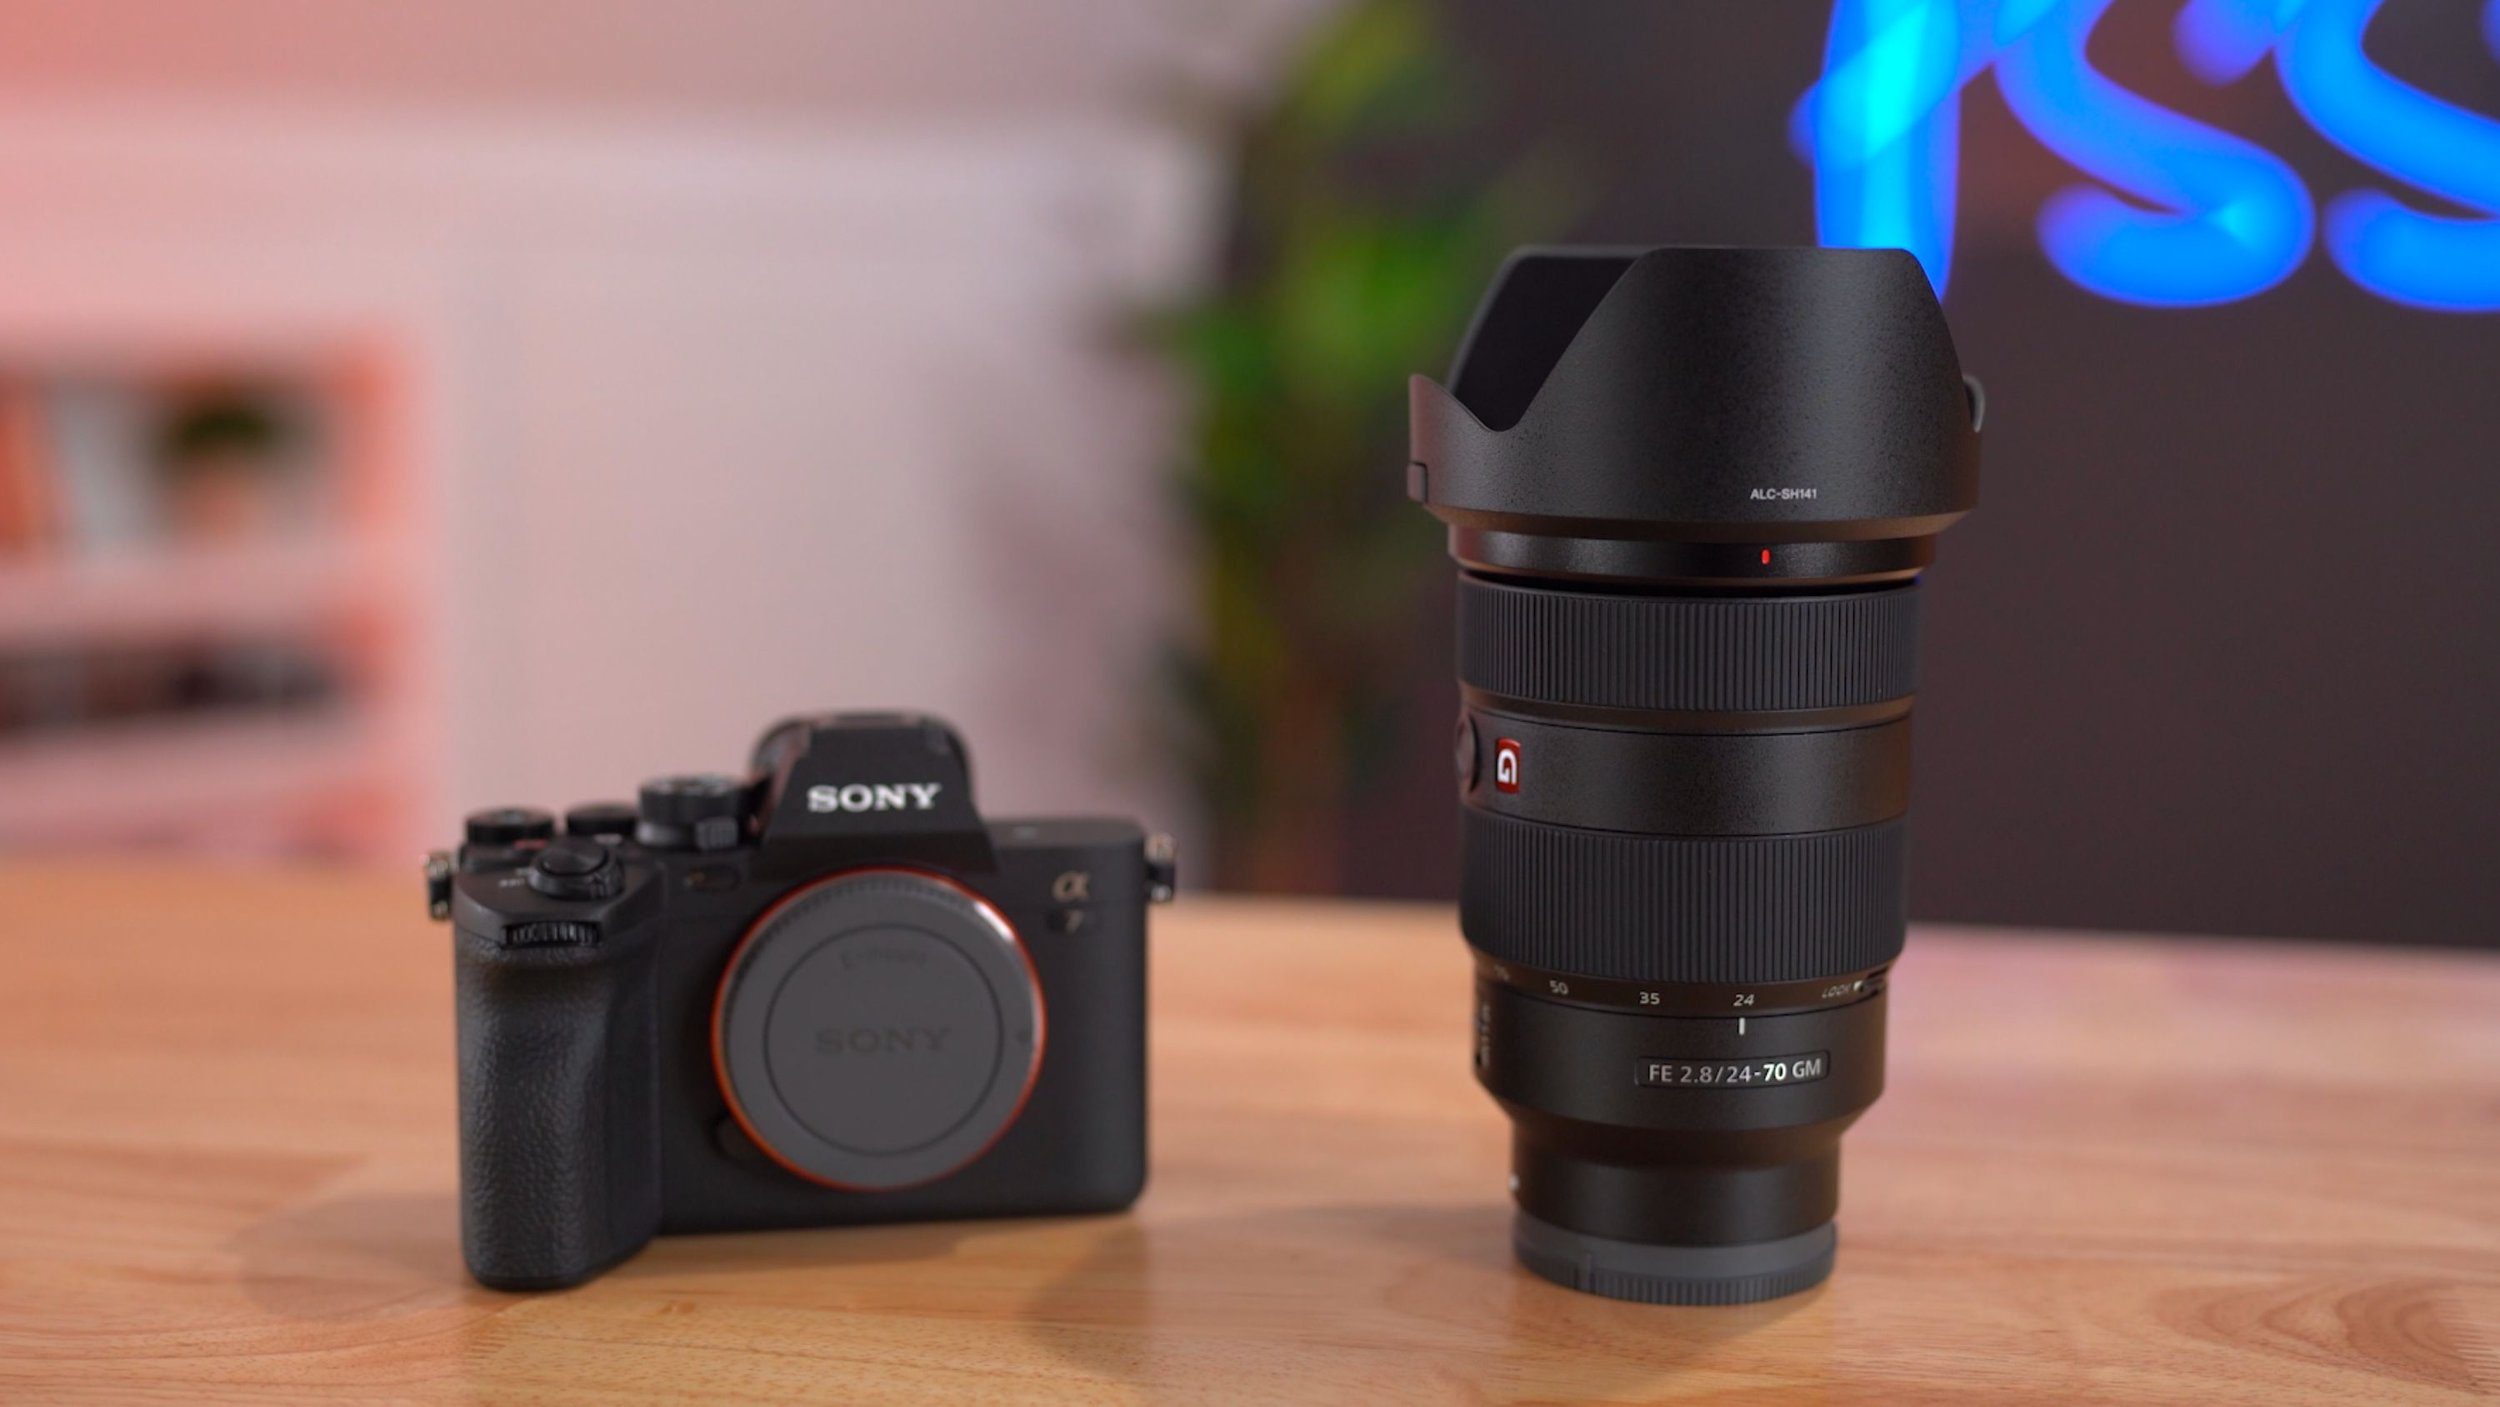
If you're building your professional video podcast studio and are looking for a professional camera and lens to achieve that cinematic look you see in some of your favorite shows, in this case, one of the best options for video podcasting is the Sony A7 Mark IV Camera Body and the Sony FE 24-70mm f/2.8 GM Lens.
We’ll show you how to set it up, and we'll run some tests so you can judge the incredible picture quality of this setup. The Sony A7 Mark IV will make you look like a movie or podcast star, because why not?
As We Demonstrate the Sony A7 IV Camera, we'll talk about:
1 — Camera Buttons: Sony A7 Mark IV
2 — Sony FE 24-70mm f/2.8 GM Lens: 24mm vs. 35mm vs. 50mm vs. 70mm
3 — Main Menu Settings: Sony A7 Mark IV
4 — Function Menu Settings: Sony A7 Mark IV
Watch Our YouTube Video: Best Camera for Video Podcasting [Cinematic Look]
It is a Saturday and Stephen has been working since five in the morning to get all the equipment set up in our studio.
We are working on a project for a client, step-by-step video tutorials on how to use the Sony A7 Mark IV Camera Body and a zoom lens. Our client has all of this equipment in his studio so now we are teaching him how to use it.
What's really cool about using Sony cameras to demonstrate the Sony camera is they have really good crystal clear focus, especially on close-up objects so you can see all the little buttons, parameters, and settings. This is how we teach camera technology and all sorts of things and experiment with different advanced POV (point-of-view) shots to increase the efficacy of the learning.

🤔 Do you think we pulled this off or did Stephen's computer explode?
Okay, now that you've seen our sweet setup to capture every single angle of the Sony A7 IV camera, I'm going to ask Stephen to show you one of the tutorials that he shot, showing the menus and important adjustments you need to make if you are using this camera for a video podcast setup.
But first, welcome to the Pod Sound School. I’m Veronica, the content marketing director and instructor in our programs.
My job is to help you make a podcast that attracts the right audience so you can hit your personal or business goals.
If you’re a business owner, this is a great time to:
start a podcast to educate prospects about what you do
become a trusted authority in your industry
and connect with your customers
If you’re interested in learning more about how podcasting can help you grow your business, sign up for my minicourse Idea to Podcast Simplified for Business Owners.

Are you ready? Let's let's get cozy with the A7 Mark IV!
1 — Camera Buttons: Sony A7 Mark IV
I'm using the Sony FE 24-70mm f/2.8 GM Zoom Lens for this walkthrough. This lens has a zoom ring on it so when I spin it to the left, the shot gets wider, and when I spin it all the way to the right, the shot becomes more of a telephoto shot.
You'll see it's 70 millimeters for the focal length when I zoom all the way IN…

And it's 24 millimeters for the focal length when I zoom all the way OUT…

So now let's get familiar with all of the buttons. We'll especially focus on the ones that we are actually going to use every day for video podcasting.
Buttons On the Back of the Camera — Sony A7 Mark IV
Let's start on the back of the camera.

1. MENU BUTTON
First, to the left-hand side, you'll see the MENU button. That's a very important one that we will be clicking into all of the time to access the menu on the camera.
2. C3 AND C1 BUTTONS
Next to that you see C3. We also see a C1 button on the other side. These are custom buttons that professionals use. You can customize really anything you want to work with these buttons. That's something very advanced that we're not going to get into.
3. AF-ON BUTTON
Then there's this AF-ON button that will turn the AUTOFOCUS ON.
There's also a little magnifying glass icon next to that because the AF-ON button also commonly works with your focus magnifier.
4. AEL BUTTON
Then this button in the top right corner, AEL, stands for AUTO EXPOSURE LOCK. This will lock your current exposure settings into place. This is, again, pretty advanced and we're not going to get into it
5. FN BUTTON
Underneath all of that is the FN button which stands for FUNCTION. This is an important button we'll use all the time because it brings up our function menu. Notice, that when I press it, the function menu pops up on my screen.
6. SCROLLING WHEEL
After that, I have this wheel that works as a scrolling wheel that will fast scroll through lists and other functions on the camera, but it also has clickable spots around it, at the top, bottom, left, and right that you can press to select something or navigate left, right, up, and down.
Notice the top position says DISP which stands for DISPLAY. When you press to select it, it changes the display options on your monitor.
I like to tap it until it has the minimum amount of things displayed, or it shows the audio meter and a histogram to see my exposure levels.
We won't get into the depths of histograms but know that the left side of the histogram represents black and the right side represents white.
Now, on the right side of the scroll wheel, we see ISO, our EXPOSURE settings. ISO in digital photography is artificial light or artificial exposure.
When we press the wheel to select ISO, the ISO settings menu appears on the screen so you can choose our exposure. At the very top of the menu is the ISO AUTO option many people choose to stay in.
7. PLAY AND TRASH BUTTONS
Finally, at the very bottom of the back of the camera, we have a PLAY button and a TRASH button. The play button allows us to preview recordings that we've made on the camera, and the trash button allows us to delete things from that same menu.
Buttons On the Top of the Camera — Sony A7 Mark IV
SHOOTING MODES & MEMORY RECALL (1, 2 & 3) ON THE MODE DIAL
Before we take a closer look at the buttons and dials on top of the camera, let's talk about the three little icons located on the back side of the MODE dial.
These 3 icons are the 3 MAIN SHOOTING MODES:
➔ STILL PHOTO MODE (picture camera icon)
➔ VIDEO MODE (video camera icon)
➔ S&Q MODE (SLOW for slow-motion, and QUICK for time-lapse)
On the opposite side of the MODE dial, there's a little button that you can press in to unlock and rotate the dial to select a shooting mode.
For video podcasting, we're going to be in video mode, the center mode, the majority of the time.
For professionals who want to create and save their own custom settings as a preset, they’ll use numbers 1, 2, and 3 on top of the mode dial in combination with the 3 shooting modes on the back of the dial.
Numbers 1, 2, and 3 are for saving custom MEMORY RECALL settings. Memory recall allows you to quickly recall frequently used camera settings before you take photos or shoot videos.
The Sony A7 III only allowed you to save 2 memory recall presets, whereas with the new Sony A7 IV, you can save 9 MEMORY RECALL PRESETS, up to 3 presets per shooting mode.

YOU CAN SAVE 9 MEMORY RECALL PRESETS TOTAL:
➔ up to 3 presets for STILL PHOTO MODE (picture camera icon)
➔ up to 3 presets for VIDEO MODE (video camera icon)
➔ up to 3 presets for S&Q MODE (SLOW for slow-motion, and QUICK for time-lapse)
But as a beginner in video podcasting, don’t worry about 1, 2, & 3 on the mode dial, you don’t need to know how to make your own custom presets to achieve a professional, cinematic look.
So now we can move on and discuss the other dials and buttons on top of the camera.
1. C2 BUTTON
Again, you see a C button, C2. This is just another custom button you can program if you're an advanced photographer.

2. RECORD BUTTON
The red button here is the classic record icon we're used to seeing everywhere. So this is where you will press record on this camera.
3. ON/OFF SWITCH
In front of that, we have the on/off switch.
4. SHUTTER RELEASE BUTTON
And then the button in the middle of the on/off switch is your shutter release or how you take a photo with this camera.
5. REAR DIAL RIGHT
The wheel on the right is a quick f-stop boost or reduce. As I turn it to the left, the light is becoming more exposed because it's giving me an additional f-stop of exposure.
This wheel is great if you know your shot is a little underexposed or a little overexposed. It's a quick and easy way to reduce or increase the exposure. It’s more of a professional photographer's handy tool, so we probably won't use it very much either.
6. REAR DIAL LEFT
The wheel to the left of the exposure wheel is one that we will use occasionally because this wheel will control certain settings on the mode dial and in aperture priority mode.
7. MODE DIAL
Now the main wheel near the middle on the top of the camera is what I like to think of as the modes of operation wheel.
On the left side, a little white dash indicates the letter or number we have selected by turning this wheel.
MODE DIAL — M or MANUAL MODE
So let's start by turning the wheel to M. When we select M, you'll notice that the display changes, letting us know that we are now in manual exposure or manual mode.
This allows us to manually control both the shutter speed and aperture. This is the preferred choice of professionals because it gives you full creative control. For the most part, we are not going to hang out in manual mode.
MODE DIAL — S or SHUTTER PRIORITY MODE
When we switch to S, this is the shutter priority mode. In this mode, you select the shutter speed and then the camera will automatically adjust the aperture.
The use case for this is when you're trying to capture a lot of movement, like in sports photography or videography so you won’t hang out in this mode very often.
MODE DIAL — A or APERTURE PRIORITY MODE
The next option on the dial is A which stands for aperture priority mode. In this mode, you set the aperture and the camera automatically adjusts the shutter speed. You will be hanging out in this mode most of the time because it’s a great mode for controlling the depth of field to achieve that sought-after blurry background.
MODE DIAL — P or PROGRAM MODE
The next mode after A is the program mode or P. And here the camera will set both the shutter speed and the aperture automatically, but you can still adjust other settings. So this is suitable for quick shooting scenarios where you just need to focus on composition rather than exposure settings.
MODE DIAL — AUTO MODE (Green Bar)
And finally, auto mode. This is the fully automatic mode where the camera will handle everything automatically. This is best for beginners or those who aren't comfortable with DSLR cameras yet. It’s a great place to start, especially if you're shooting solo and want to avoid making mistakes.
MODE DIAL — 1, 2, and 3
Finally, as I explained above, the 3, 2, and 1 on the mode dial are for creating and saving your own custom preset MEMORY RECALL settings for the 3 shooting modes. These options are ideal for advanced photographers and filmmakers.
Quick Recap of the Buttons You’ll Use the Most — Sony A7 Mark IV
On the BACK of the camera, you’ll use:
the MENU button
the Fn or FUNCTION MENU button
the DISPLAY option on the scrolling wheel
the ISO option on the scrolling wheel
On the TOP of the camera:
Select VIDEO MODE on the mode dial
Keep your camera in A or APERTURE PRIORITY mode.
And congratulations, you're now officially cozy with the Sony A7 Mark IV!
2 — Sony FE 24-70mm f/2.8 GM Lens: 24mm vs. 35mm vs. 50mm vs. 70mm
Okay, so I'm excited to show you this beautiful lens in action, so you can see why it's our go-to for multiple situations and studio sizes.

I love this lens because it really illustrates what you could think of as the trifecta of the focal length that every content creator needs in their toolbox: the 24mm, the 35mm, the 50mm, and with this lens you also can zoom all the way up to 70mm.

As we demonstrate the zoom capabilities of this lens, let's look at how everything changes in the shot from how I look to how the room or the studio looks around me.
24 millimeters
So we'll start all the way zoomed out at 24 millimeters. For this, I'll have to move myself much closer to the camera, about 25 inches.

35 millimeters
Now let's bump it up to 35 millimeters. And here I will have to step back from the camera about three to four feet. Notice the background now appears closer to me.

50 millimeters
Then as we zoom to the 50 millimeters, again, I will have to move backward, this time about 5 feet away from the camera.

70 millimeters
Lastly, when we're all the way zoomed in, you can easily see that everything has been squashed together. It almost looks like I'm against the wall, even though there's eight feet distance between me and the wall.

What’s the best focal length for your video podcast?
35-55 mm (recommended)
However, it really depends on your specific studio size and recording needs. The great thing about having a zoom lens like the Sony FE 24-70mm f/2.8 GM Lens is that you don’t have to commit to one focal length. You can zoom in and out to find the perfect setting for your situation, giving you a lot of flexibility.
Ask an Expert (strongly recommended)
Someone who knows the technical ins and outs of DSLR cameras can look at your podcast studio and help you calculate the best focal length(s) for your situation, saving you from making costly mistakes and wasting time. We love designing podcast studios and providing gear strategy and training. Click here to learn more about how to work with us.
The Budget Lens Option
If you’re feeling brave and want to get set up on your own without investing $1,700 on a high-quality zoom lens, Sony has another option: the Sony 28-70mm f/3.5-5.6 FE OSS Zoom Lens.

All right, now hold on. I know the zoom is amazing, but we still have work to do. You've got to know all about the menus in this camera and how to adjust the settings so this works properly as a video podcasting camera. We better get to it!
3 — Main Menu Settings: Sony A7 Mark IV
Okay, now let's look at the menus you will use in the Sony A7 Mark IV.
To start, press the main menu button on the back, upper left half of the camera.
Now that I'm in the main menu, I’ll use the scroll wheel on the back of the camera to navigate around, as well as the buttons and options around and within the scroll wheel.
How to Navigate Between Catagories
We are going to start right near the top with this camera icon.
Notice if you press the left side of the scroll wheel and move to the left category menu, you'll enter into what I think of as the category view, where you can quickly move through these big categories. This can be a quicker way to navigate around this very complex main menu.
So once you find the category you want, you can either enter into the category by pressing the center button or the right side of the scroll wheel.
Shooting Menu (Red) > 1 Image Quality > File Format
The first place that we're going to start is with the number one option here. Notice that the numbers are also color-coded red to go along with this shooting category. You can also refer to these as tabs and subtabs.

I'm in subcategory number one under the shooting category tab.
When I press the middle button to enter into the 1 Image Quality tab, I'm given this list here. The first menu we are going to take a tour through is the top item here, File Format.

When we click on File Format, we have five different file formats. What do all of these mean, and which one should we use? Let's first go through each one, and then I will tell you the ones that I choose to use on a regular basis.

HS 4K
The one at the top is the HS 4K. This uses the H.265 codec which offers a higher efficiency and better compression making it a great option for capturing high-quality 4K footage with smaller file sizes.
S 4K
The one down from that, the S, is what I think of as the Standard 4K. This is the classic 4K H.264 codec that's widely used across different Sony cameras.
This is great for general resolution 4K recording, balancing quality and file size for everyday professional videography.
S HD
Underneath that we have Standard HD, same as above, only here now you're at 1080p quality resulting in smaller file sizes and lower-quality video.
Underneath that, we have our two SI options.
SI Options: S-I 4K and S-I HD
These SI options are what Sony calls an all-intra format (XAVC-S-I) for 4k video. This offers the highest quality with less compression because each frame is recorded independently. And so this results in really large file sizes, but maximum image quality.
This is ideal for professional products, where maximum video quality is critical, like filmmaking or high-end commercial work.
My 2 Go-To Settings for Video Podcasting
So it should be no surprise that the two in the middle are my go-to's. And the S 4K is the one I recommend you stay in most of the time.
If you're trying to limit your file sizes, I would first experiment with the top one, HS 4K, where you get the H.265 codec, which will give smaller file sizes, or even use 1080p, S HD.
Okay, now we can go back into our previous window by simply selecting the file format we want.
Shooting Menu (Red) > 1 Image Quality > Movie Settings
And now we're back in the Image Quality subcategory again. Now go down one tab to Movie Settings and click enter (the button in the center of the scroll wheel).

Here we have the option of a Recorded Frame Rate at the top and our Recording Setting at the bottom.

Rec Frame Rate
For the Recorded Frame Rate, most of the time, we’ll keep this at 30p. You can also put it up to 60p if you're capturing a lot of movement. But 30p is just an all-around great setting here.
Underneath this, we have the Record Setting.
Record Setting
This is where you can also increase the quality and increase the file size the higher the numbers get.
The big M here stands for megabits per second.
So this top one (140M 4:2:2 10bit) is a very exciting option on the Mark IV because it gives you 140 megabits per second, which is a ton, and a 4:2:2 color ratio with 10bit recording.
But here, my go-to setting is 60 megabits per second. This is still very high-quality and helps you to keep those file sizes manageable.
So now I can just press the back button (left side of the scroll wheel) and return to the previous menu. Let's go ahead and press the left button again to return to this previous menu.
Shooting Menu (Red) > 2 Media > Format
And now in this shooting category, let's advance now to number two. This is one you will be coming into on the daily, and that's because this is how you format your card.

Let's click into this 2 Media subcategory.
Where you see Format, go ahead and click into Format.
Now it will show you which slots you have SD cards in.

You can choose to format it by simply selecting the slot in question. It tells you this is a Quick Format that will delete all of your data. Go ahead and say enter.
Formatting is a best practice every time you're about to shoot. You should always reformat your card before your next shoot.
And that's it for the shooting category. Now let's go to one more category and look at some settings there.
Setup Menu (Yellow) > 5 Touch Operation > Touch Func. in Shooting
Go all the way down to the yellow category or the toolbox icon, also known as the SETUP category.
Now press the right side of the scroll wheel to access the subcategories, and scroll down to Touch Operation.

The setting that we want to adjust is Touch Function in Shooting.

And make sure that Touch Focus is selected. This is going to enable us to use the Spot Focus feature.
So now let's go back into the previous window or menu by clicking the left button. But we're not done with this setup category yet.
Setup Menu (Yellow) > 9 Power Setting Option
We're going to continue to scroll down until we get to number nine, the Power Setting Option subcategory.

Let's go ahead and click into that subcategory. And we're going to make sure that this camera is set to NOT AUTOMATICALLY POWER OFF or turn off on us when we're in the middle of recording a podcast episode.
Auto Monitor OFF
The first one here, where it says Auto Monitor OFF, make sure it says Does not turn OFF.

Power Save Start Time
The next one down is actually the power save for our little LCD screen. So, we want to click into that and make sure that it says either 30 minutes or off.
If it's set to 1 minute or 10 seconds, that will get very annoying very quickly when your monitor keeps turning off on you. And back to the previous menu.
Auto Power OFF Temp.
Now let's go down to the very bottom where it says Auto Power OFF Temp. We want to click into that and make sure that it is selected at high instead of standard. It defaults to standard so make sure you have it set as high. It will warn you. Go ahead and accept the warning.
And that's it for this power setting option. Let's go back to our previous page.
Setup Menu (Yellow) > 12 External Output
And now we're just going to visit one last subcategory: 12 External Output. So let's go ahead and click into 12.

HDMI Resolution
The first one at the top is HDMI Resolution. Let's click into that. We're going to want to ensure that this is set to 2160p instead of Auto.

HDMI Info. Display
Now we'll continue down and this one is very important: HDMI Info Display. You notice that I have mine set to ON. If I click mine to OFF, now you only see the camera shot. And so that is the setting that you will want to ensure it is set to. Make sure the HDMI Info Display is set to OFF so no information is displayed (as pictured below).

I'm going to keep mine set to ON so that you can actually see the info being displayed (as pictured below). But if yours is set to ON, then when you're not in your menu, all of the information, the standby, the audio meters, and the histogram, will be sent out your HDMI cable and into your recordings.

So let's go back into the menu again and make sure the HDMI Info Display is turned OFF!
And that's it. You have made it through the main menu settings! So now you can press the menu button here and exit the main menu.
And now let's move on to our next menu. And that is our function menu which is the Fn button.
4 — Function Menu Settings: Sony A7 Mark IV
Let's press the Fn button and let's get comfortable with the options here.
In this menu, you have some quick boxes.
You'll notice along the bottom that it gives you half-wheel icons and it says Change. This allows you to quickly change the settings in any box/menu you're hovering over, by turning the scroll wheel. However, I prefer to click into the boxes or menus myself.
Focus Mode (AF-C)
The first one we're going to take a look at is AF-C or Focus Mode. Click into that box/menu and make sure Continuous AF (autofocus) is selected. NOTE: Many of our lenses will also have a physical switch on the lens that you will have to set to AF or autofocus to also work with the autofocus with your camera

Focus Area (M)
Let's press the function button again and move to the neighboring box on the right called Focus Area. Click into that box/menu and select Spot: M. This is a moveable spot. If you press the left or right side of the scroll gear, you can change it to Spot S, Spot M, or Spot L. Yes, that's small, medium, or large. I prefer just the M, the medium box, and we'll go ahead and press the center Okay button.

How to Change the Spot You Want to Autofocus On
Now, you'll notice that this little white box/bracket has appeared on the screen and this is really cool because this allows us to change the spot that we want the camera to autofocus on.
So if I zoom in on the shot of this room, I can select the area I want to focus on. So for example, if I want to focus on the microphone, I can put the bracket over that microphone and everything else goes slightly out of focus and I get a nice blurry background. Notice that the lens behind the microphone on the table is also now subtly out of focus.

I could again then bring this lens into focus and that will allow the microphone to go a little bit out of focus. And of course, I can select that PSS sign on the back wall, and now it’s in focus. Or I can make the tree back there in focus and the microphones on the table out of focus.
This is a really handy way to focus because you can click on the speaker's forehead. And then when the speaker moves their hands, the camera won't be constantly trying to bring their hands into focus instead of their face. Also, using this setting, the camera will not mistakenly focus on the microphone that is typically in front of the person speaking, which is a common mistake that happens from autofocus.
So using the settings above and manually choosing a specific focus area is a much better way to use autofocus.
White Balance (AWB)
Okay, now let's quickly finish up with this function menu and take a look at one other box: the AWB or White Balance menu.

If we click into that box/menu, we can have Auto White Balance, which is where we are going to keep things for now.
But it's good to know that you can quickly change your white balance to different settings, daylight, shade, cloudy, and incandescent, using the left options menu. You also have some custom options at the bottom of the menu to create and save your own custom white balance presets, an advanced technique that we'll cover in future videos.
And now you are cooking with gas and ready to record some seriously professional video with the Sony A7 Mark IV camera.
WATCH OUR YOUTUBE VIDEO:
Best Camera for Video Podcasting [Cinematic Look]
Conclusion
Setting up the Sony A7 Mark IV Camera Body for video podcasting is our favorite choice for achieving cinematic-quality footage that elevates your content to a new level. This camera, paired with the Sony FE 24-70mm f/2.8 GM Lens, offers versatile focal lengths and stunning picture quality that can make your podcast visually appealing and engaging.
We've walked you through the essential buttons and settings for beginners, focusing on what you need to know to get the most out of your camera for video podcasting. From understanding the key functions of the buttons to navigating the complex menus, and configuring the crucial settings, you are now equipped to handle the technical aspects with confidence.
Remember, the key to mastering any new technology is practice and experimentation. Don't be afraid to try different settings and modes to see what works best for your specific setup and style. With the Sony A7 Mark IV, you're not just capturing video; you're creating an experience. So go ahead, start recording, and let your creativity shine through.
We Can Help You Design Your Studio and Launch a Professional Video Podcast
I know choosing the right equipment and learning how to use it in the process of producing a video podcast can be overwhelming, but you don't have to do it alone. We can help you put together your studio and give you and your team the training to launch a professional video podcast. Click here to learn more about how to work with us.
Also, if you're looking for a compact video podcast setup for your home office, instead of a commercial-sized one, let me show you how I turned my home office into a multipurpose video podcast studio. I shared all of the equipment I use to record audio and video and the lighting. Go check it out.
