2-Person Video Podcast and Live Stream Setup - Ultimate Guide for BEGINNERS
As an Amazon Associate, Pod Sound School earns from qualifying purchases made through the links provided on this website. This means we may receive a small commission at no additional cost to you if you choose to purchase through these links. Your support helps keep the content coming. Thank you!
A 2-person podcast setup with a host and a co-host (or a guest) in the same location is tricky enough. But when you add video to the mix, it gets even more complicated.

And if you throw live streaming into the blend, well, that's when conniption fits can happen.
Don't worry — no conniption fits for you because you've arrived at Pod Sound School.
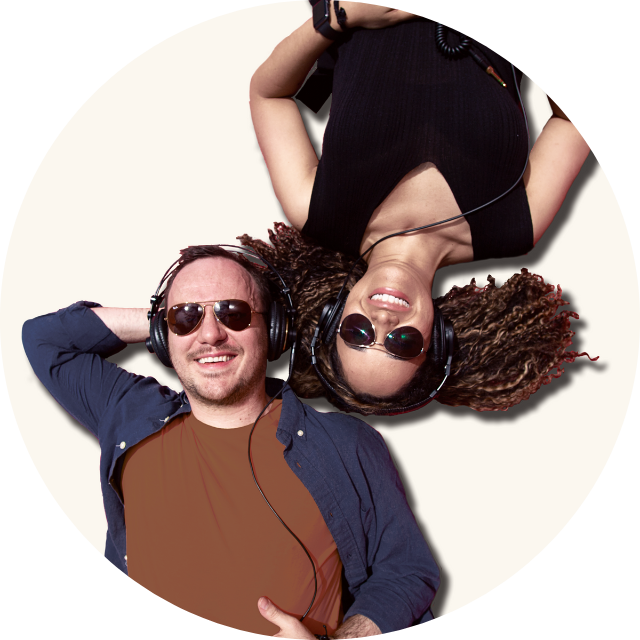
I'm Studio Steve, an audio engineer and video producer.
And together, we're going to learn how to live stream and video podcast at the same time:
1 Why Start with a Simple Setup
2. Watch Veronica Unbox the RODE Podcaster Bundle
How to Set Up and Use Your RODECaster Duo (Step-By-Step)
3. The RODECaster Duo was Made for Live Streamers
4. The Downsides of the RODECaster Duo
5. How to Record Your Audio in the Most Professional Way
6. Download the Reaper Digital Audio Workstation
7. Adjust the RODECaster Duo’s Settings to Work with Reaper
8. The Difference Between Pre-fader and Post-fader
How the Routing Works and How To Set Up Your Digital Audio Workstation (DAW)
9. Get Reaper Set Up to Record Multiple Separate Tracks
10. Adjusting Volume Recording Levels
11. How to Add Custom Sound Effects to the RODECaster Duo
12. Links to All of the Equipment We Used to Live Stream
How to Set Up Your Camera, OBS, and the RODECaster DUO to Live Stream a Video Podcast
13. The Benefit of Using OBS for Video Podcast Live-Streaming
15. How to Set Up OBS to Create Multiple Scenes From ONE Camera
16. How to Set Up StreamYard In OBS
WATCH OUR YOUTUBE VIDEO: Use this 2 Person Video Podcast and Live Stream Setup (BEGINNERS)
And when you follow along, your live-streamed video podcast will be produced at the highest professional level. Did you expect anything less from us? ‘Cause we don’t do bleh around these parts.
But in all seriousness, did you notice #14 above? I saved the best trick for last: my active speaker hack where you can turn one camera into three different shots. So ninja, right?
Looks like we’ve got a lot to learn. We better get started.
So like a good chunk of our content, this blog post was inspired by a student, Maybe (pronounced mībā), an editor inside our Podcast EditLab program. In addition to becoming a certified podcast editor, Maybe is also the producer of her video podcast that she co-hosts with her husband.

Maybe LIVE streams with:
3 different cameras
a camera switcher
and a RØDECaster Pro
She also wants to record that live stream at a high-quality level so that she can edit it professionally after the fact.
As I was helping her with her setup in the EditLab, I realized that there are many of us that are having these same struggles. There are so many moving parts in this kind of setup.
So Veronica and I took it upon ourselves to show you a really cool approachable setup.
This was also the perfect opportunity for us to try out the new RØDECaster Duo.

You don't have to be podcasting for very long before you hear about RØDE. They make some really great podcasting equipment and the very popular RØDECaster Pro just got a major upgrade with the RØDECaster Duo.
RØDE actually sent us all of the equipment for a complete two-person podcast setup. So Veronica is so excited to unbox all of the new toys from RØDE and show you how easy it is to set it up.
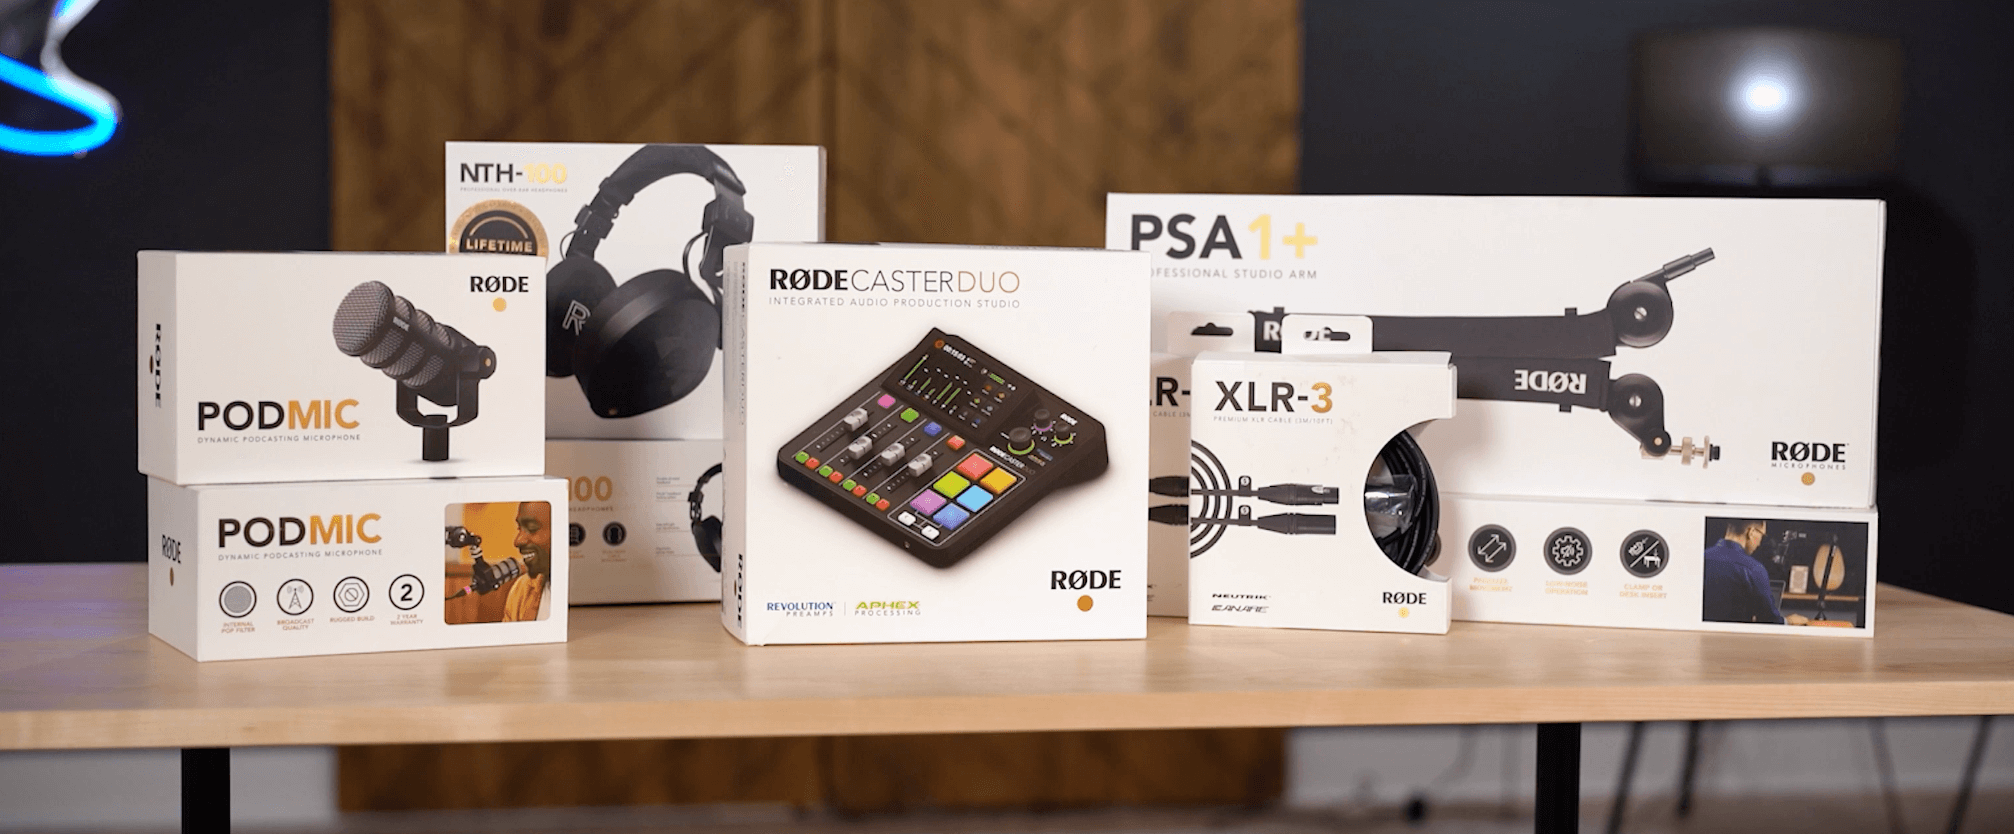
And I'm excited to dive into the RODECaster Duo and figure out how it works and see what all the buzz is about.
I'll show you how you can set up the RODECaster Duo to:
Livestream
And also multi-track record at the same time
I'll also show you how easy it is to:
Drag and drop your own audio files into the cool colorful buttons on the RODECaster Duo so you can use them on demand during your live stream

Add a camera to the mix

Now, I know I mentioned that Maybe, our student, is using three different cameras, but…
I think if you're NEW to video podcasting or live streaming your podcast, it's better to start simple before upgrading to a MULTI-CAMERA setup.
But for those of you who are going to ignore my advice (you know who you are), we created this tutorial for a three-camera setup. You’re welcome!
Also, if you have ever thought about becoming a certified podcast editor, I have a free minicourse where you can test the waters. You actually DOWNLOAD a Digital Audio Workstation and all of the files to edit your own podcast episode. It's a reality check so to speak. You can go HERE and enroll for FREE today.

Why Start with a Simple Setup
To keep yourself from pulling your hair out too much, I think it's really important NOT to overcomplicate your setup, especially because it may interfere with your performance and the value of the conversation or interview within your podcast.
As you get more comfortable switching around microphones and sound effects and working with the camera switcher just on one camera, then you can start adding additional cameras.
The Downside of Using Only ONE Camera
The problem with using only one camera is you generally have to use a pretty WIDE SHOT to get both the host and the co-host in there.
That wide shot can get a little boring. And also if you're anything like me, you make tontote faces (as seen below) when the other person is speaking.

That's why I'm gonna show you how you can use one camera shot and OBS on your computer to create a three-shot setup:
a wide shot
and 2 active speaker shots

So make sure you stick around until the end for that, okay?
Awesome. Now let's get to the fun stuff and set up the gear.
Watch Veronica Unbox and Set Up the RODE Podcaster Bundle for a 2-Person Podcast Setup
How to Set Up and Use Your RODECaster Duo
Okay, so let's chat about the RODECaster Duo. I found it to be really EASY to set up.
1. Plug the the RODECaster Duo Into Your Computer
2. Go Through The Setup Wizard
After you hook up the RODECaster Duo to your computer, it has a setup wizard so you just go through the setup wizard.
3. Download the RODE Central App
The setup wizard will tell you how to download the RODE Central App. Once you get the RODE Central App downloaded, it'll look like the image below and everything's good to go.

THE RODECASTER DUO WAS MADE FOR LIVE STREAMERS
What's really cool about the RODECaster Duo is it's really meant for streamers above all else is what it seems like to me. And the way that it comes directly out of the box when you go through the setup wizard, it's already set up perfectly so when you plug it into your computer, you're going to sound amazing starting with your very first live stream.
THE DOWNSIDES OF RECORDING A PODCAST USING THE RODECASTER DUO
Where it becomes tricky and can cause problems is when you want to use it maybe in a more traditional multi-track recording way, the way that we would traditionally record podcast episodes.
TIP: RECORD EVERY VOICE AND SOUND EFFECT ON A SEPARATE TRACK (PODCAST EDITORS LOVE THIS)
This is where it's important to understand routing and how routing works and also where the settings are on the RODECaster Duo to change this so it can be recorded multi-track.
RECORD THESE AUDIO ITEMS ON SEPARATE TRACKS:
Record each microphone on a separate track
Add music from your phone or computer and record it on a separate track
TIP: You can hook up your phone to the RODECaster Duo via Bluetooth to have some music playing or to review some kind of social media clips or something in your podcast episode
And then using all of the colorful sound effects pads, you can design and add your own sound effects — those should also be recorded on separate tracks
If you're working with a professional editor, they love getting all of the tracks separated because it gives us TOTAL CONTROL in the mix after the fact to:
Add some really cool production bells and whistles on it
Maybe the music was too loud and we wanted to bring the volume down
Maybe the sound effects were too jarring
Maybe we didn't even like the sound effects and they're not going to fit well for the podcast episode, even though they were really good in the live stream
HOW TO RECORD YOUR PODCAST AUDIO IN THE MOST PROFESSIONAL WAY AND WHY IT’S IMPORTANT
So now let's look at the setup and specifically, I'll show you how to get this set up to work with a digital audio workstation. Don’t worry, we’ll take it step by step.
As a reminder, Veronica and I LOVE to put ourselves through the test and be guinea pigs for you on YouTube so that’s what we did with this episode of our Content Jefe podcast! We did a live stream and recorded our podcast episode AT THE SAME TIME we were live streaming. We did it with a SINGLE-CAMERA SETUP which we'll get into later in this post.
But right now let's just focus on getting the RODECaster Duo set up to record properly in the most professional way.
What’s the most professional way?
You got it! Connecting it so it records your audio using a high-quality digital audio workstation (DAW), software that can be downloaded for free on your computer.
In the background, the DAW will record the audio while we're also live streaming this awesome-sounding audio using something like StreamYard, or logging directly into Facebook or YouTube to stream — you don't even need an account with a streaming service like StreamYard.
And now without further ado, let's get to how to set this up.
Download the REAPER Digital Audio Workstation
If you didn't know, REAPER is my go-to digital audio workstation

Time and time again, we test it every year. We put it up against Adobe Audition and Pro Tools. I think Reaper is the most professional solution that's THE BEST ALL-AROUND DAW for podcasters and content creators, especially because it has really low CPU usage and is really reliable.
When you're gonna be plugging in a bunch of cameras to your computer and you're gonna be using the RODECaster Duo with your computer, you want your DAW to be friendly to your computer and not bog the computer down as much as possible.
Not to mention, it has a much prettier and friendlier user interface than Adobe Audition. Look, you can make every track a different custom color!

Adjust the RODECaster Duo’s Settings so it will Work Seamlessly with Reaper
In order to get the RODECaster Duo to work with Reaper properly, we first need to adjust some settings in the Duo.
So let's do that…
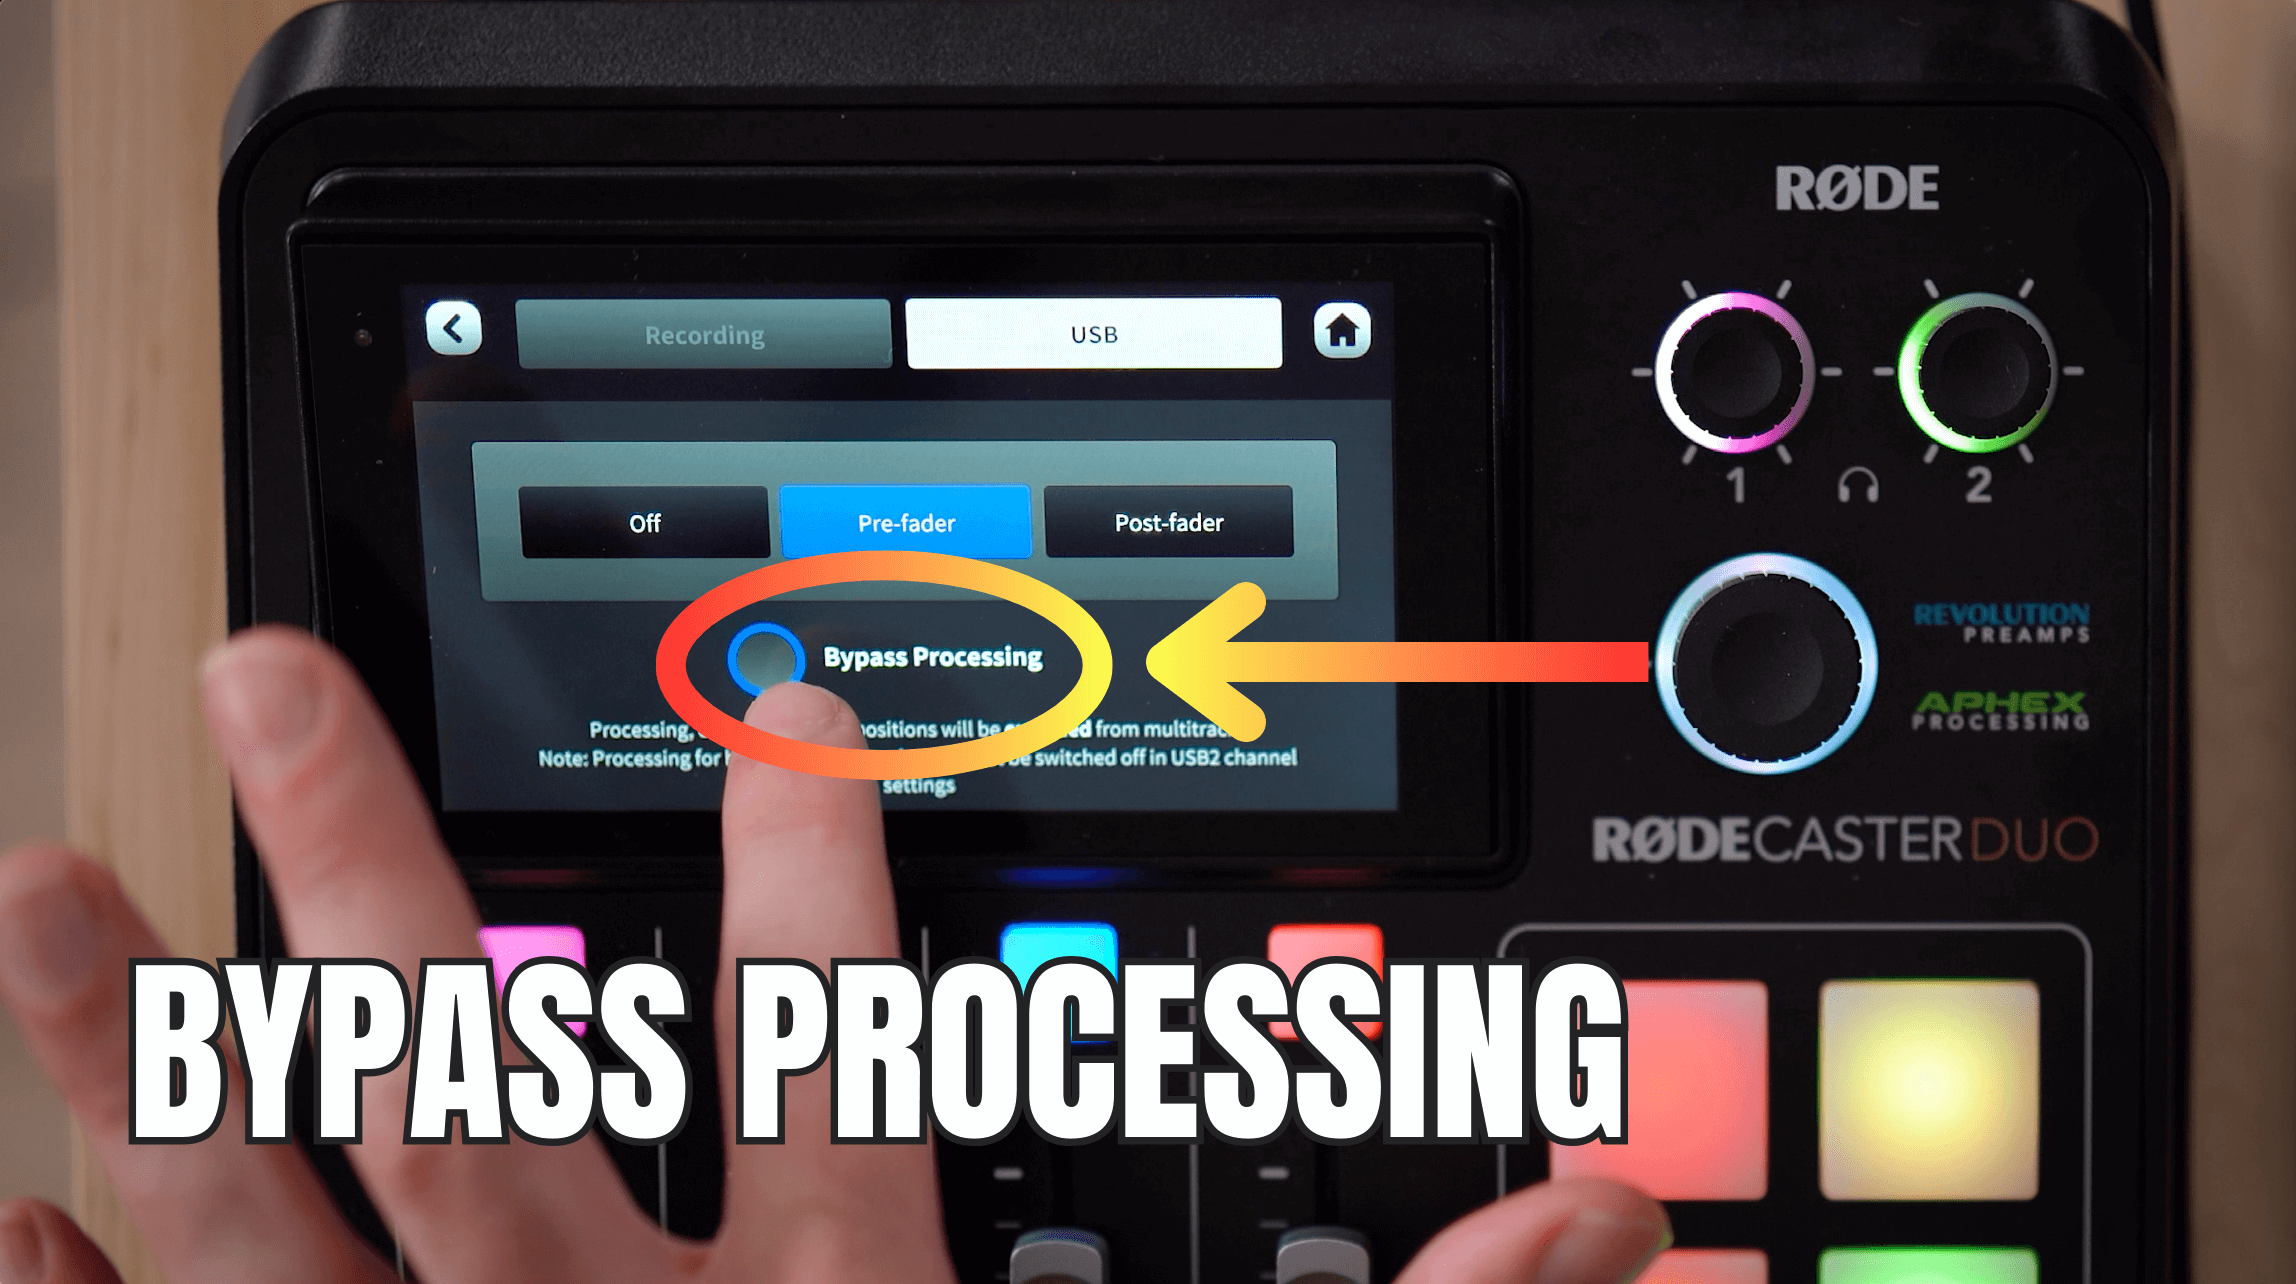
Go to the settings wheel right here

2. Choose Outputs from the configuration. NOTE: This is also something you can do on the RODE Central app that you have on your computer. You could do it there too, but we'll do it here actually on the RODEcaster Duo.
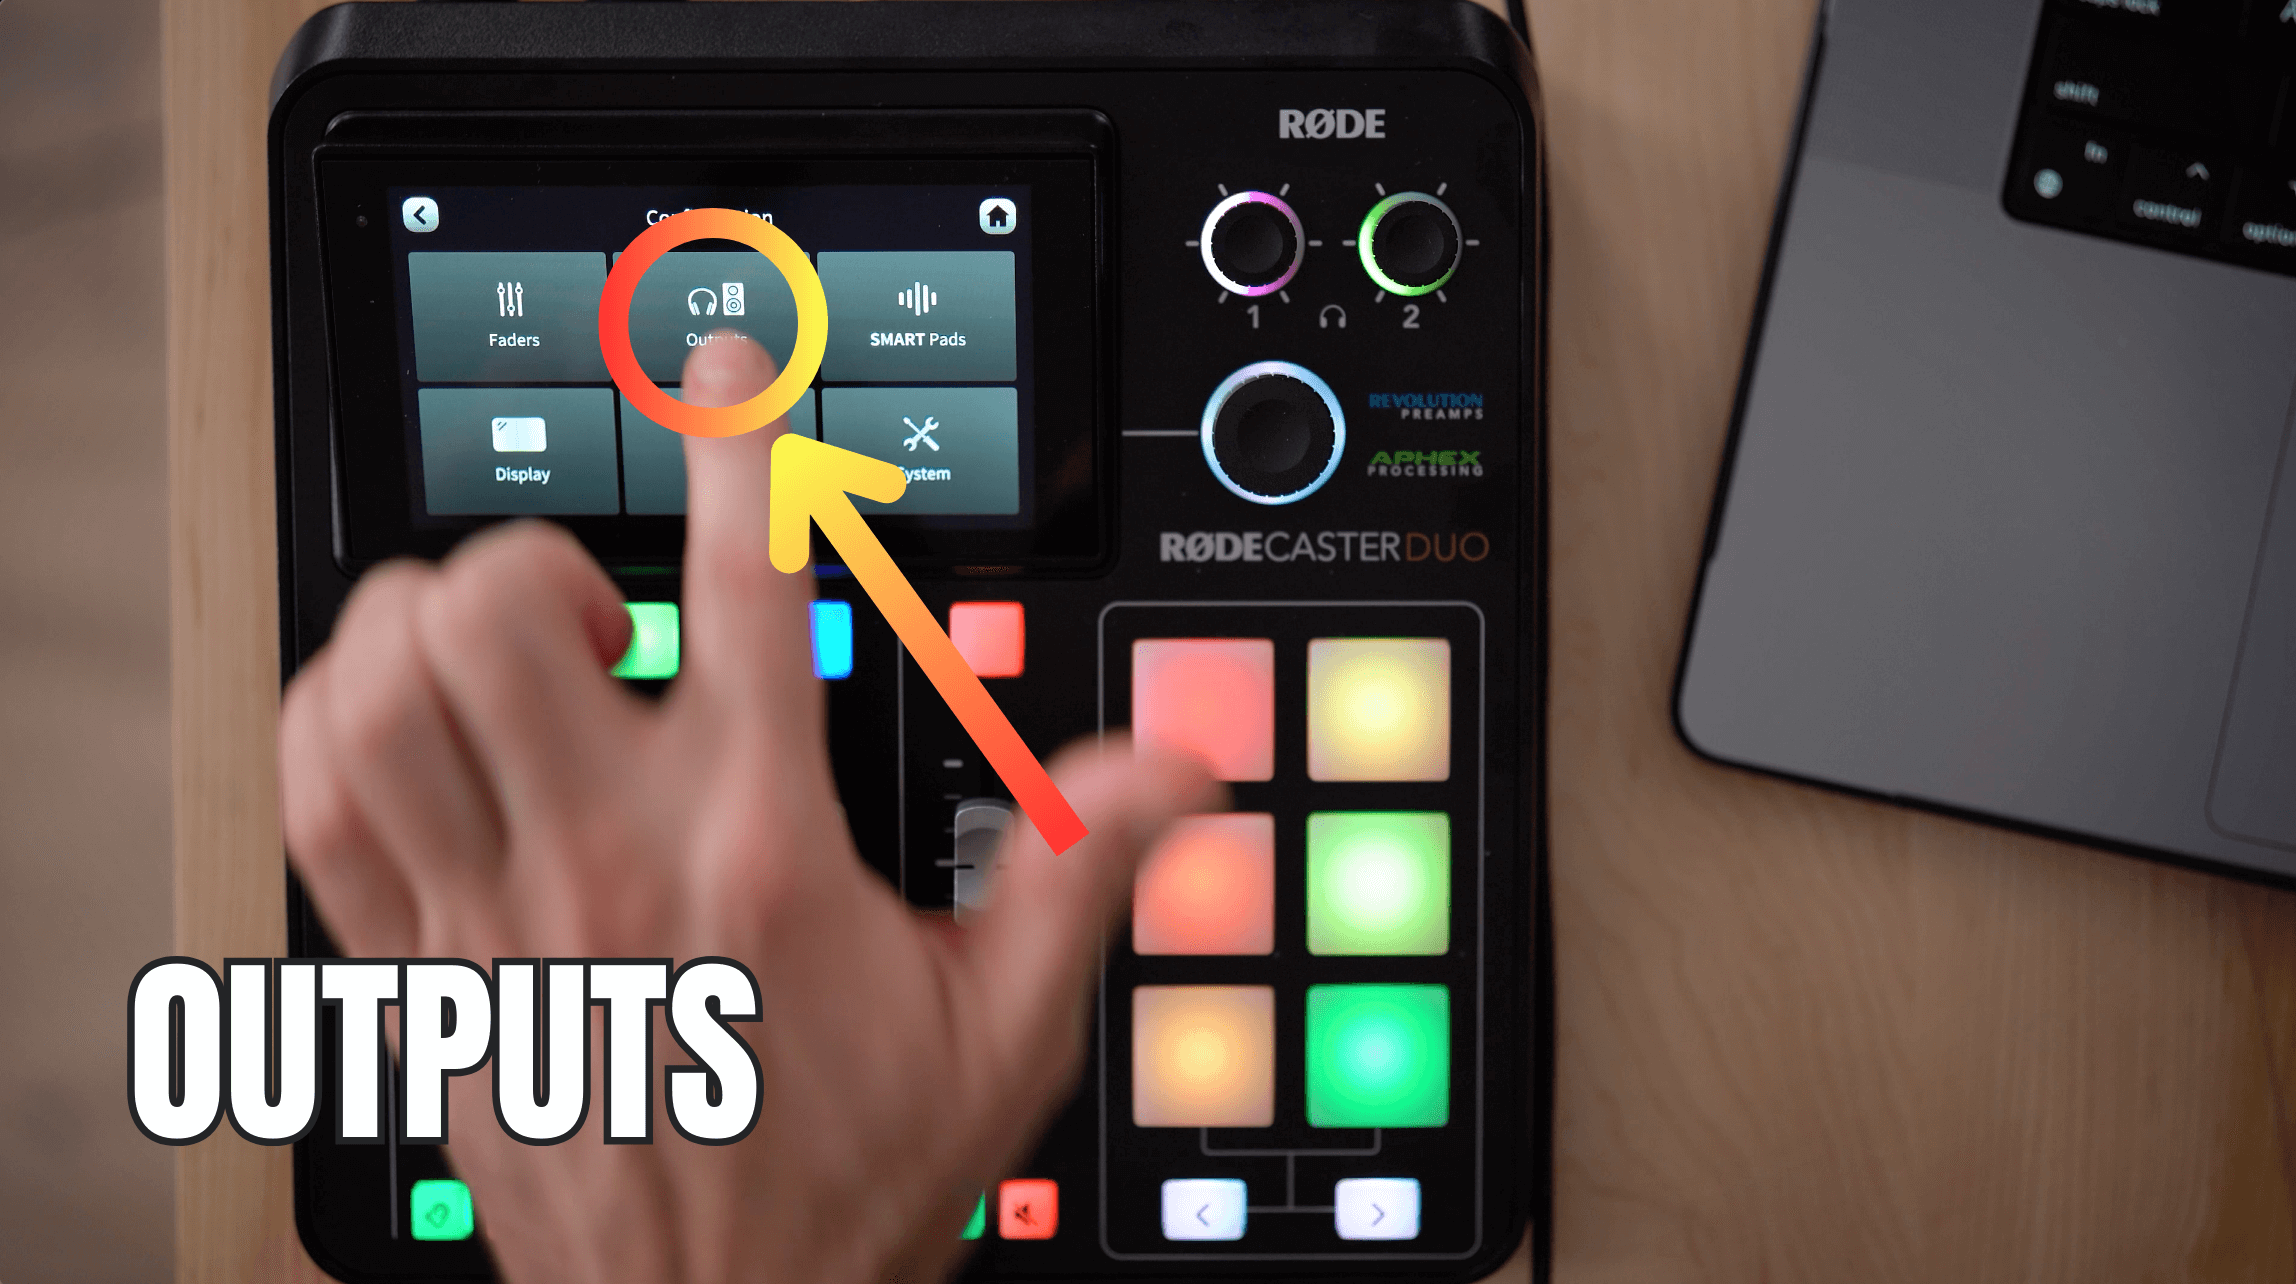
3. Now select Multitrack

4. By default, it will be set to OFF but we’re going to select Pre-fader — so the OFF button should be black

5. Set it to Pre-fader — the button should be BLUE

6. And then I like to also Bypass Processing
So let me quickly explain the difference between Pre-fader and Post-fader with recording and with the USB.
What is a Pre-fader?
What Pre-fader means is that it's going to RECORD the audio before this fader here:

What this means is you WILL be able to adjust the volume of this fader during your live stream BUT those volume adjustments won't be recorded.
So in that case, when you have the music playing here, you could have the music down really low, and you could actually play with the volume of the music in your live stream. But the recording of the music will just be one consistent level of that music playing, which is really beautiful for your editor and post-production.
So it's really cool that we can have the RODECaster Duo send 2 separate signals:
One that sends a stereo monitor signal to our live stream, whether it be StreamYard, or as I mentioned, just logging in live and streaming on any of the platforms
And another that sends the signal to the DAW on our computer to create a separate high-quality multitrack recording
Now back to the steps.
7. Set both the Recording and the USB to Multitrack and Pre-fader
Click the Recording button and set it to Multitrack and choose Pre-fader
Click the USB button and set it to Multitrack and choose Pre-fader
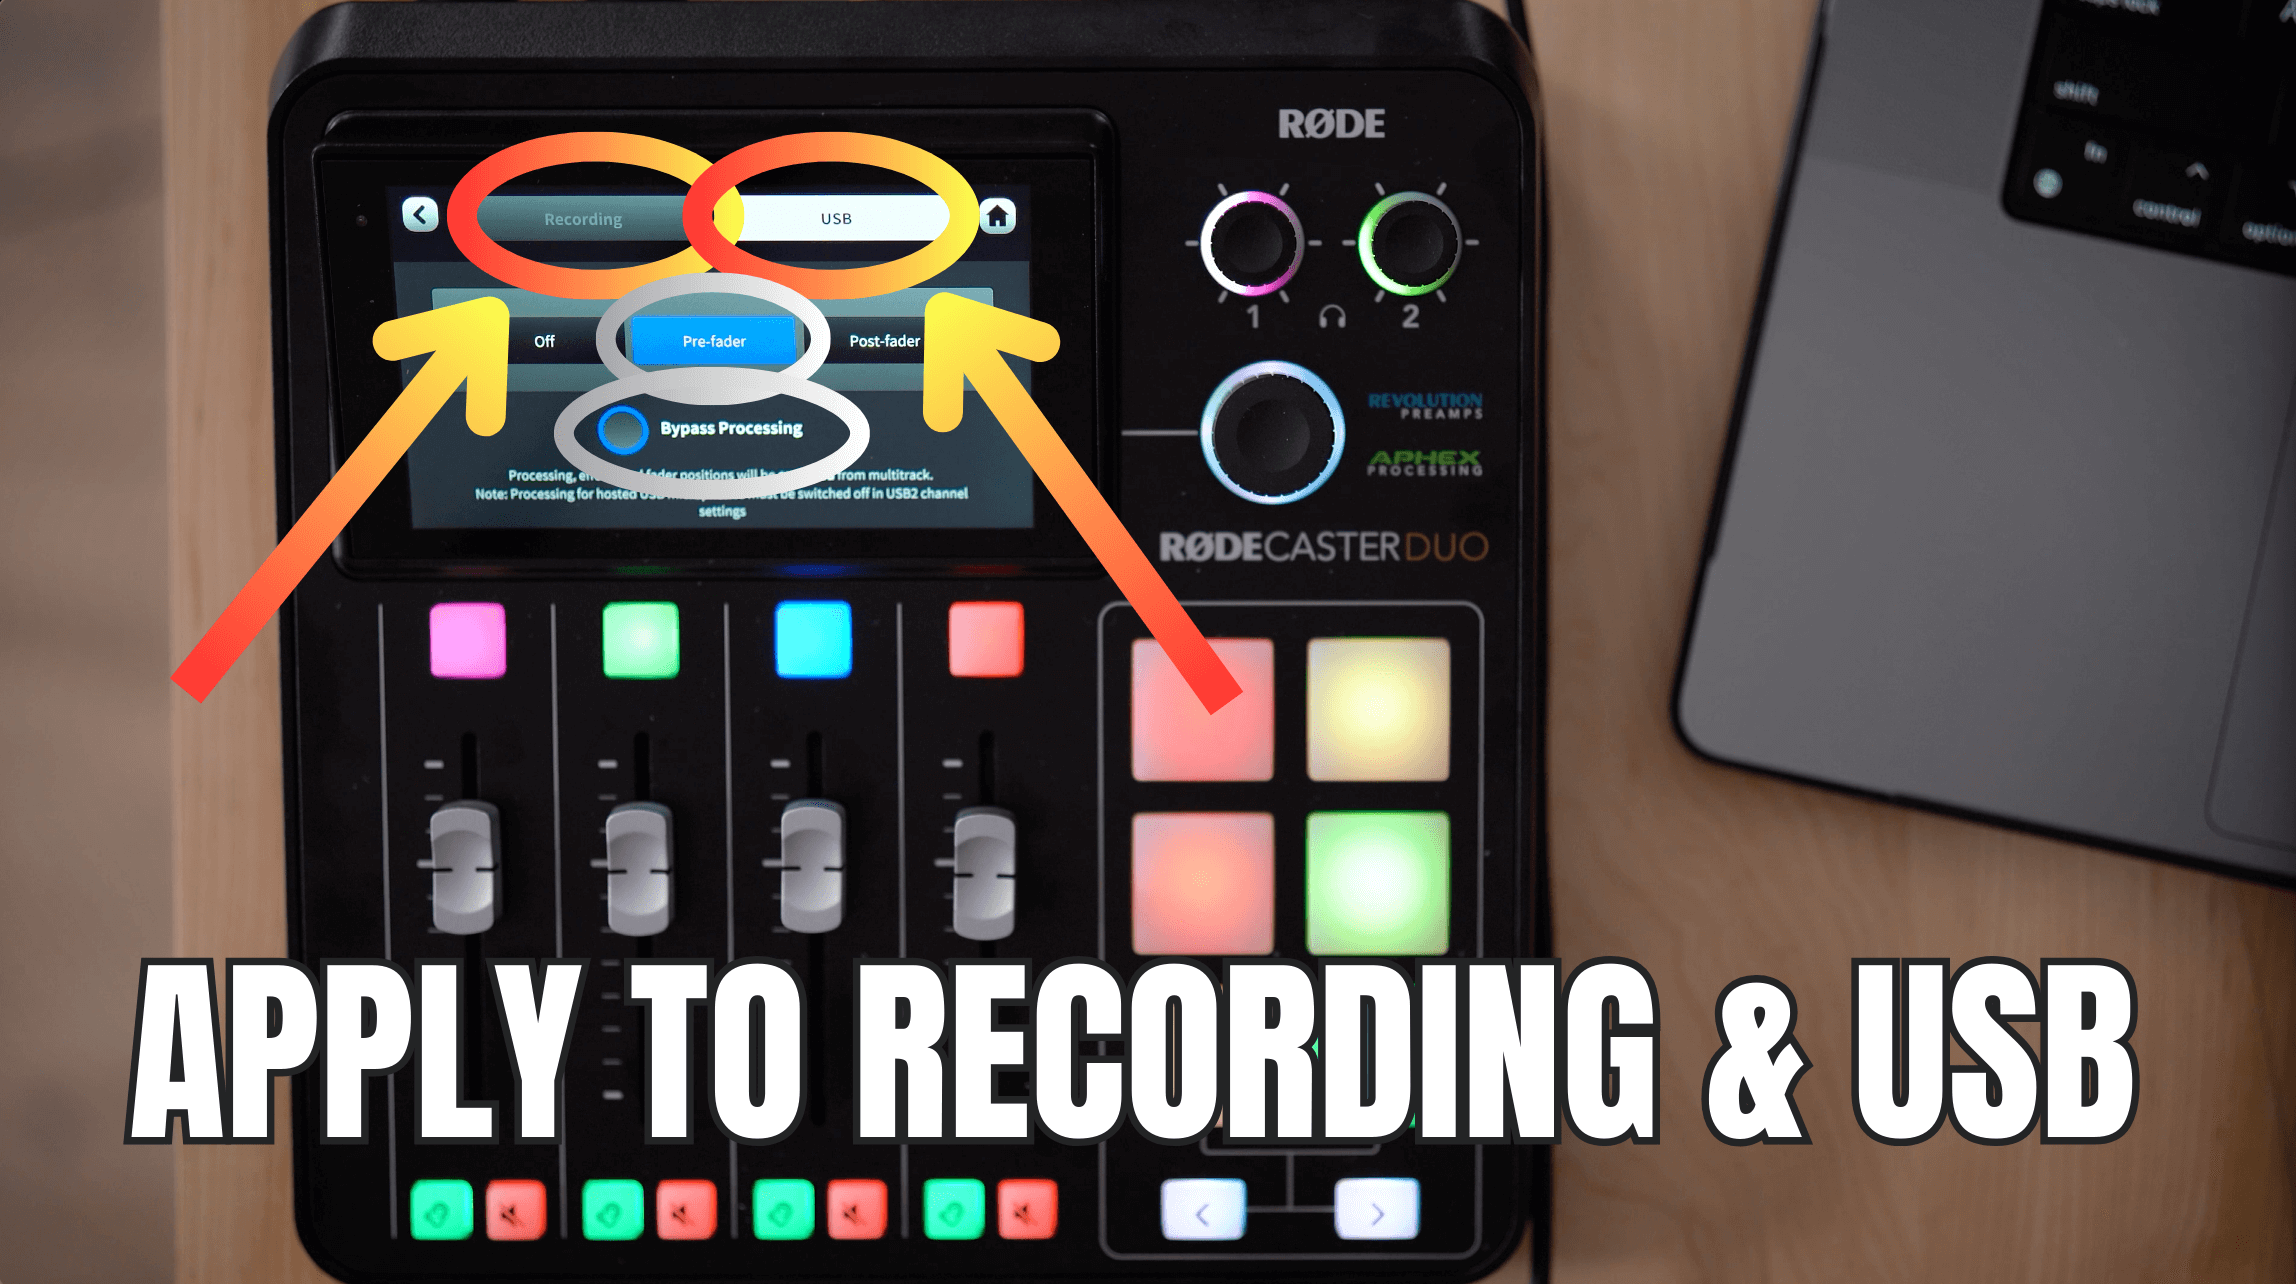
8. And make sure it says Bypass Processing — that means that it's going to bypass all of the effects
So you'll notice on the board, it says APHEX Processing.
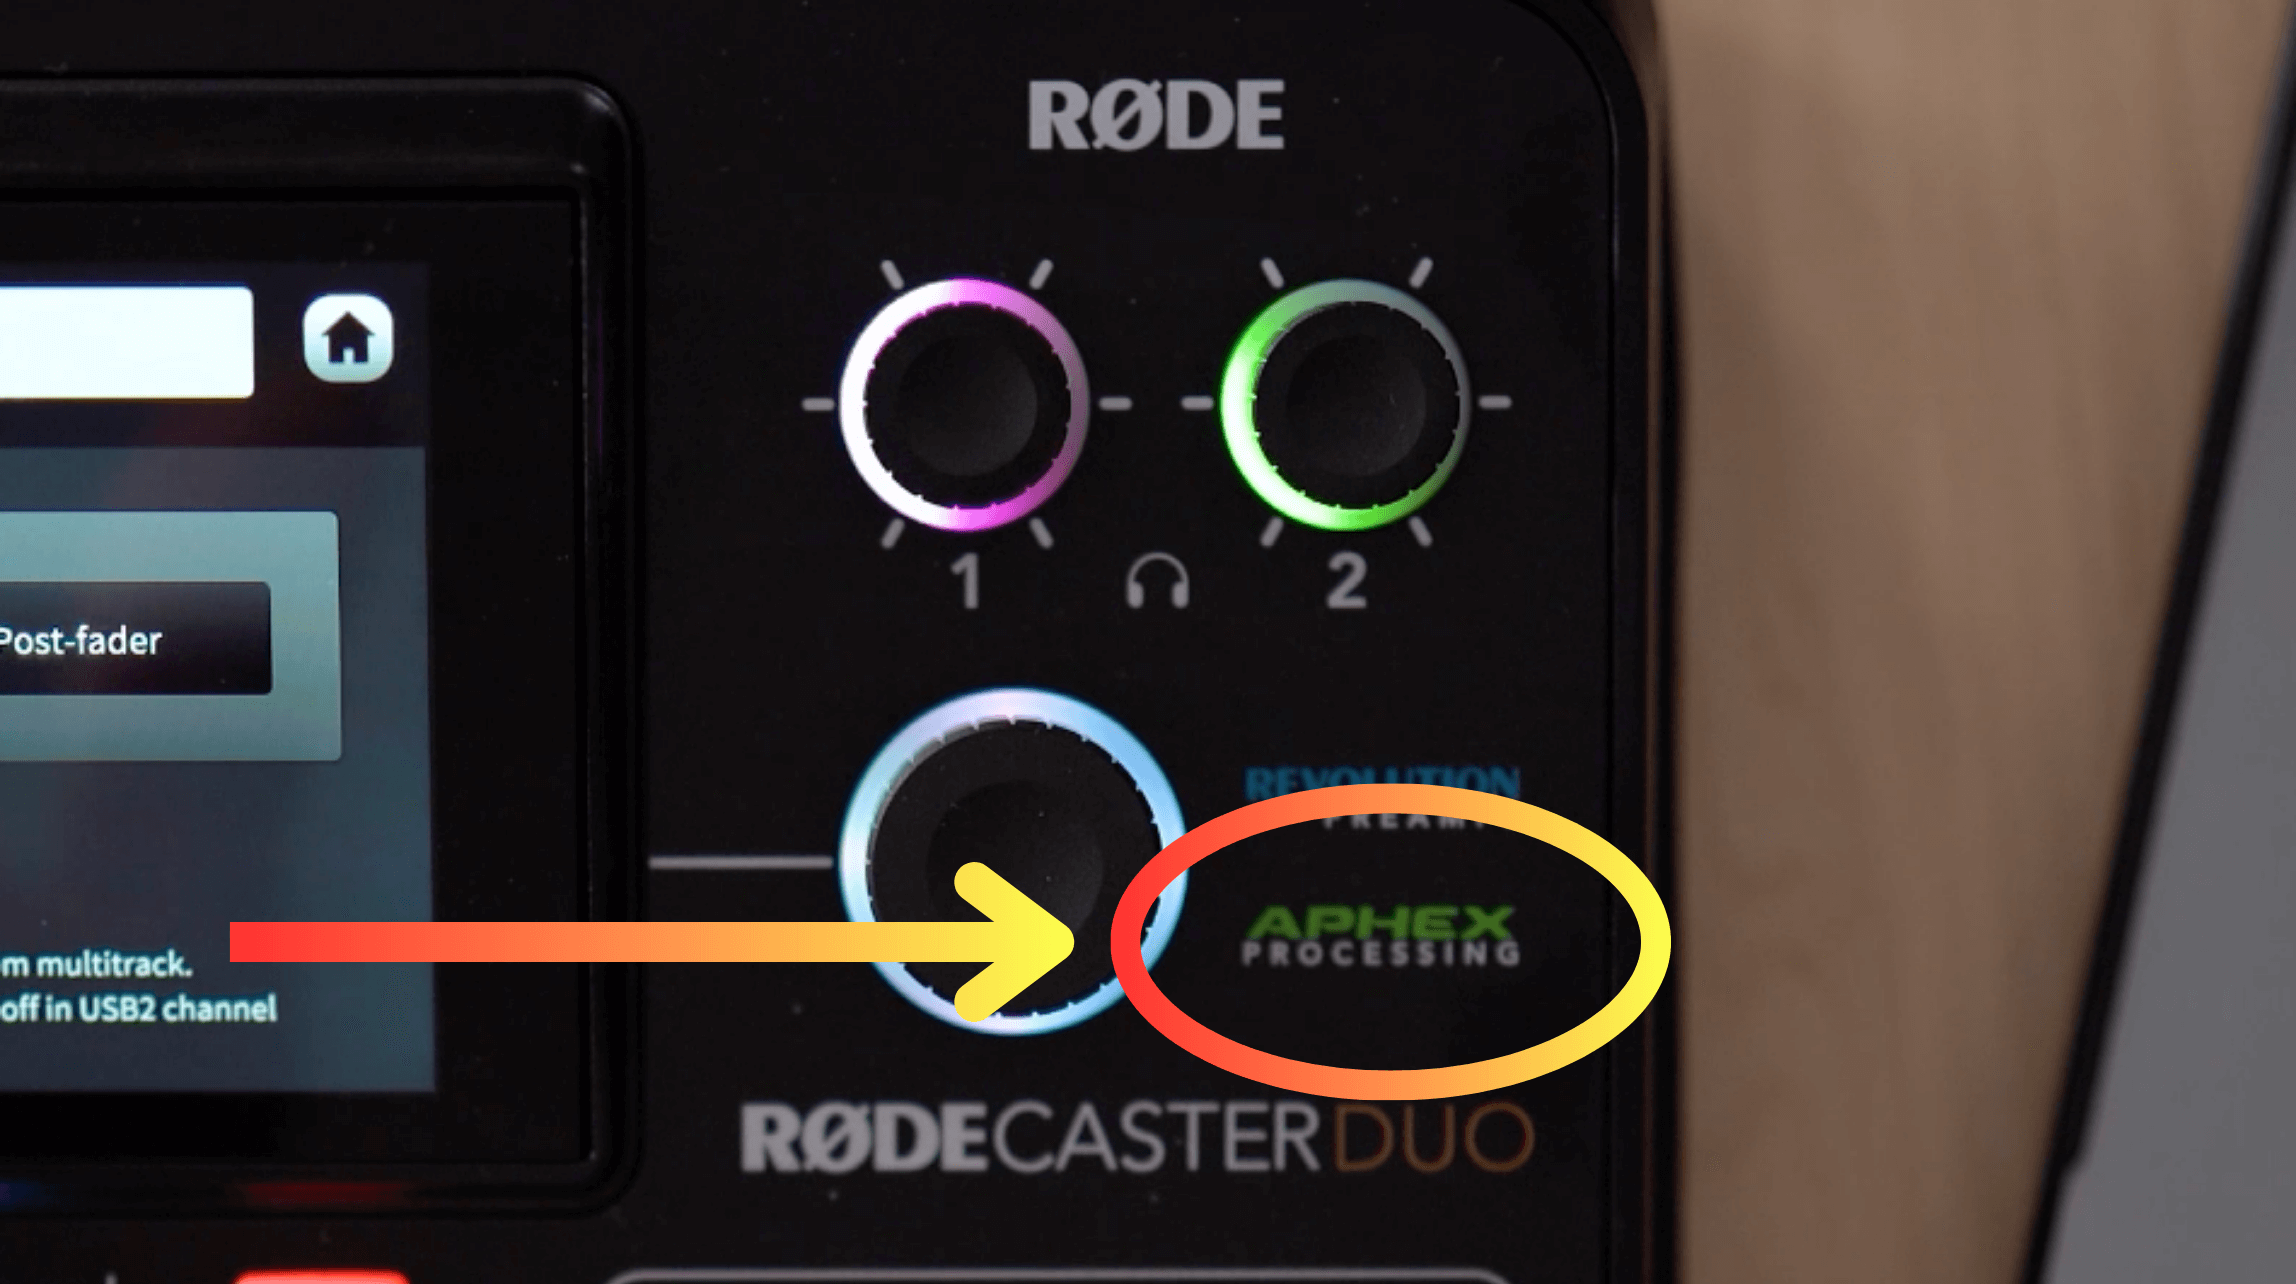
The APHEX Processing is the effects that come built into this board. It has EQ, compression, noise reduction, and it sounds really good.
It sounds great for live streaming because:
you sound clean
you have that noise reduction
and you sound like a super pro podcaster
But for recording, we like our editors to use more advanced presets and plugins from third-party companies like Waves or Universal Audio.
With those plugins, we'll usually get more pristine, higher-quality processing in editing if we DON’T first have the RODECaster apply a compressor, EQ, and everything while producing the original audio recording.
Who Shouldn’t Bypass the Processing?
You might want to leave the cool podcast voice settings turned ON on the RODECaster Duo IF:
those are things (compression, EQ, DeEssing, DeReverbing, etc.) you don’t want to mess with when you're editing your episodes
or you don't have access to fancy third-party plugins
…then you might NOT want to bypass the processing.
So now that we've adjusted the RODECaster Duo’s settings, it’s time to adjust Reaper’s settings.
It's important to know…
How the Routing Works and How You're Going to Have to Set Up Your Digital Audio Workstation (DAW)
ALL of the Digital Audio Workstations (DAWs) are going to:
1. be set up very similar and they all WORK VERY SIMILAR to Reaper.
2. have a place in the settings where you tell the DAW what AUDIO INTERFACE to use.
In the case of Reaper here in Reaper preferences, we can see under audio device that we have RODECaster Duo Main Multitrack. I could also choose to record my Macbook Pro Microphone. But obviously since we’re using the Duo, we will record the Duo’s Main Multitrack.
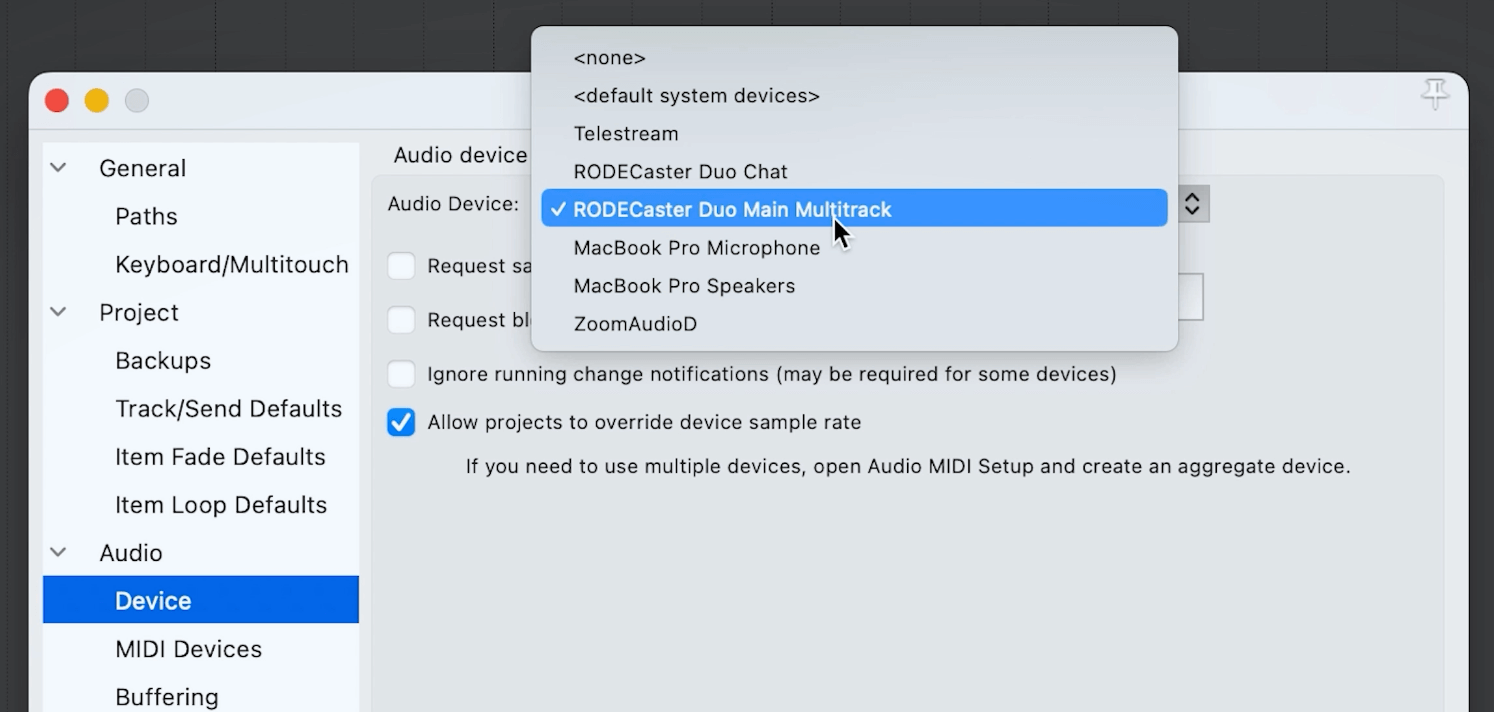
Sidenote: Notice there's also this here RODECaster Duo Chat. This is cool cause this will just give you the stereo recording of what's going on in your mixer. So this Duo Chat is really much more like that stereo send that the live stream is going to hear.
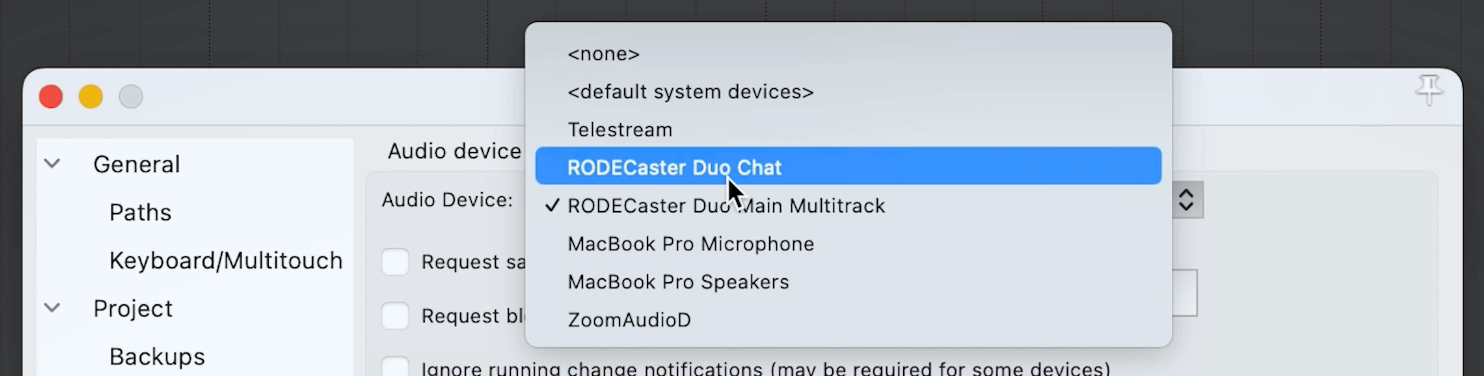
So we're going to want to make sure to select RODECaster Duo Main Multitrack.
Next, click apply and then click okay.

Now it's important to know which outputs from the Duo are being sent to which tracks in Reaper.
So if I create TWO new tracks (double+click in the left side panel in Reaper):
I'm going to want my microphone, Steve, on one track
and Veronica's microphone on the other track

WARNING:
My first inclination in working with other audio interfaces would be that I would be track #1 and Veronica would be track #2.
But here’s how the Duo’s multitrack outputs are actually set up:
OUTPUTS #1 and #2 on the Duo are the STEREO OUTPUT of the whole performance — of EVERYTHING that we're hearing on the Duo mixer. So if you set tracks 1 and 2 in Reaper to record outputs 1 and 2 from the RODECaster Duo, you're going to hear this microphone and the other microphone going through both tracks evenly.
It's actually outputs THREE and FOUR that we can select and use to record my mic and Veronica’s mic individually on separate tracks.
Here are the steps to get Reaper set up to record multiple separate tracks from the RODECaster Duo:
When I click the red button on my track (the one I labeled Steve), this ARMs my track and enables me to start recording (CMD+R) my microphone onto that track.

After you ARM track 1 (Steve):
2. Click Input 1 > Input: Mono > select input THREE

But look, there are 15 inputs that Reaper is recognizing from the RODEcaster Duo — audio signals from all of those colorful buttons and tracks!
Inputs ONE and TWO in Reaper are a STEREO input of everything from the Duo’s board.

Input THREE is track one on the Duo (pink) — use this for microphone 1
Input FOUR is track two on the Duo (green) — use this for microphone 2
Input FIVE is track three on the Duo (blue) — it’s the Bluetooth track. So if I had a phone set up that I wanted to play Spotify or clips from YouTube or something, I’d use this track.
Input SIX is track four on the Duo (red) — it’s actually the audio output of the SOUND EFFECT buttons on the Duo.
But Inputs 7, 8, 9, 10, all the way up to 15 — these are actually the large buttons on the Duo’s right side, which is really cool because you can get any of these sound effects when you play them in your live performance, you can record them on their own separate track.
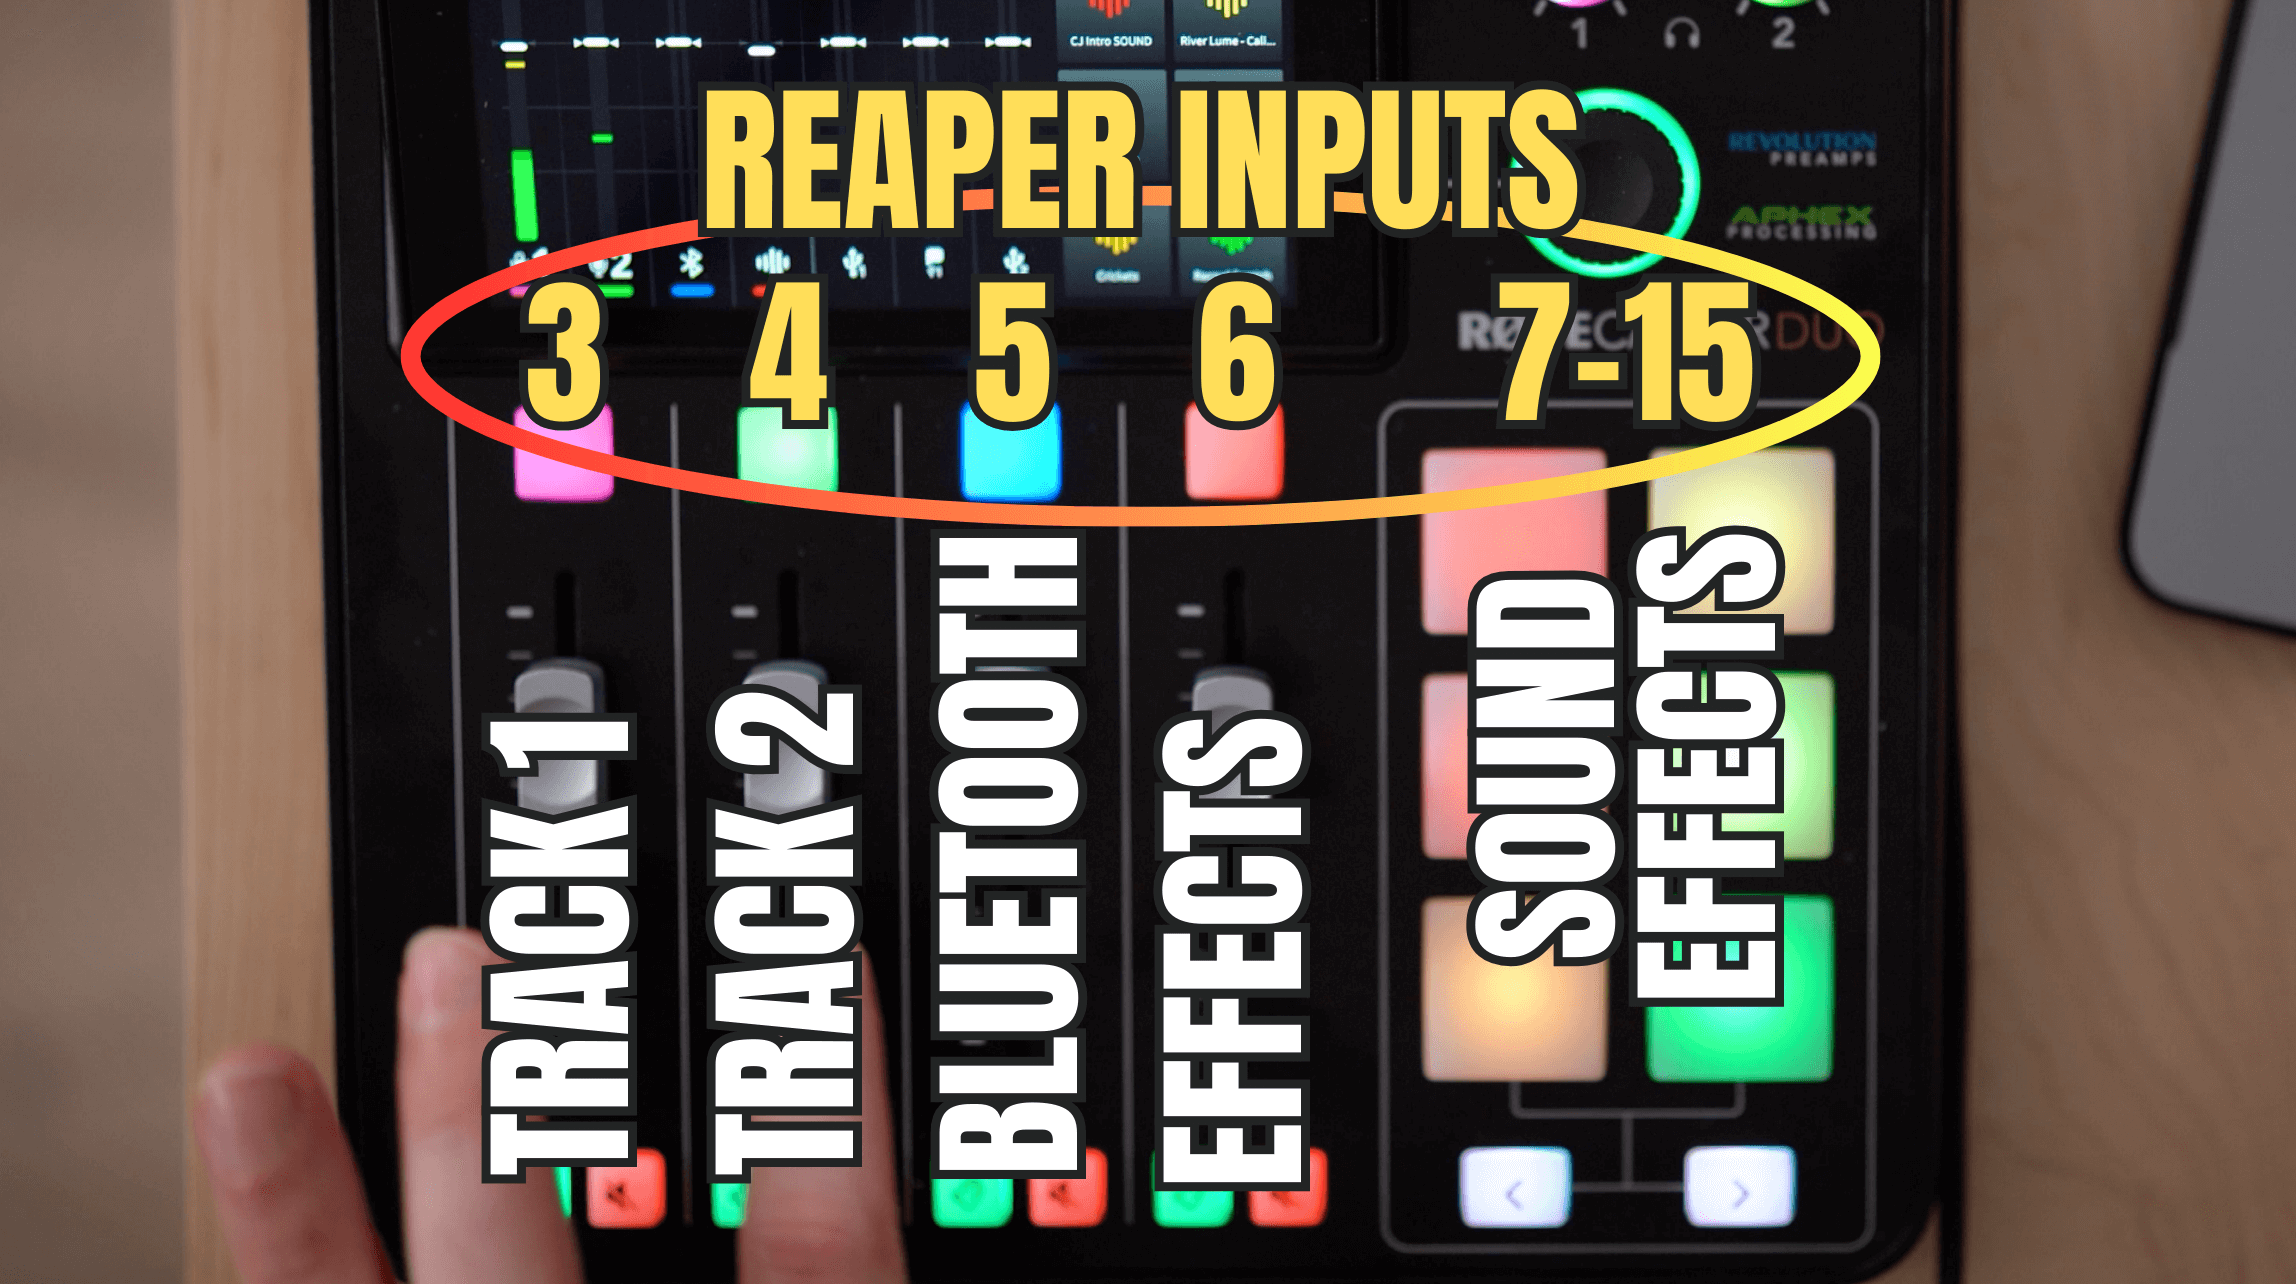
And I think that's really incredible. And it opens up a whole possibility of recording things at the highest level of professionalism while still being able to achieve a really fun and exciting live stream.
So now I'll go to Veronica's track:
Click+RED button to ARM the track (meaning it’s now ready to record)
Click Input 1 > Input: Mono > select input FOUR

So now as you can see, my voice is still being picked up a little in Veronica's microphone at the other end of our table.

ADJUSTING VOLUME RECORDING LEVELS
One thing that's important to know is that now that we are using the RODECaster like a regular audio interface — remember, we switched on pre-fader — when I turn the volume to my microphone all the way DOWN (track 1 on the RODECaster Duo), I become completely silent to anyone listening to my live stream. But in Reaper, I'm still recording, and that's because we have that pre-fader button selected here in the RODECaster.
Now, what that means is that if I'm getting TOO HOT of a level, or if I'm recording my voice NOT LOUD ENOUGH, or if I'm recording my voice too loud and distorted (as you can see in the image below), I'm going to need to change the recording level of my microphone on the RODECaster Duo interface.

You can change the recording level in 2 different ways:
One is commonly referred to as gain or microphone gain — this is the power we give a microphone
The other one is referred to as playback level or monitor level — which is what the fader on the Duo is doing when I slide it up and down (as you can hear in the video below)
So we need to adjust the recording level.
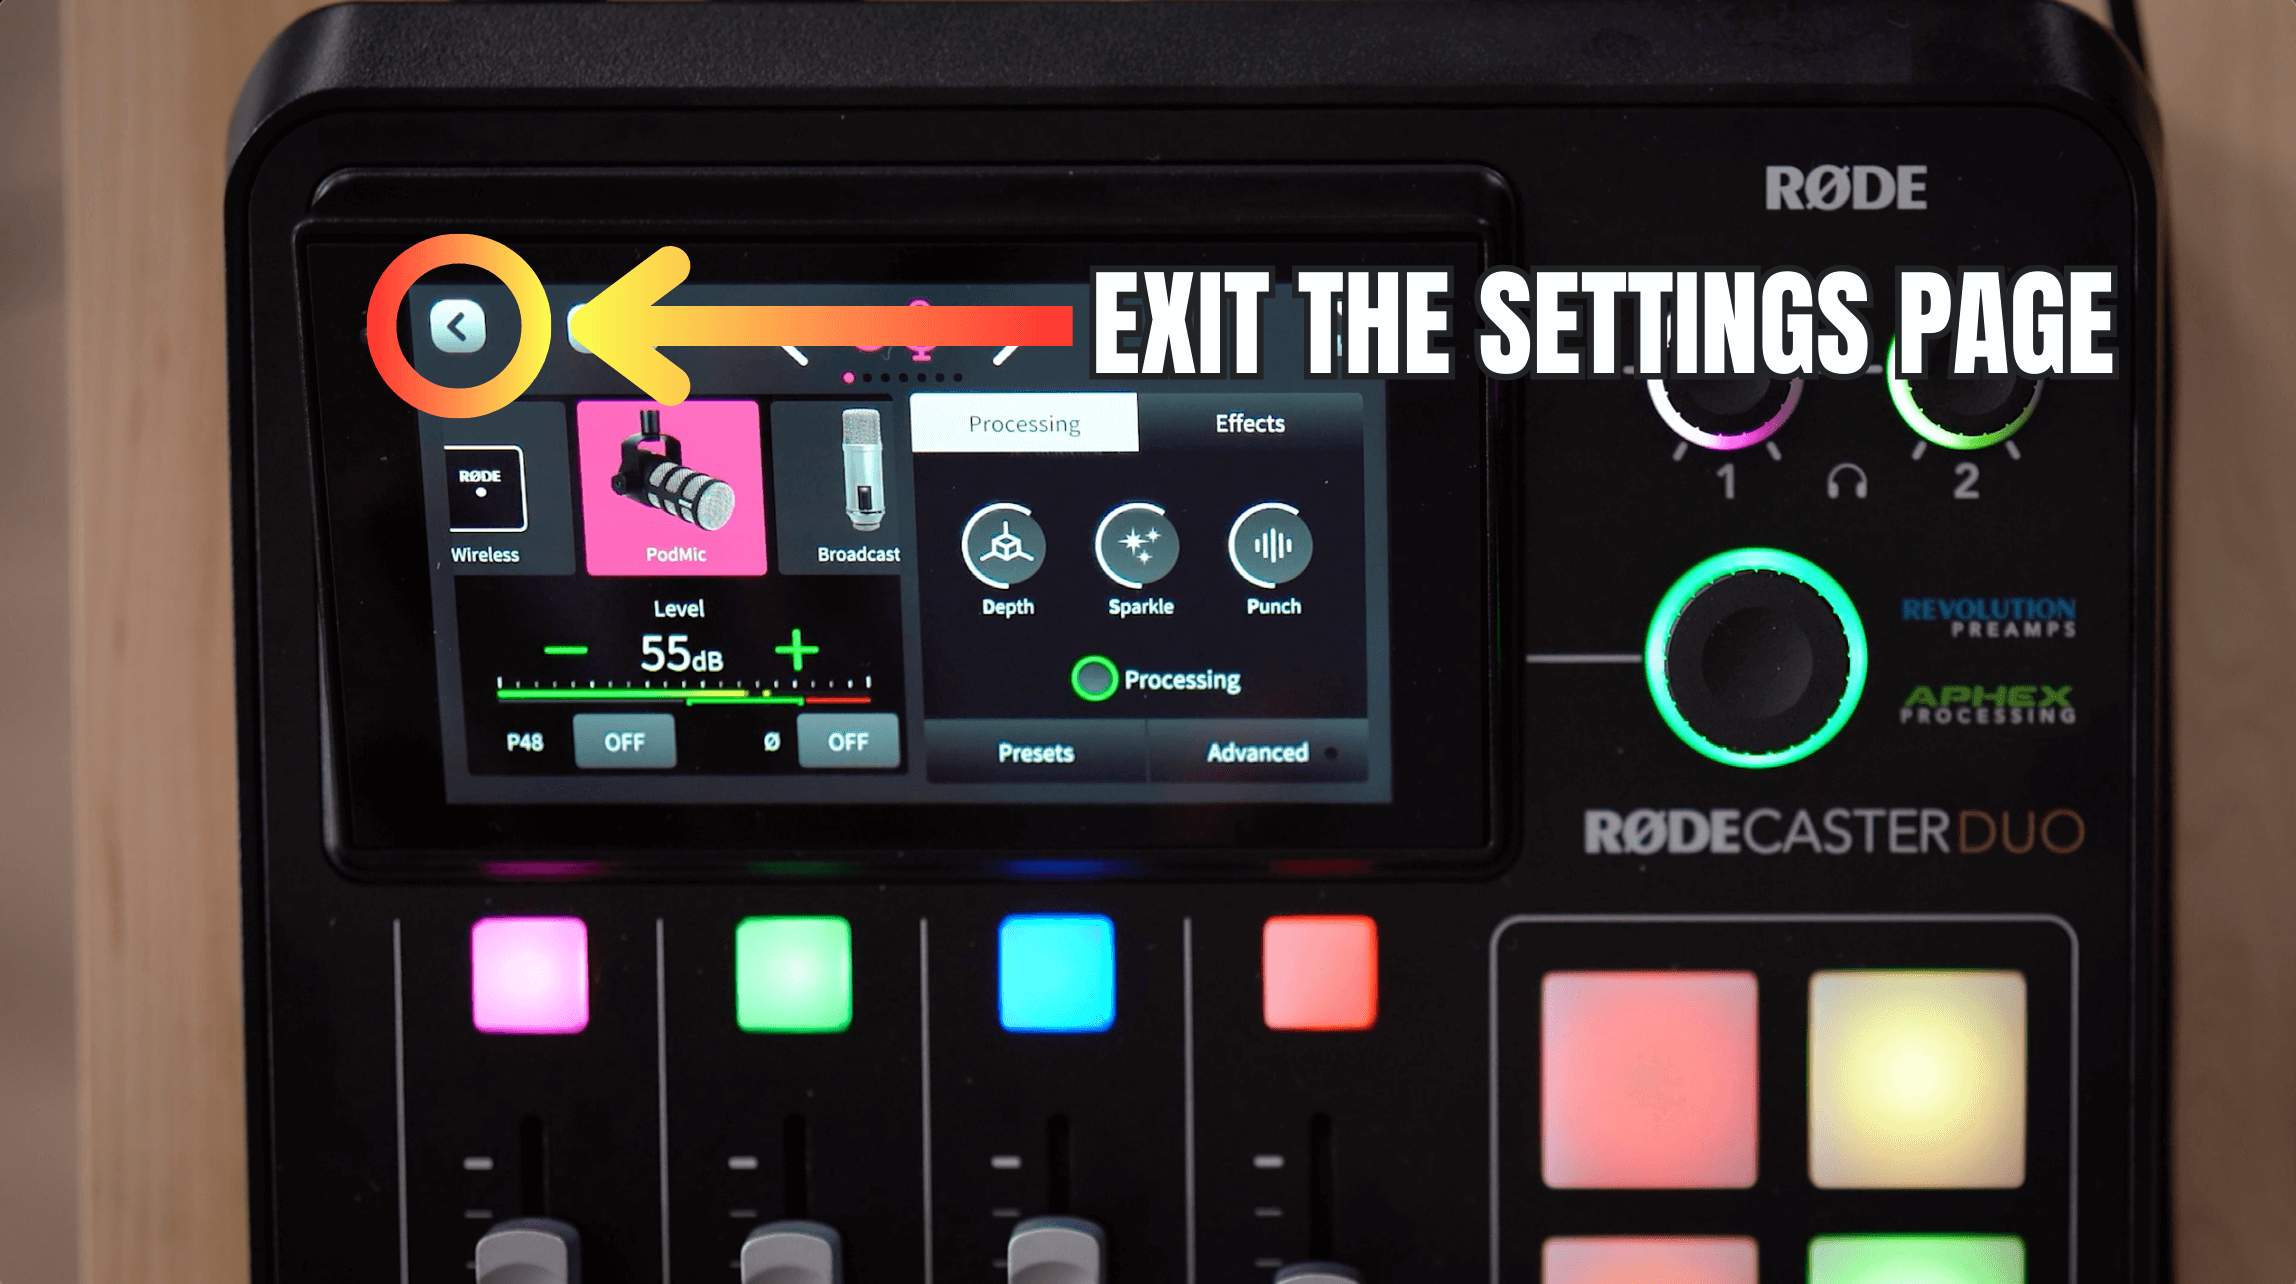
How to Adjust the Recording Level on the RODECaster Duo:
Press the pink button on track one — this is where I get all my fun podcast microphone settings

2. And look, it has a picture of the PodMic, it's pink to match track one’s button.
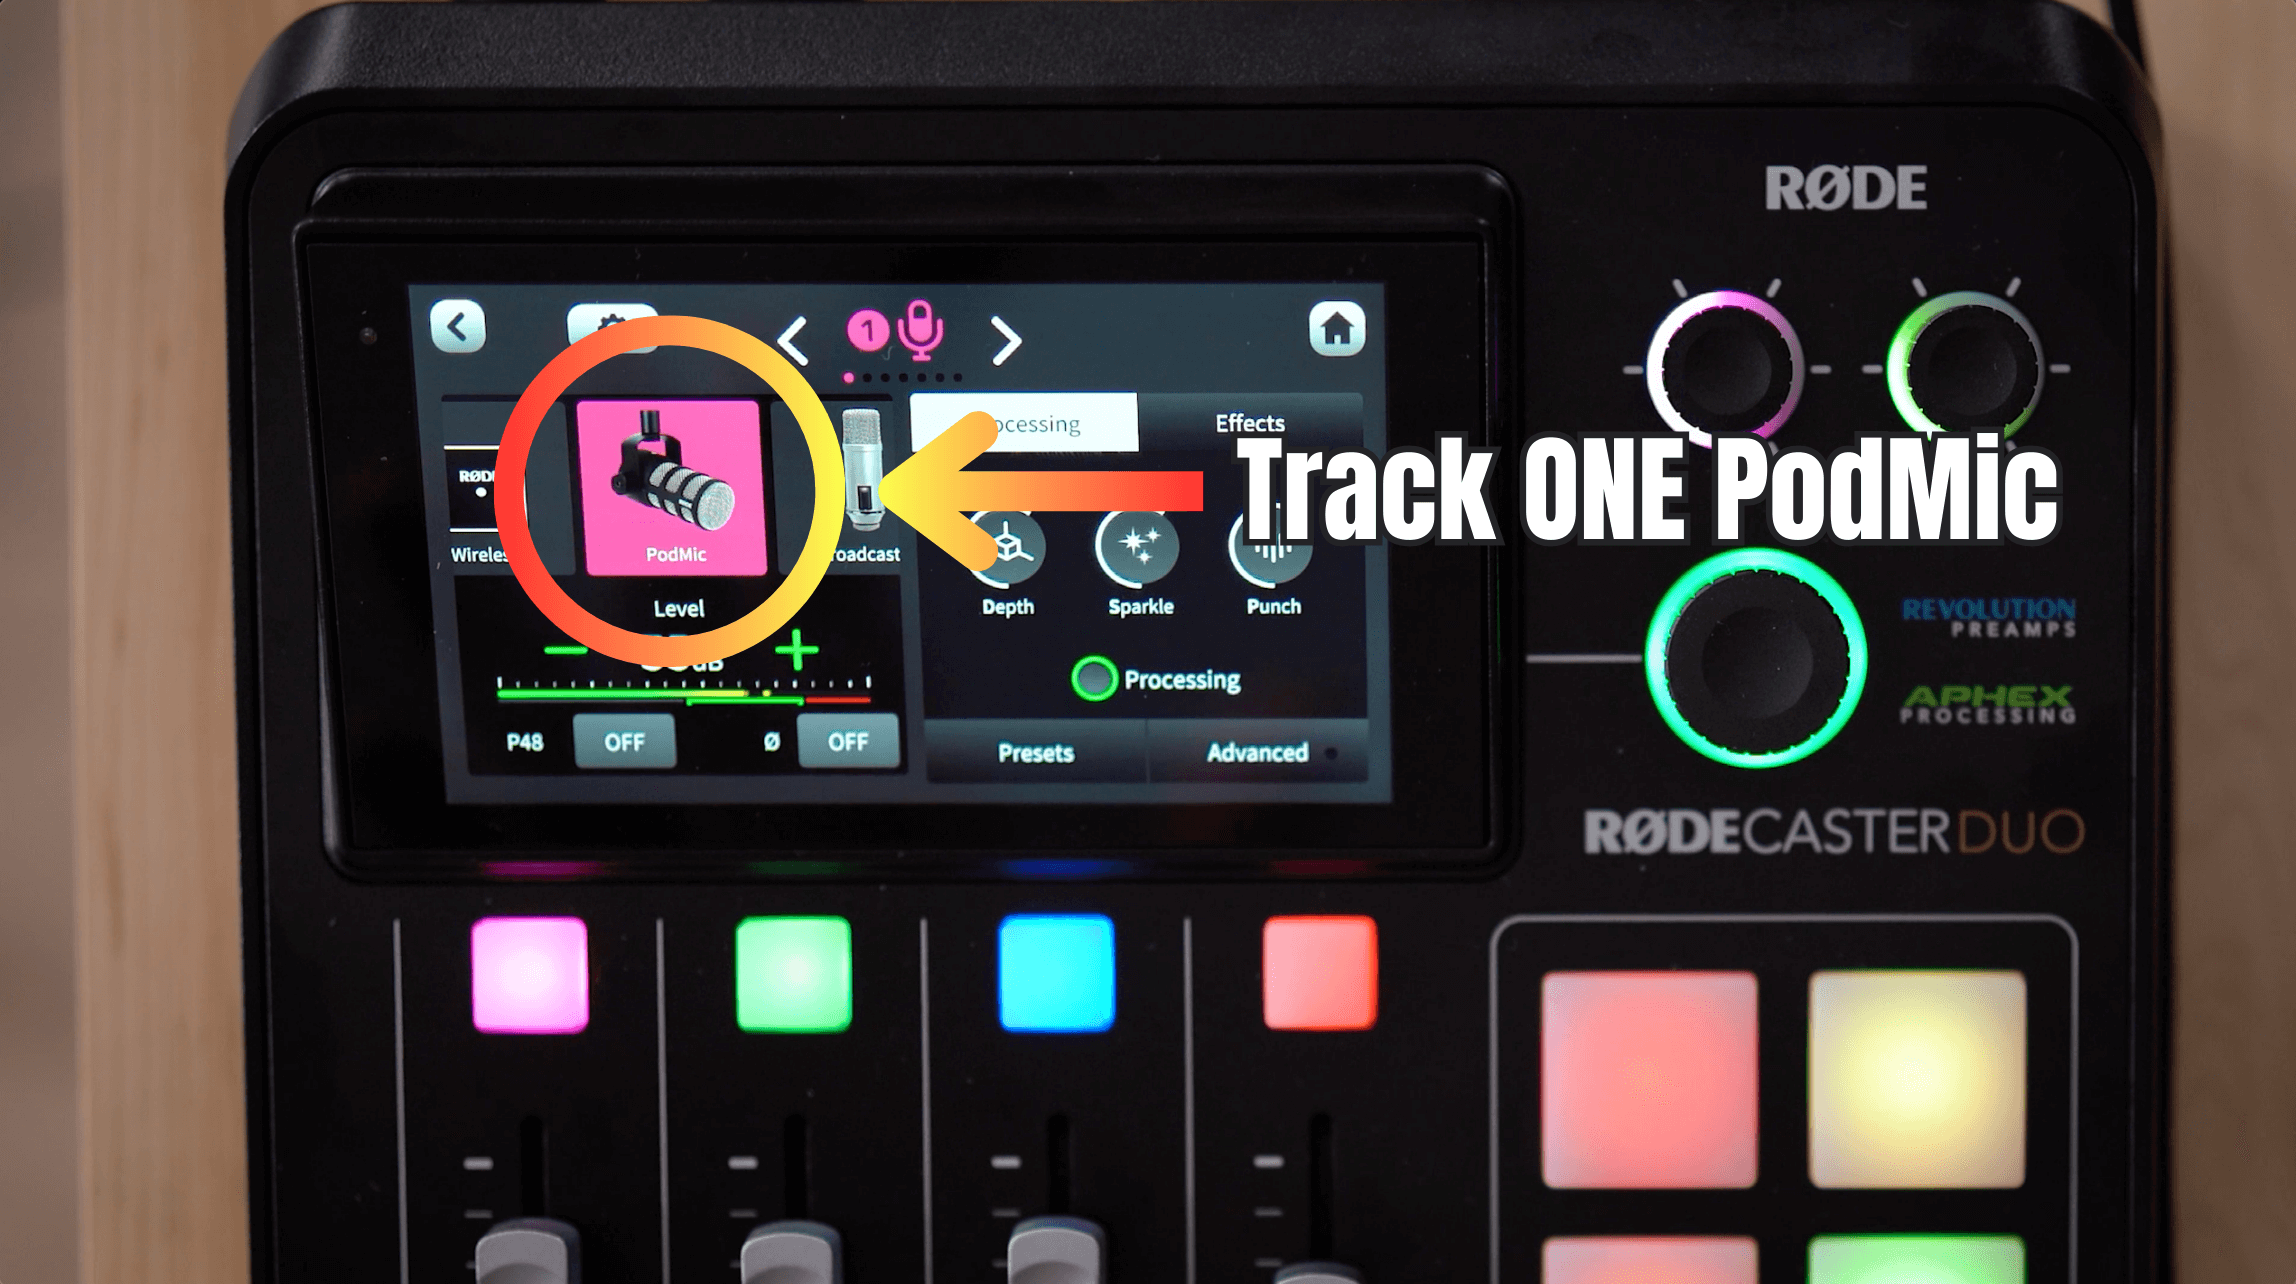
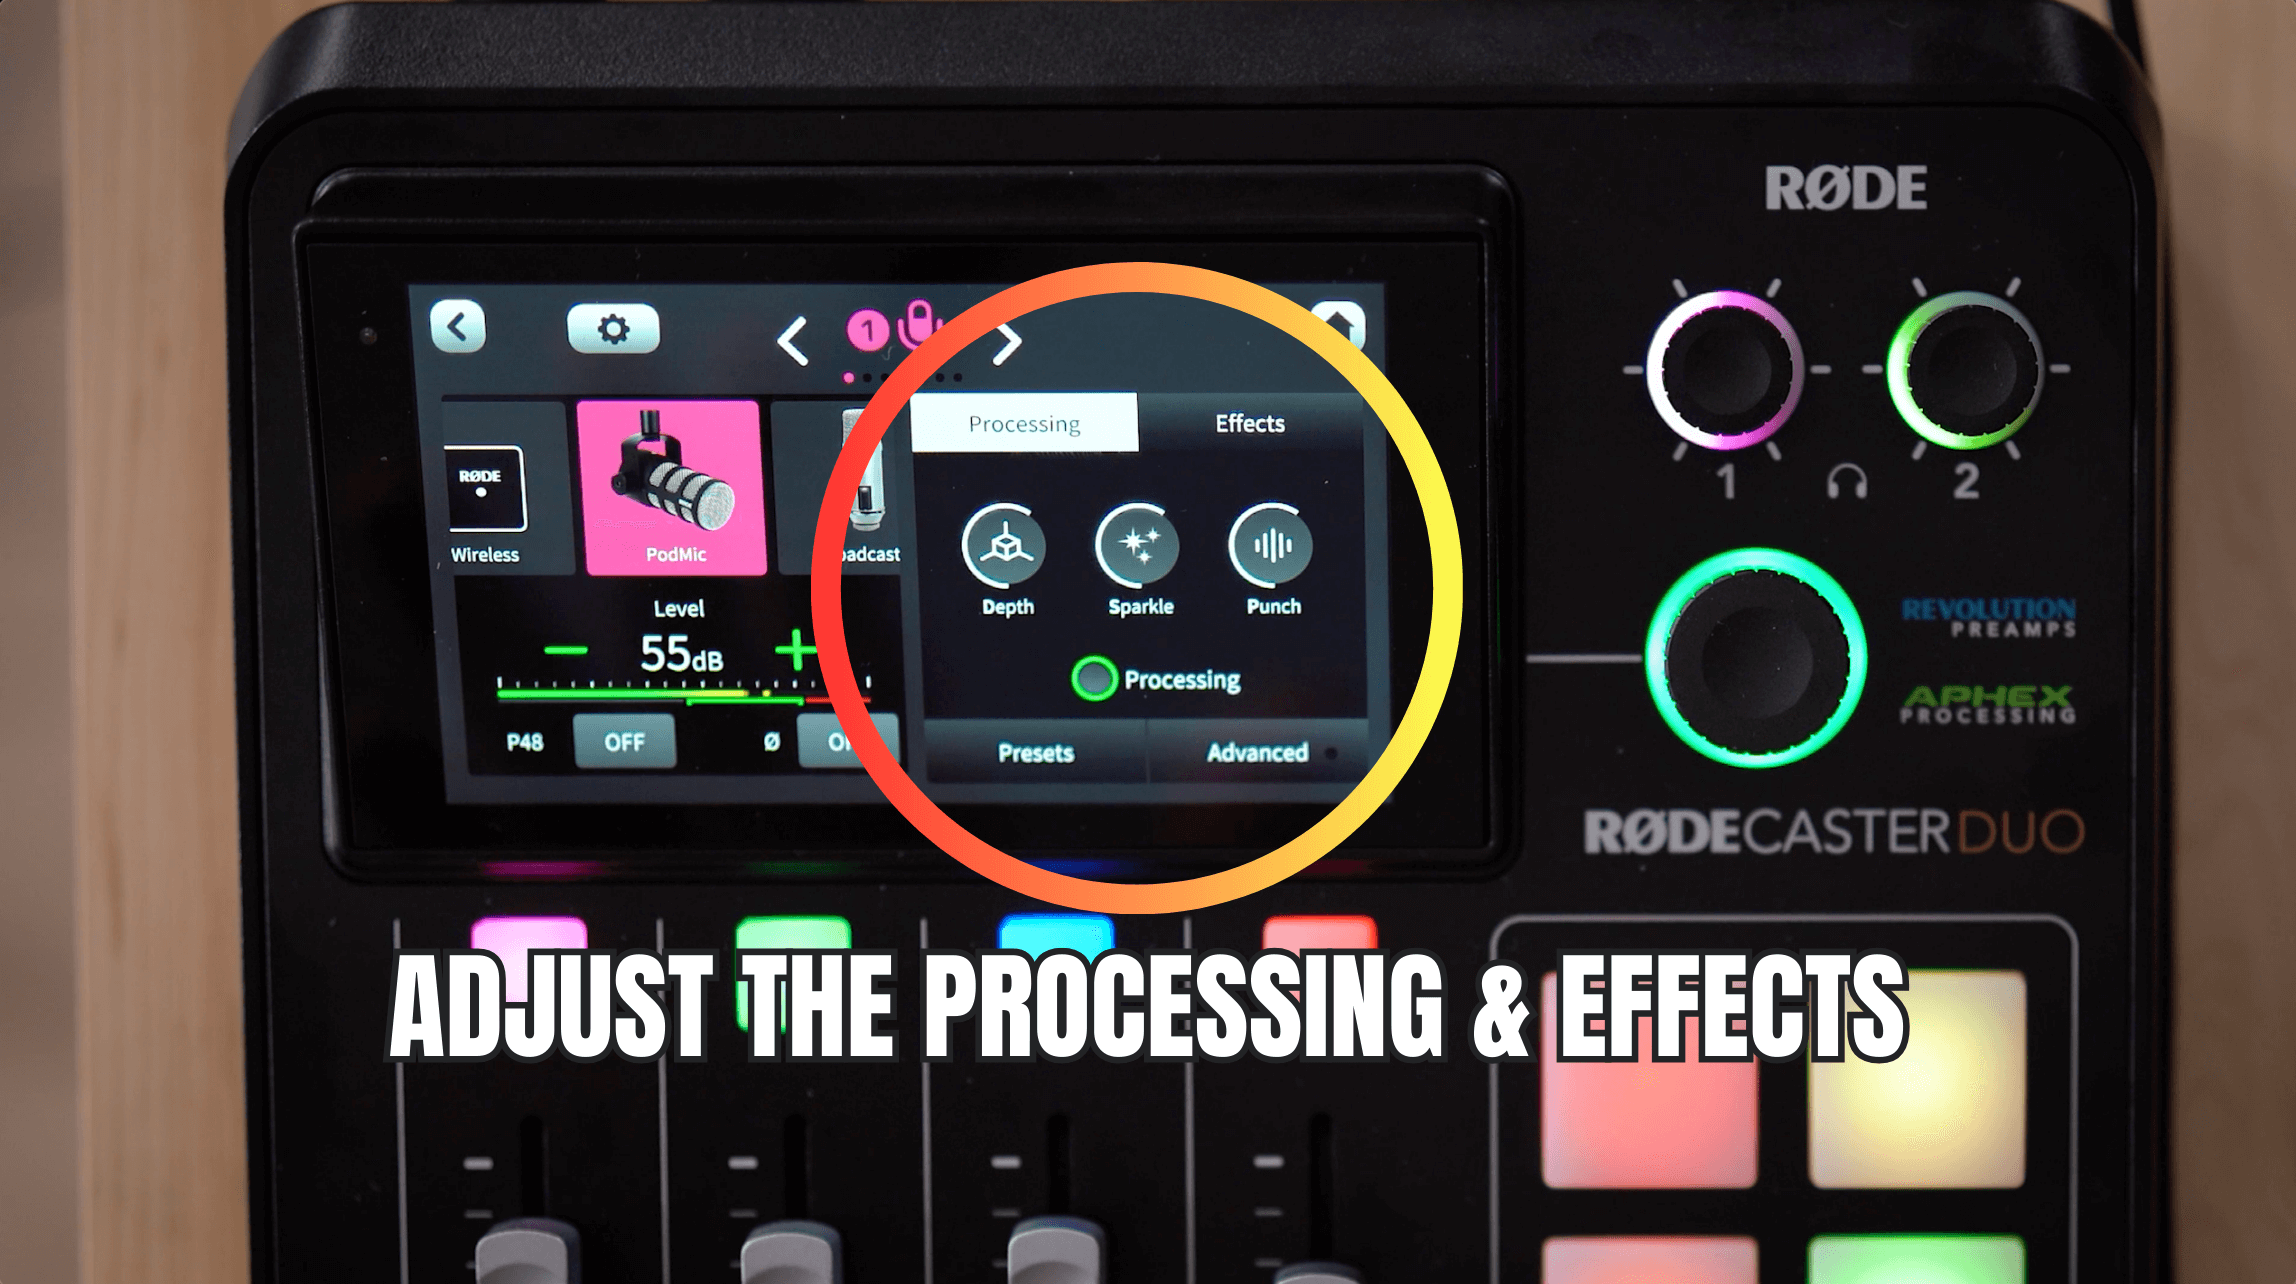
3. In the right side panel on the screen, you can adjust the processing and those effects that I talked about. This is where you can turn them up or down or even just turn them off.
4. And then right here is our record level.

5. So since I noticed that I'm recording a little hot, all I would do is press minus to turn it down a little bit.
NOTE: This is something that you actually adjust in the setup wizard. When you first go through that setup wizard, it helps you adjust the microphone gain to get that good record level.

6. And it shows you this little green bracket here. That green bracket represents where it wants you to get your voice on average. So you want to talk the way you're going to speak normally. That little input meter should be averaging in that green bracket area.

7. After you get a good level and you’re not distorting in Reaper, you can exit the settings page and go back to the regular mix view.
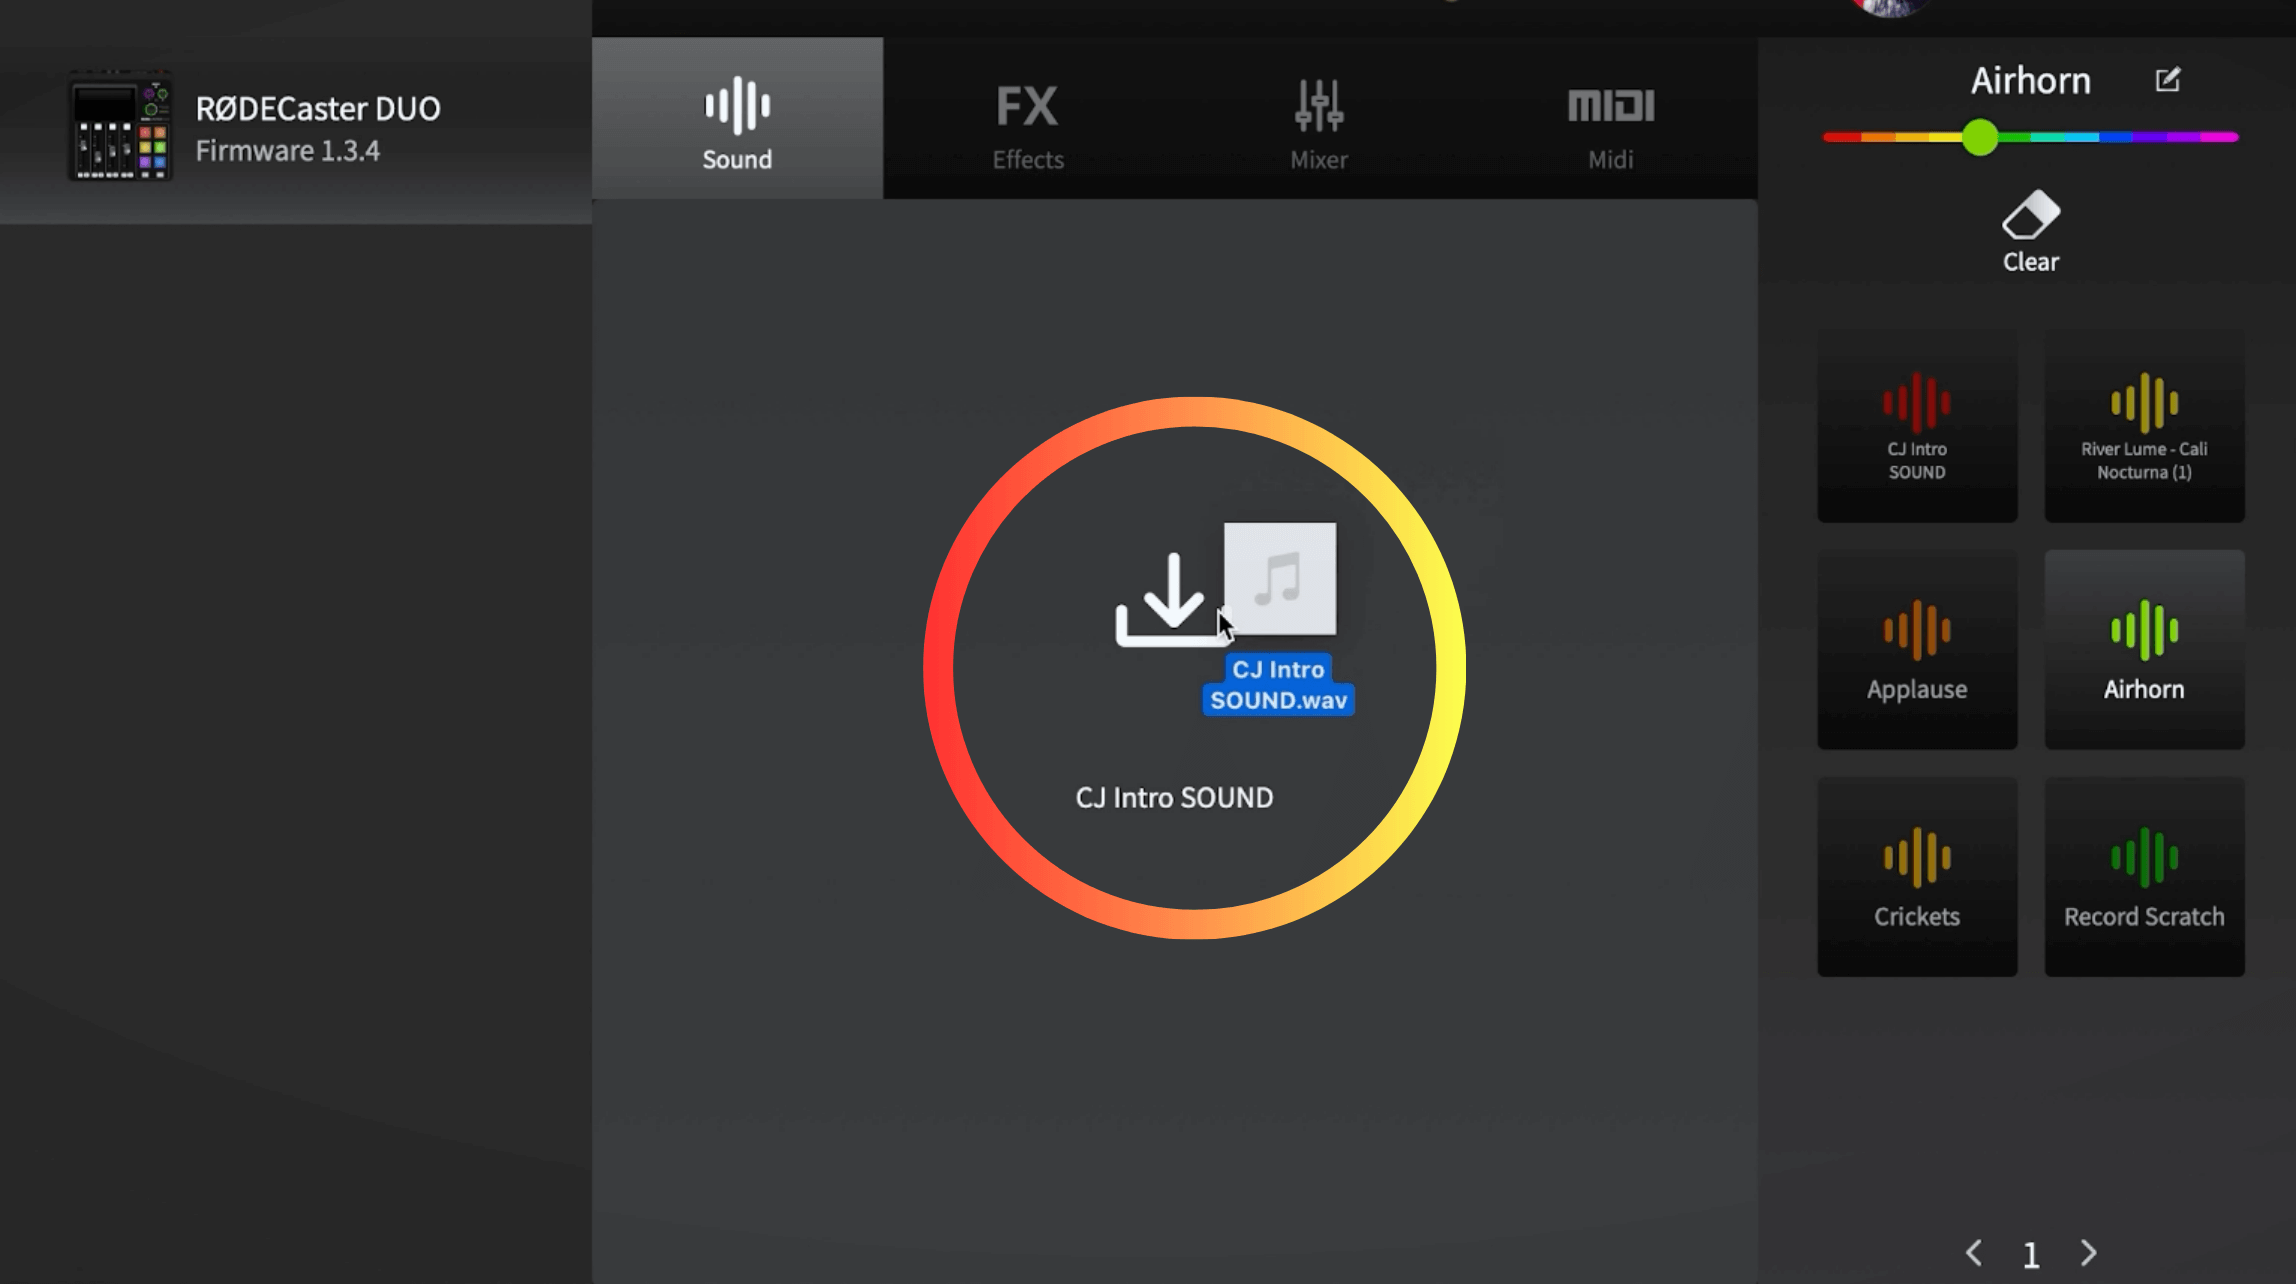
HOW TO ADD CUSTOM SOUND EFFECTS TO THE RODECASTER DUO
And now we can look at how you can add your own custom sound effects to any one of the buttons on the RODECaster Duo.
It’s really EASY to do too, and I was really happy with how easy it is.
This is where we will use the RODE Central app.
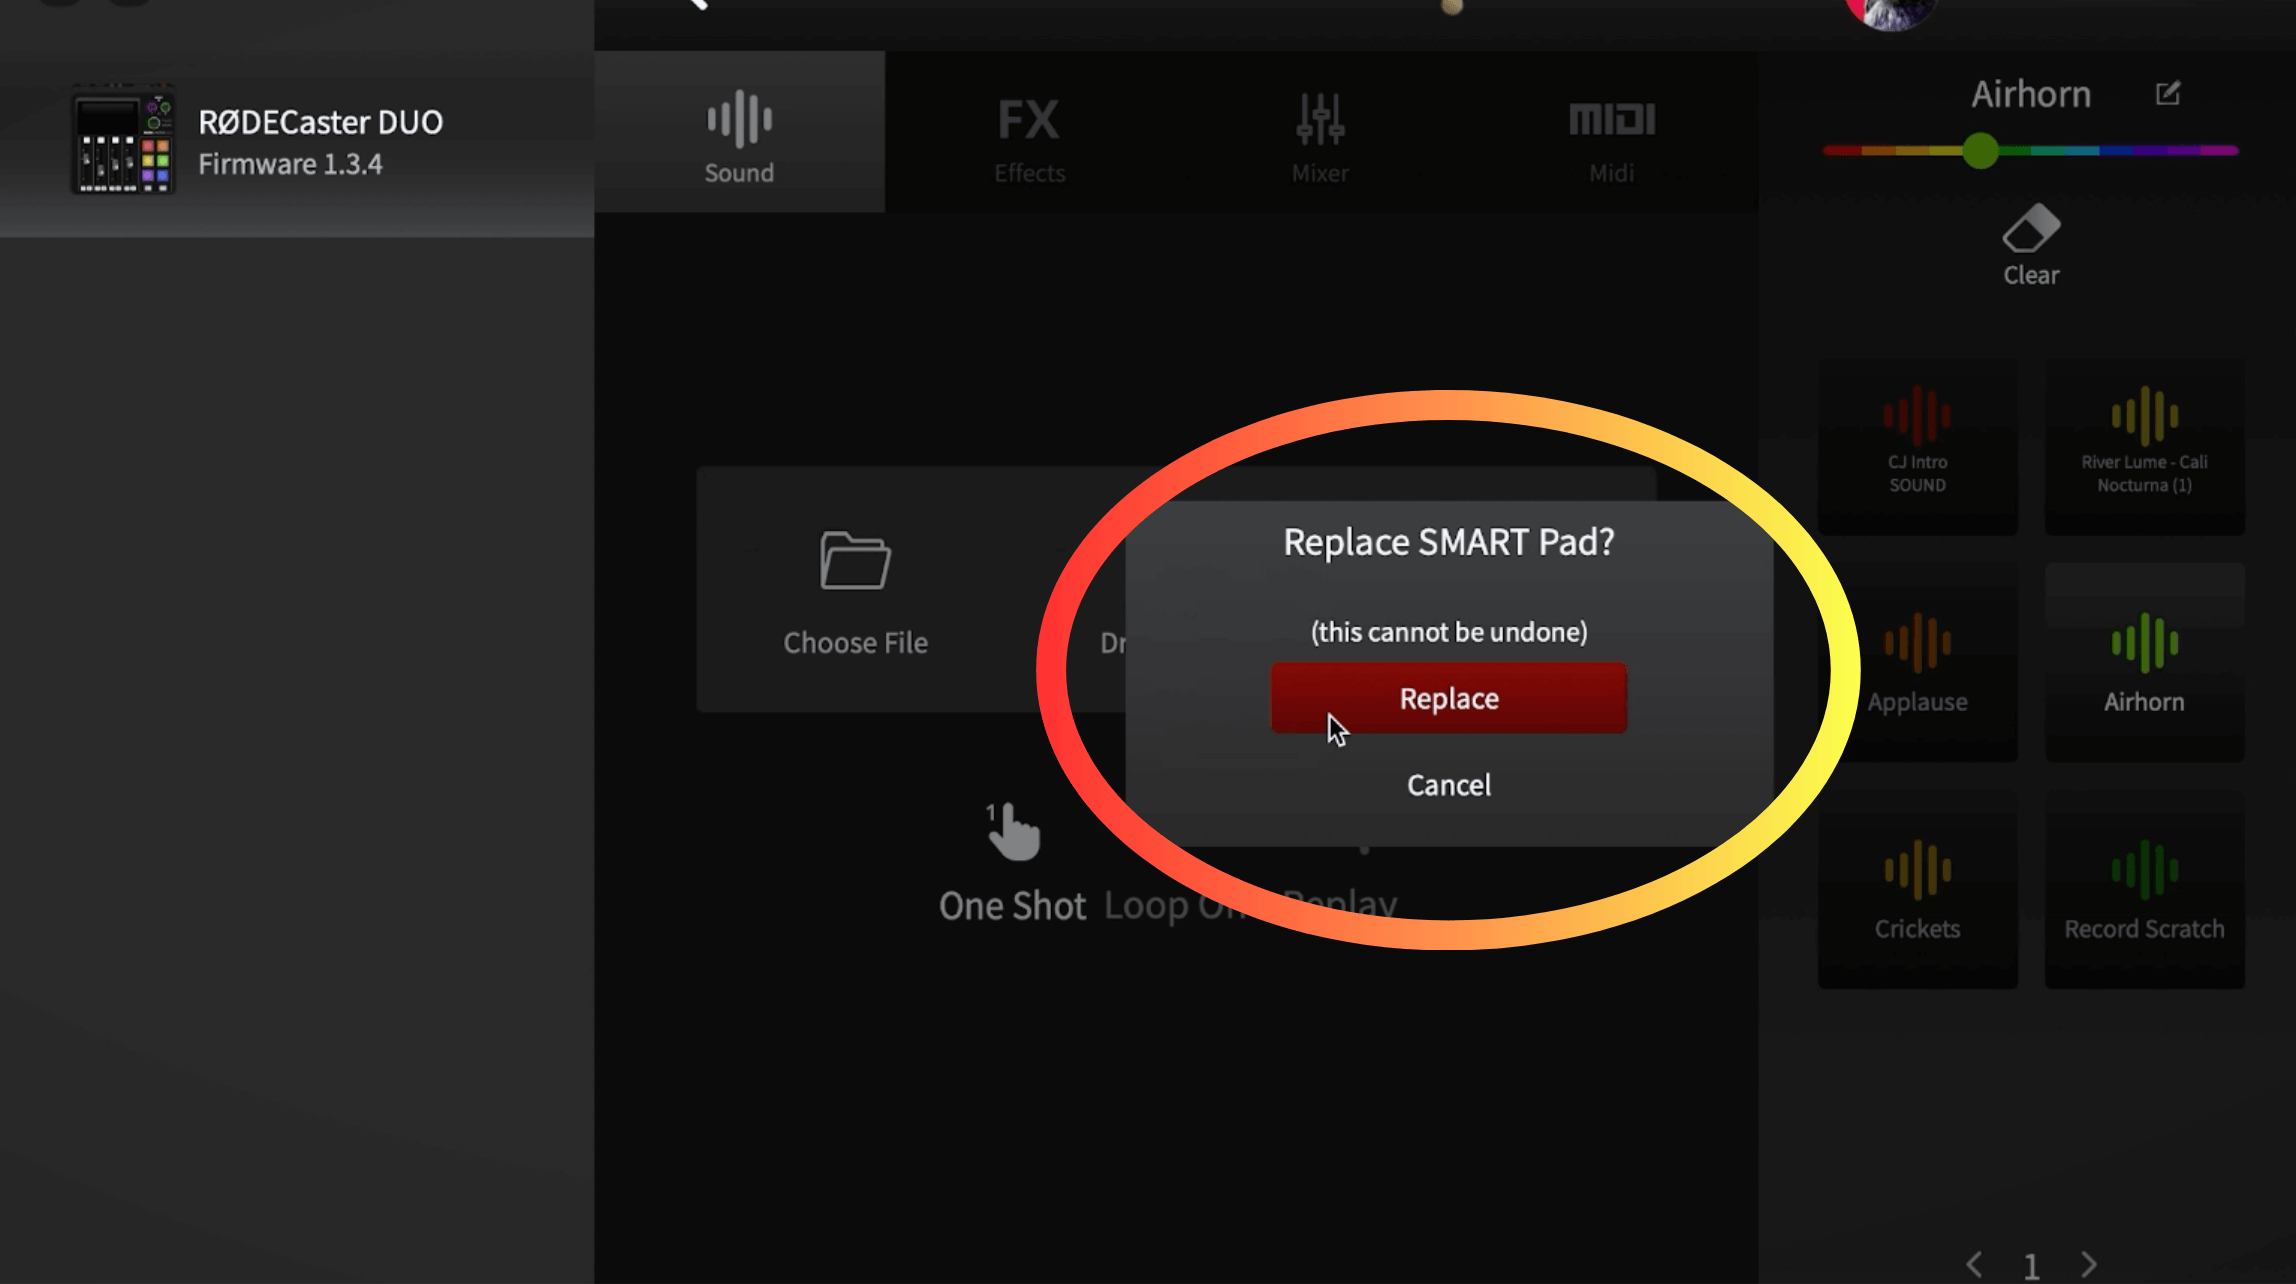
In the RODE Central app, click on Customize SMART Pads.

2. It will tell us that it's going to go into what's called Transfer Mode.
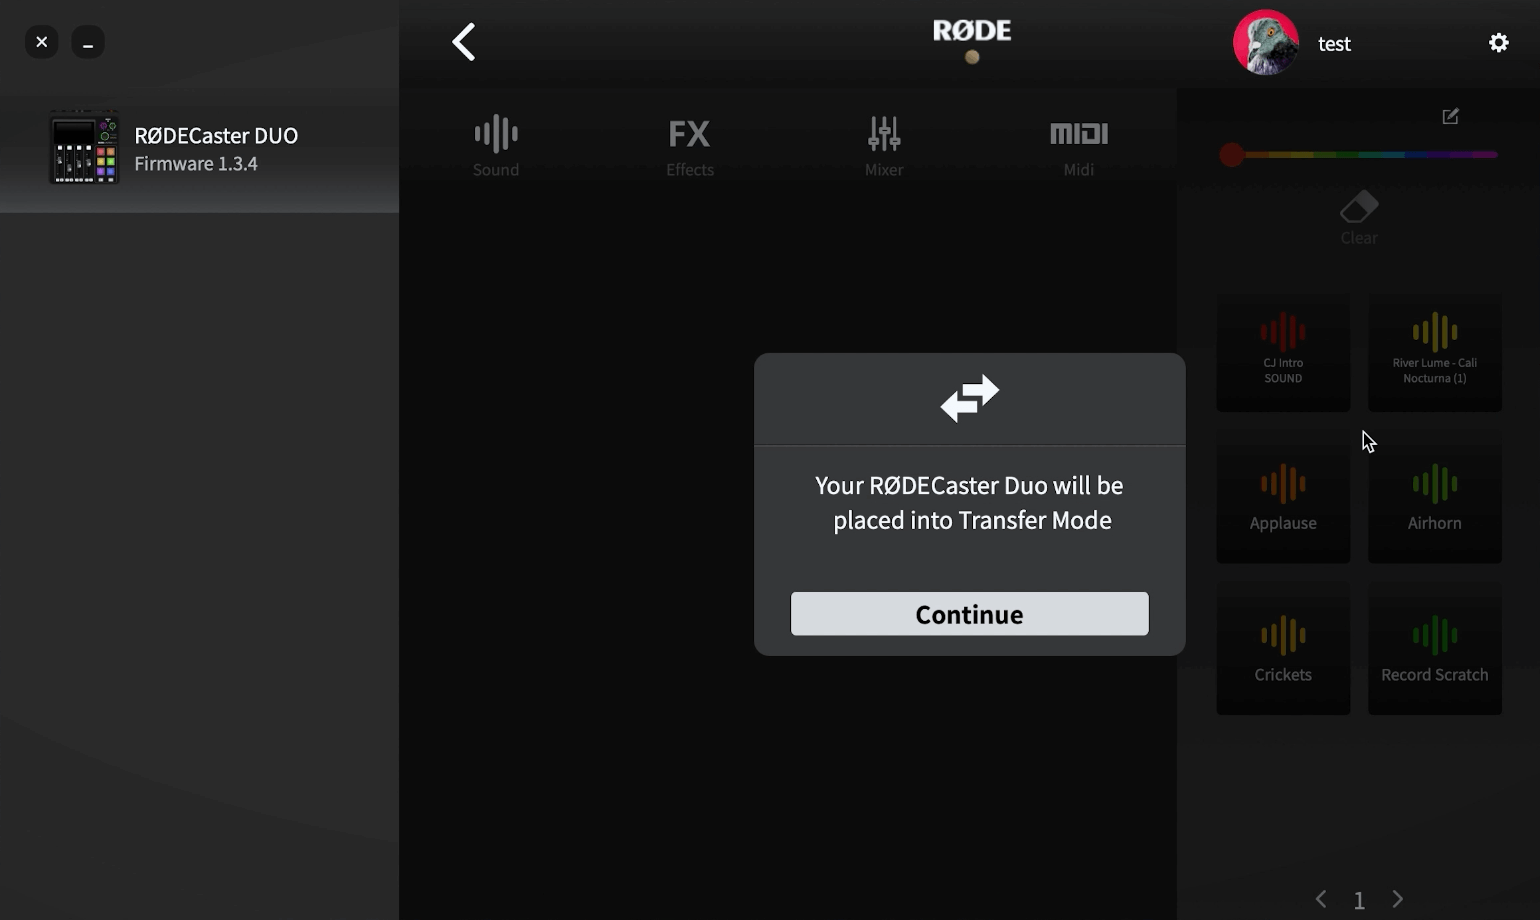
3. Your device in Transfer Mode will appear on the Duo’s screen.
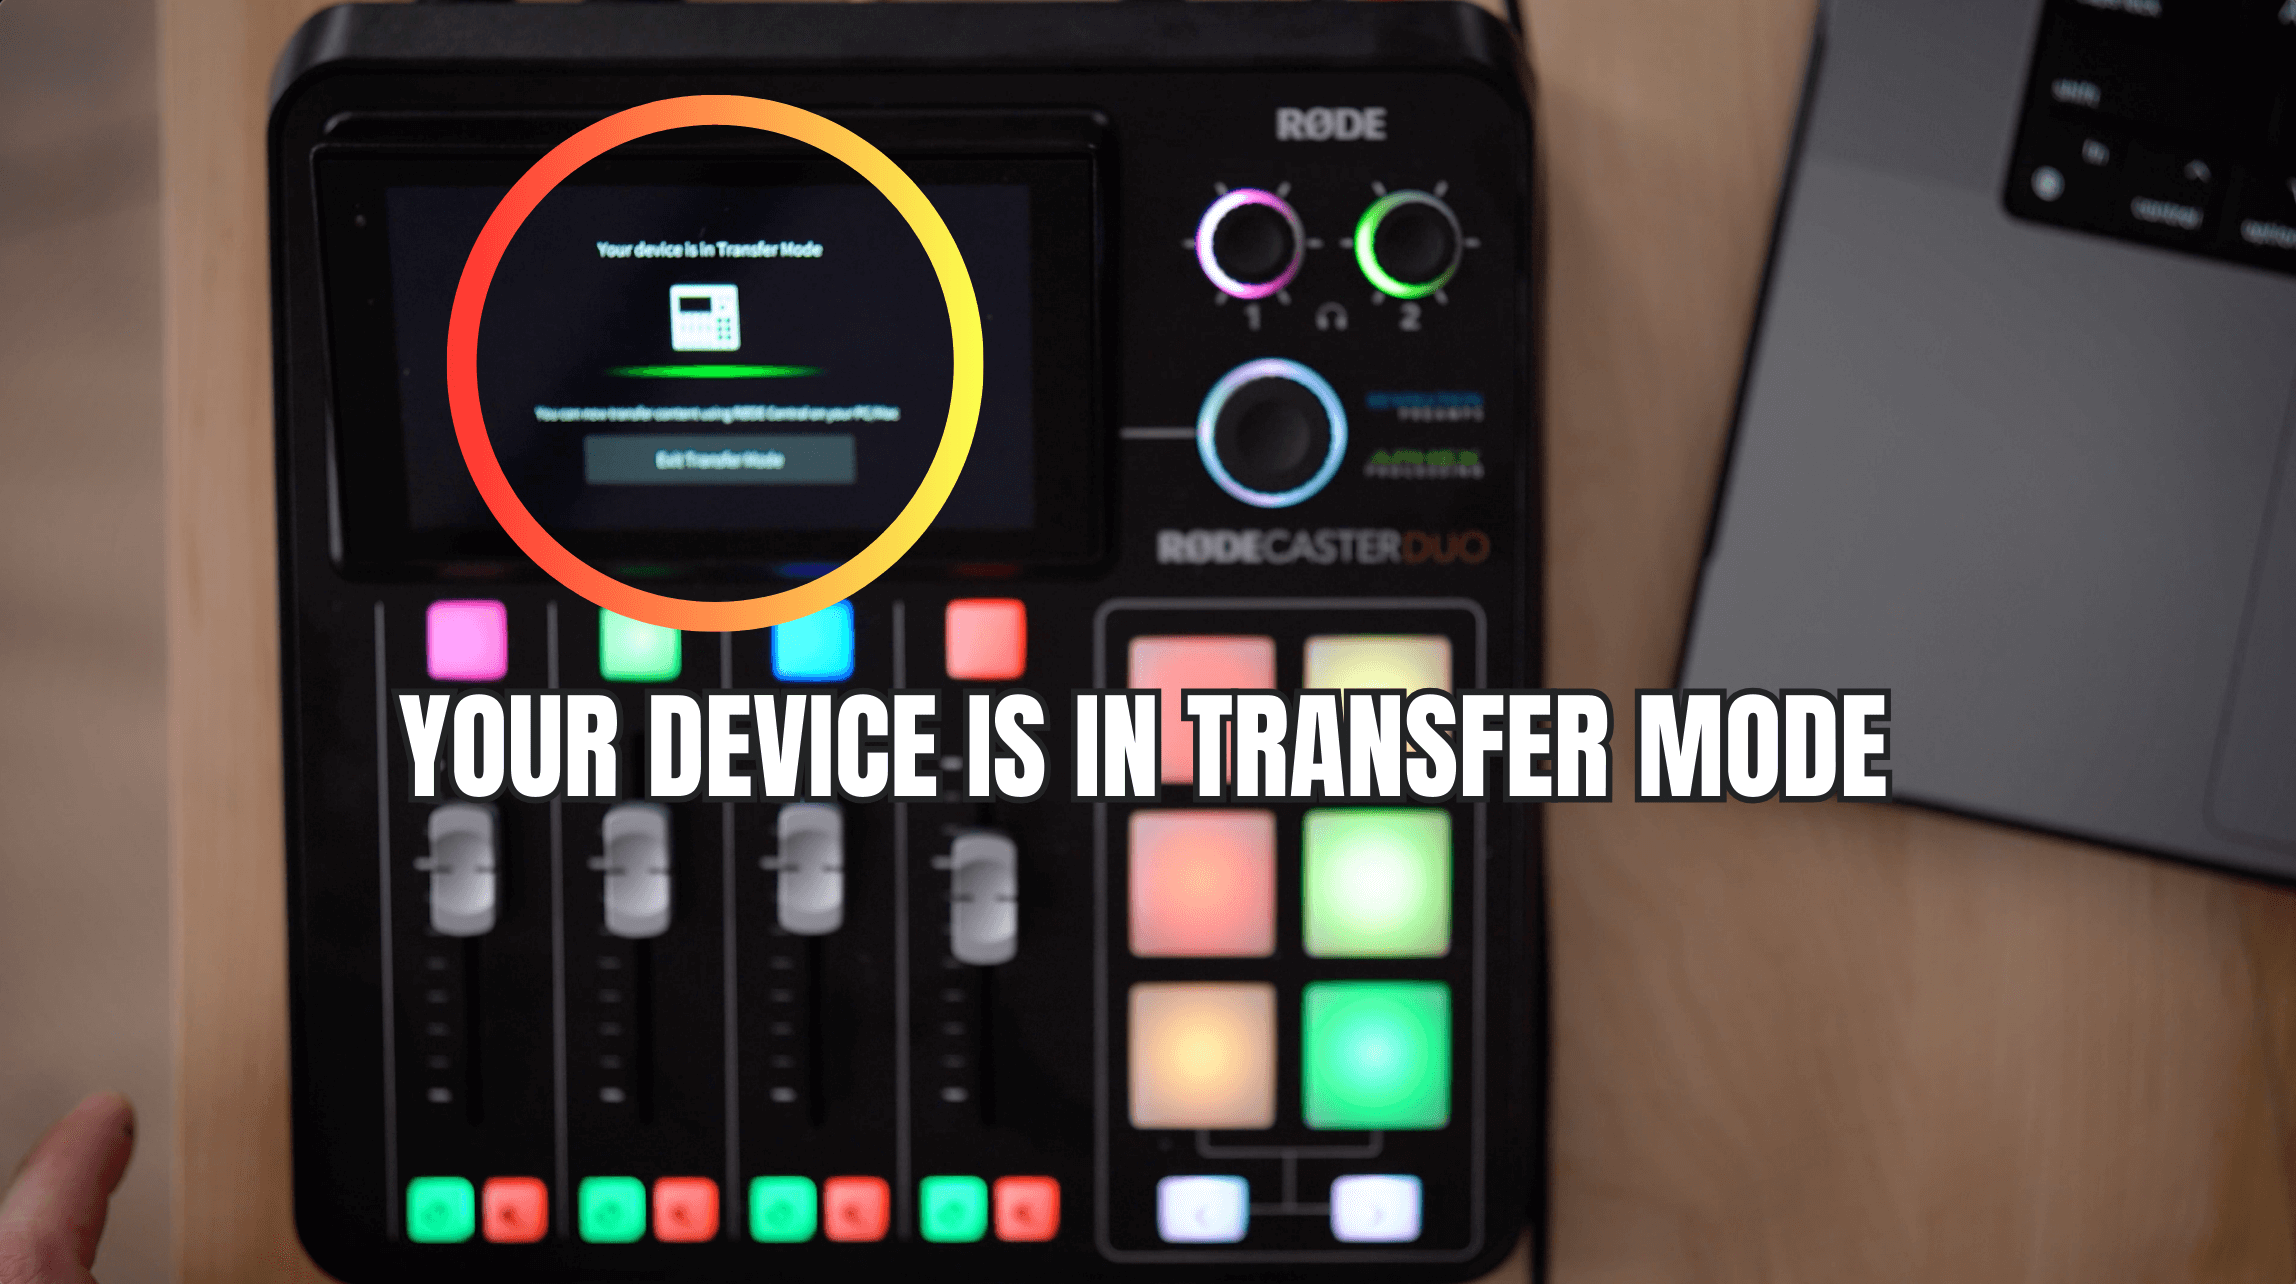
4. Now all I have to do is click on any one of these buttons (and there are multiple pages of buttons).

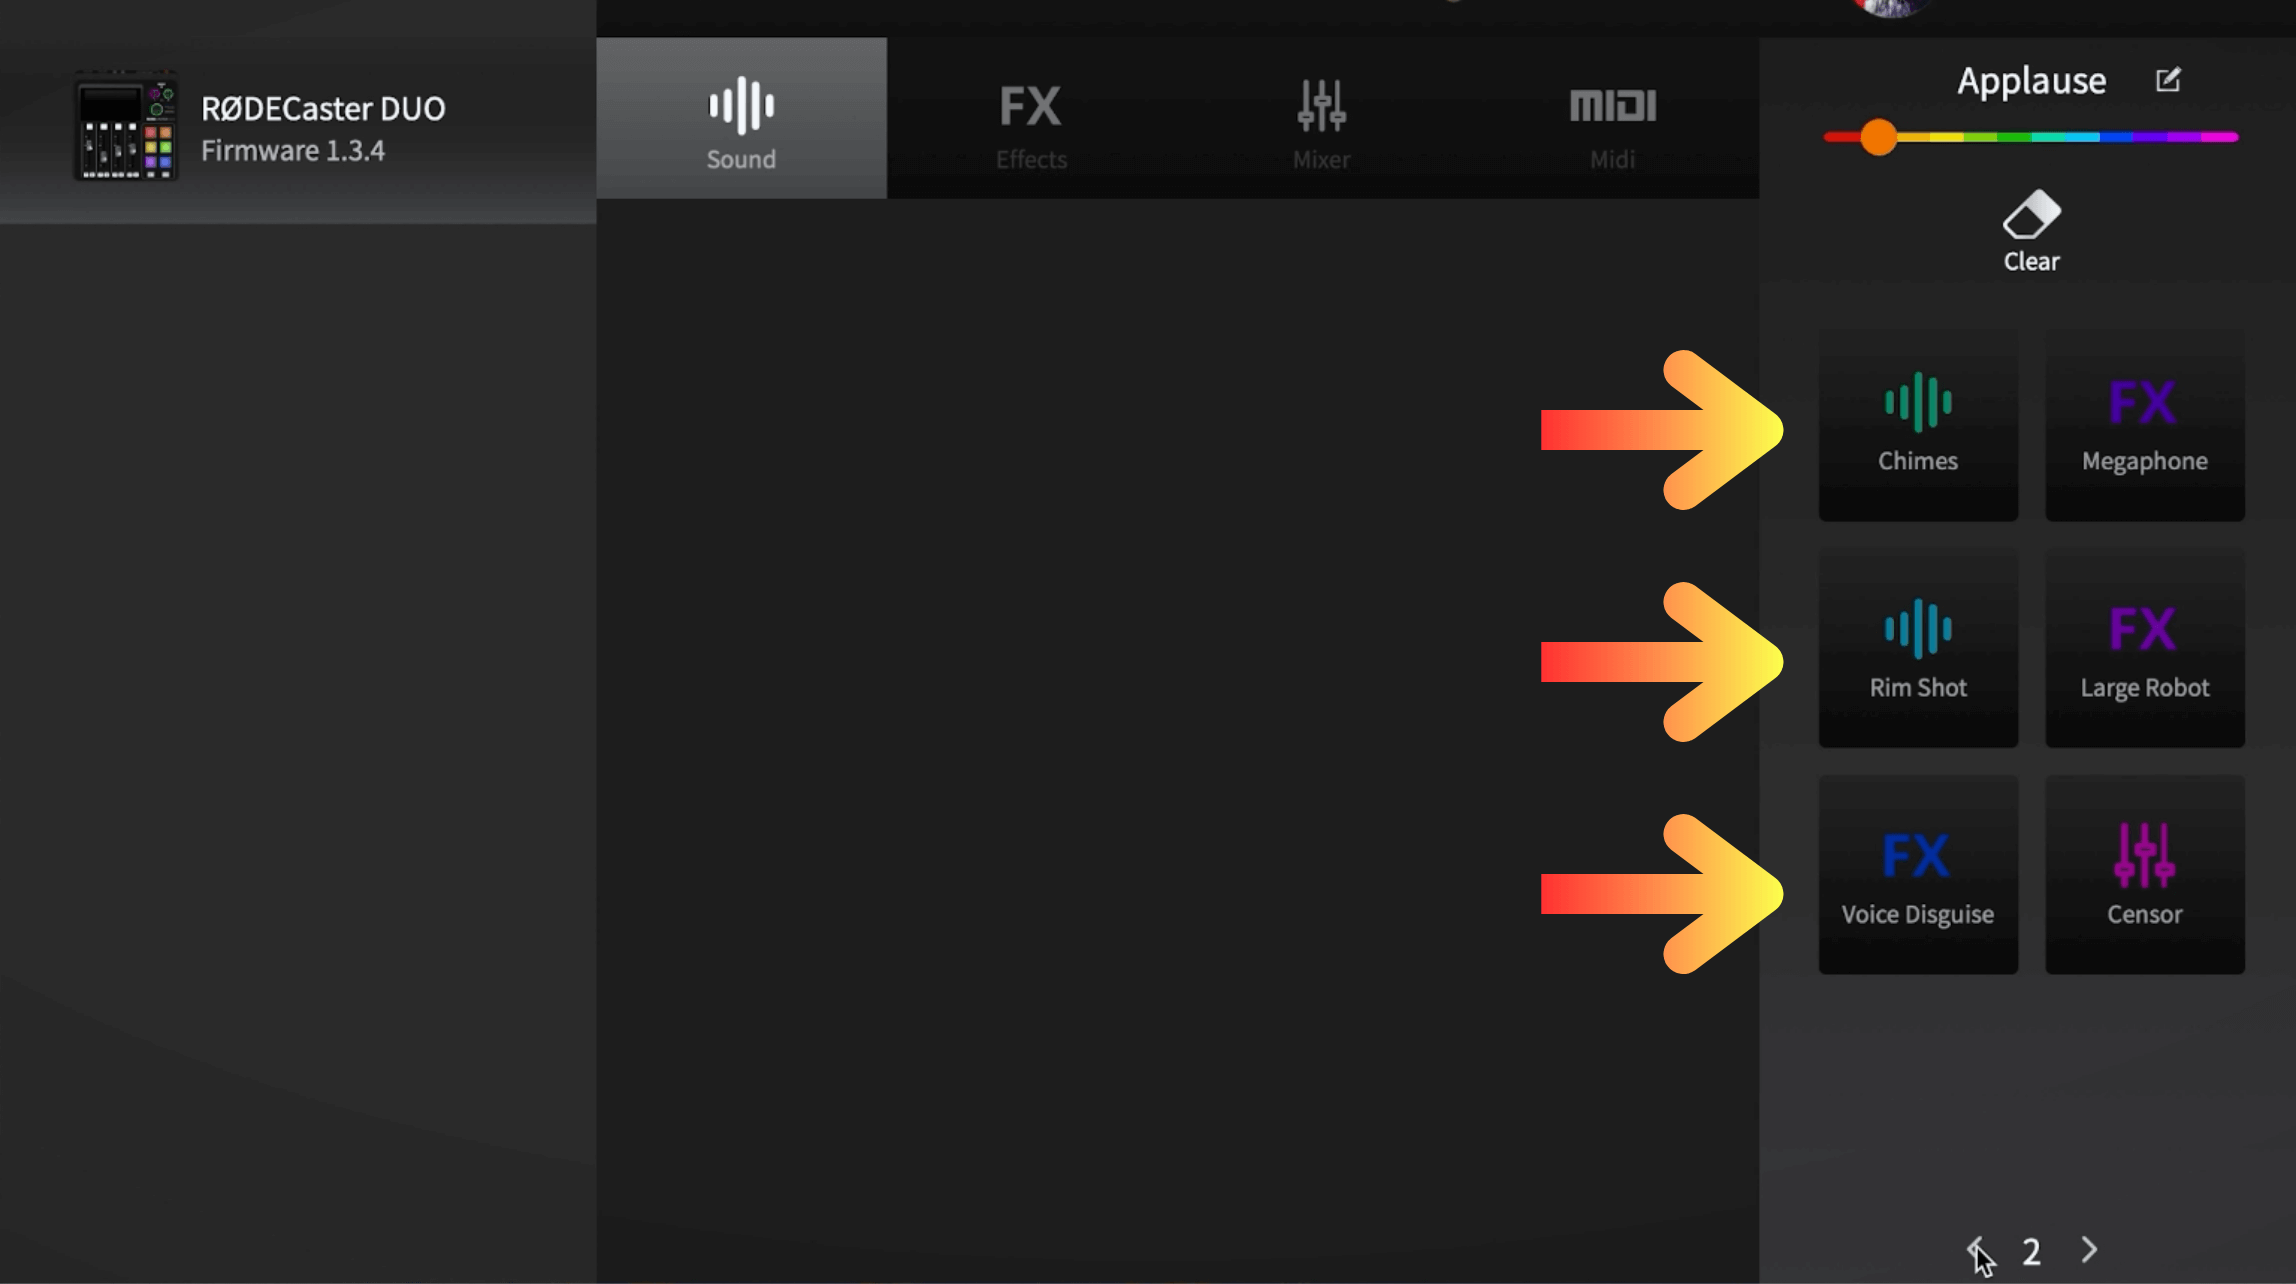
5. But on the first page, all I have to do is click on one of these buttons.
6. Then choose an audio file or drag and drop a file. And it's as easy as that.

7. So for example, I can replace this air horn file that came with the RODECaster DUO.

8. And I can just drag the Content Jefe intro sound into it, which is the intro sound for my podcast.

In addition to loading the Content Jefe Intro onto the Duo, we preloaded some fun sound effects and music. Then we played around with them when we LIVE STREAMED our podcast using the same live streaming setup I’m sharing with you in this post.
If you haven't subscribed to our podcast Content Jefe yet, make sure you go do that now.
Then go check out the REPLAY of the live stream that we did for you, because we put ourselves through the test and did a lot of back and forth and experimenting with all of the equipment just for you.

So you can be the judge yourself and decide if this is some equipment that you'd like to get for your own live-streaming podcast.
LINKS TO ALL OF THE EQUIPMENT WE USED TO LIVE STREAM AND RECORD THAT 2-PERSON VIDEO PODCAST EPISODE (ABOVE)
How to Set Up Your Camera, OBS, and the RODECaster DUO to Live Stream Your 2-Person Video Podcast [SPECIAL HACK]
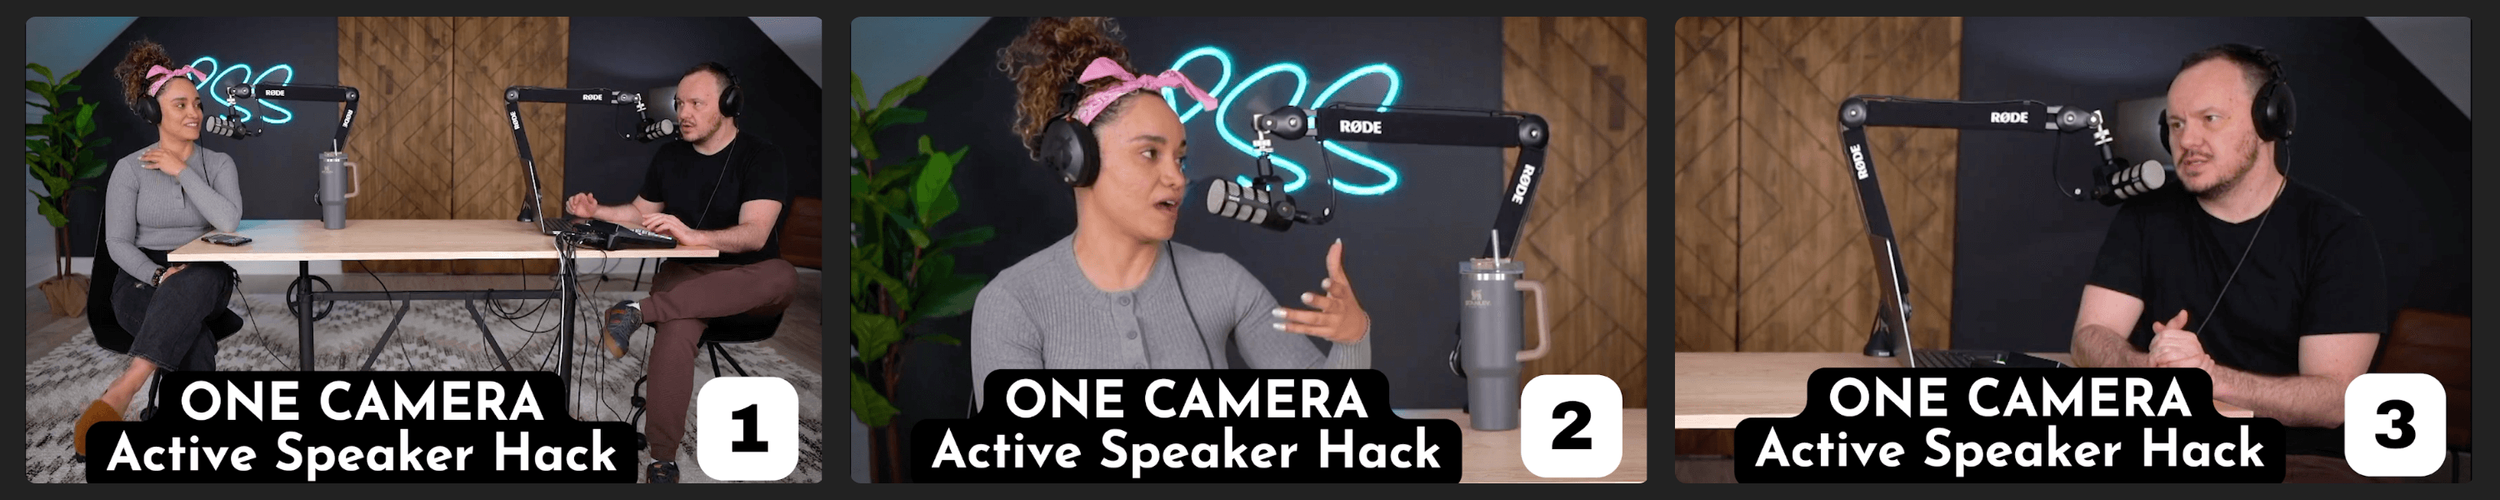
Now, what we're going to show you here is an amazing active speaker hack so you can create 3 shots with only ONE camera.
I have another video on our channel where I introduced you to my famous SWITCH AND CUT HACK, which is kind of one of our big performers. This is a similar hack to the one I’m about to show you.
Veronica: People LOVE you for that one.
Stephen: Well, then you're going to love me for this one. Let me show you how it's done…

THE MAJOR BENEFIT OF USING OBS FOR YOUR 2-PERSON VIDEO PODCAST LIVE-STREAM
You can download the OBS Studio app for FREE here.
OBS is an initialism for Open Broadcaster Software.
What OBS allows you to do is to create scenes of lots of different things on your computer.
You hear all the streamers rant and rave about OBS so I was really excited to get into it and use it for the first time, specifically because we want to help you use OBS for your live streams.
Below, I’ll take you step-by-step through how to do a really cool active speaker view switchboard effect as you're live streaming.
There are several reasons Veronica and I love this active speaker view hack.
For starters, I'm famous for my pendejo face — as seen in the short video clip below. For whatever reason, when Veronica is talking, I make a lot of weird faces so I’d rather have the camera cut to a view of Veronica only while she’s talking.
Veronica: And when Stephen's talking about audio concepts, I go behind my eyes like this. So if the camera shot switches to a view of Stephen only while he’s talking, nobody will know I zoned out for a few minutes.
And you gotta change the scene up every few seconds to make the video more eye-catching for those gen-zers with extra short attention spans.
THE ONE-CAMERA SETUP HACK
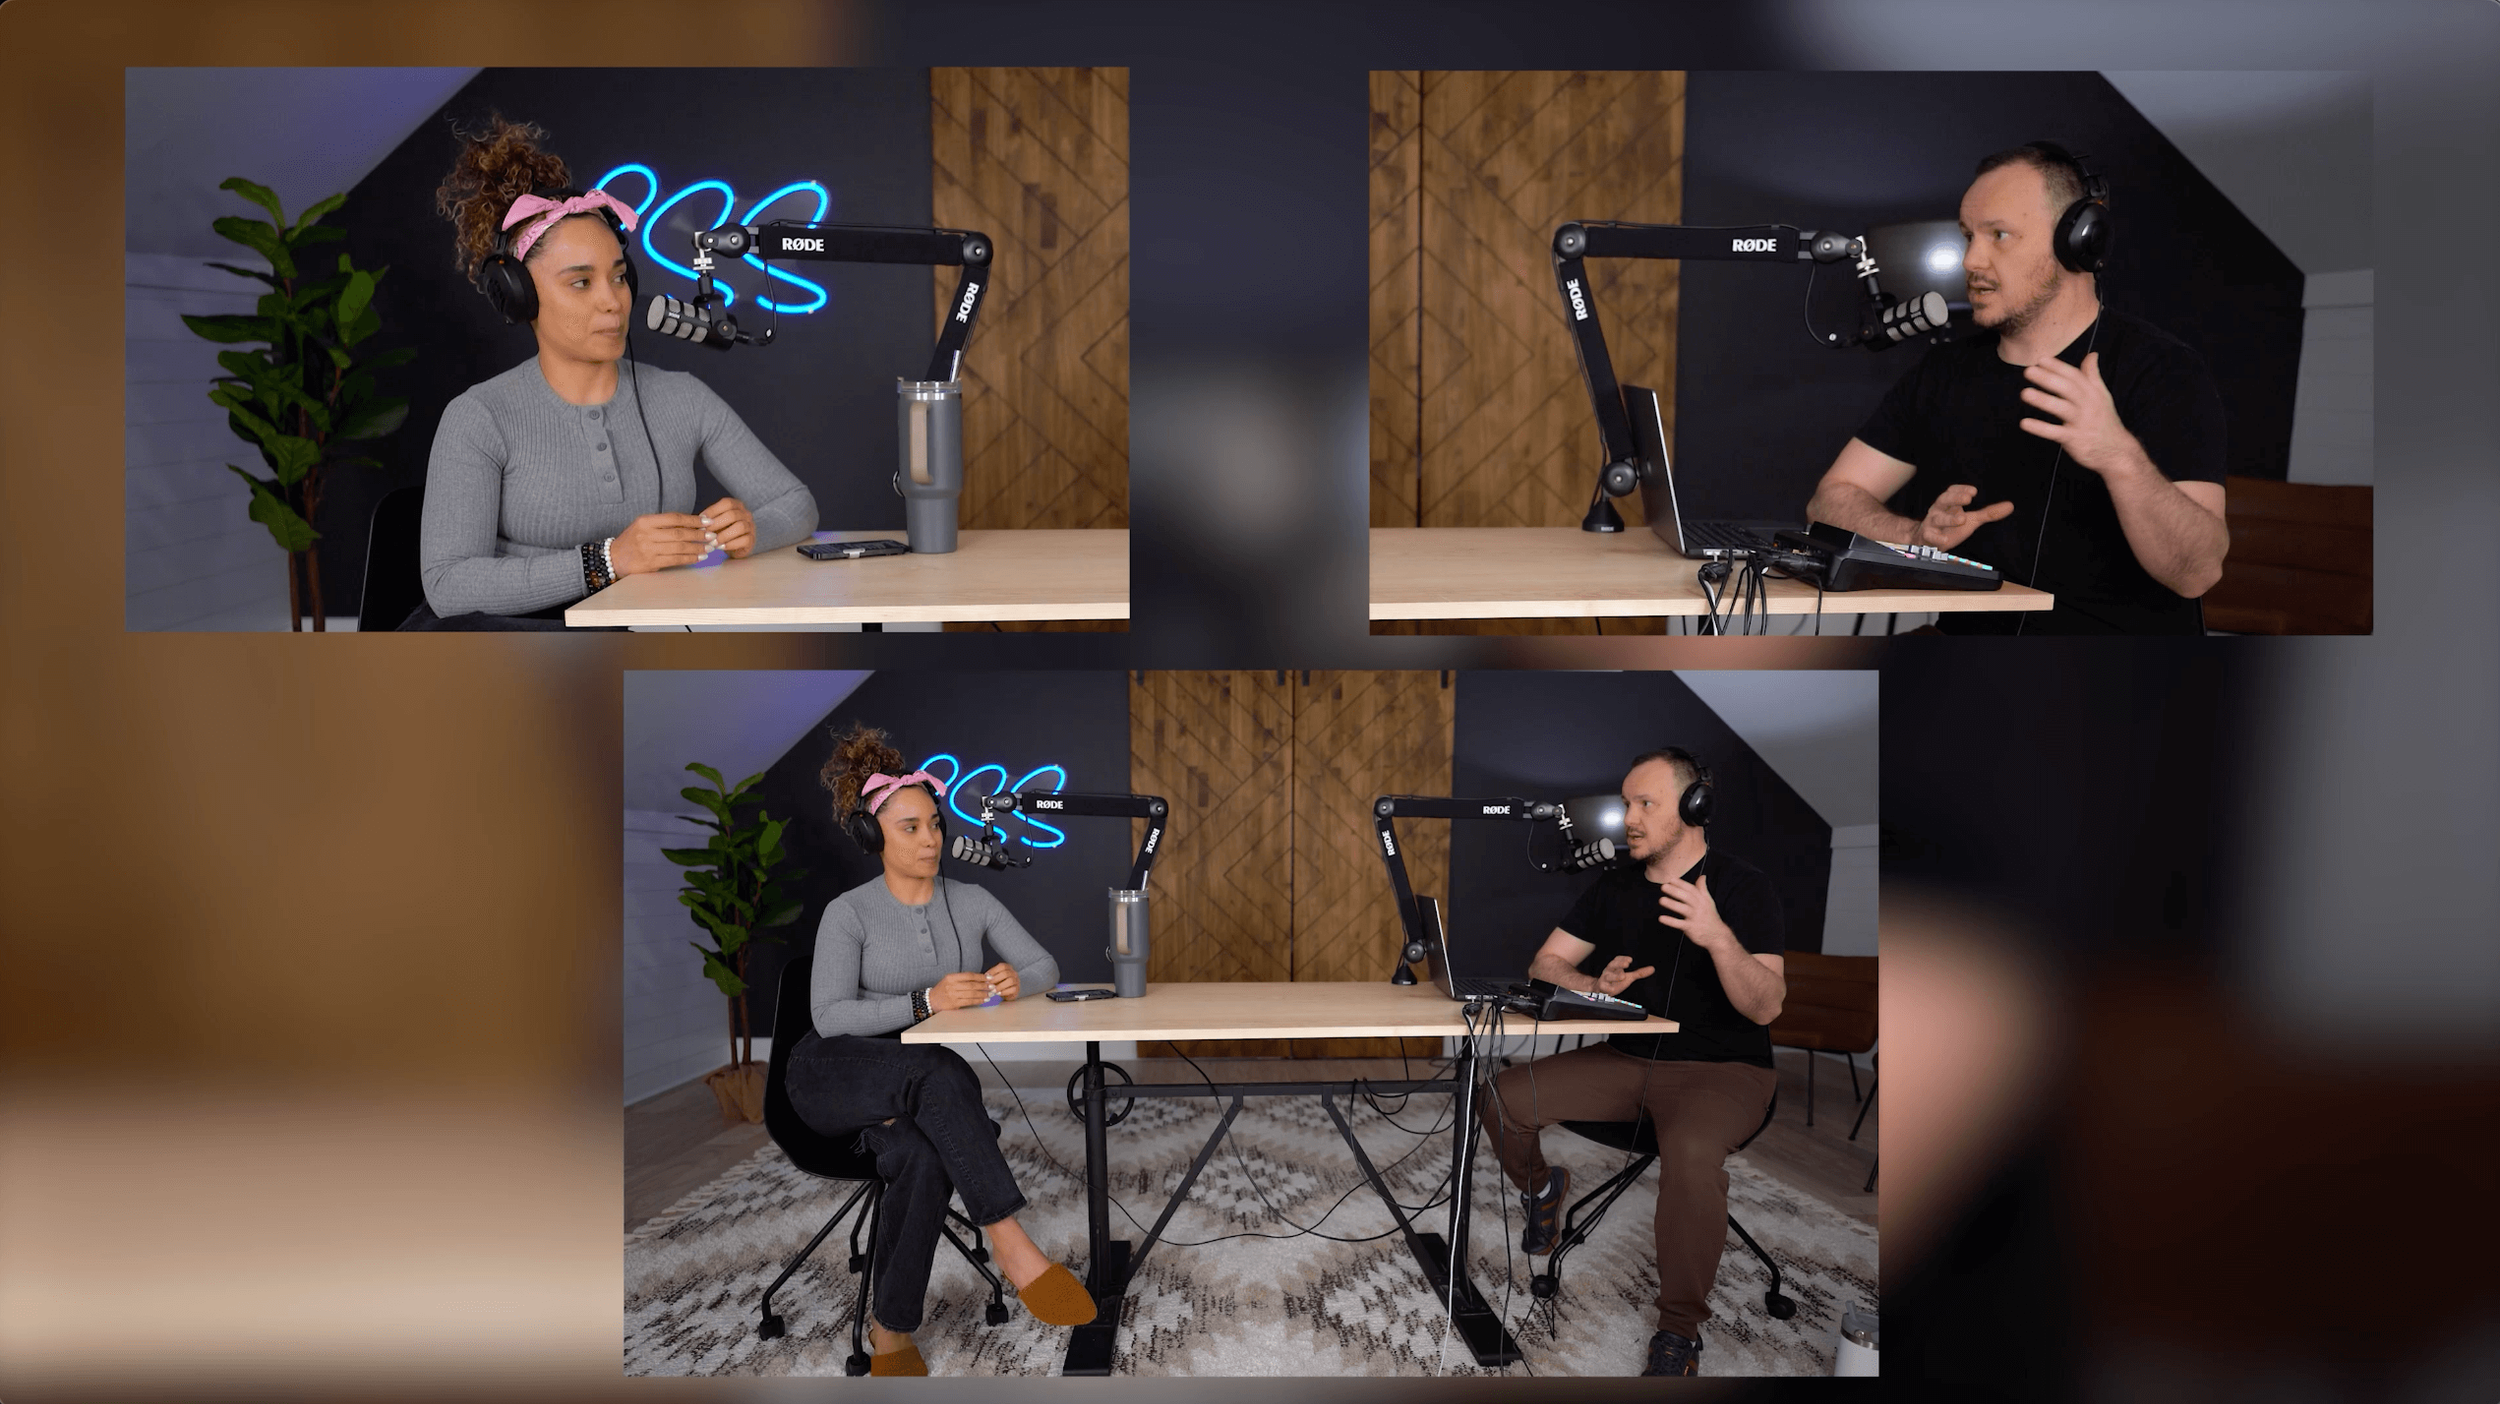
As you can see, we decided to use ONLY ONE CAMERA for this shot.

One camera is really great. We often refer to this as the newscaster shot, even though you see Veronica and I at the opposite ends of the table. This shot might actually be better if we went behind the table, like newscasters, and then we could zoom in on the shot that way.
But because we're using a REALLY WIDE-ANGLE LENS and a WIDE-ANGLE SHOT here, the idea is that we're going to zoom in on this footage.
WARNING: If you use one camera and zoom in on the footage, it's important to capture 4k quality footage so that when you zoom in, it doesn't become too pixelated.
However, this simple setup means you won’t have to buy or deal with the headache of setting up multiple cameras which can be a little complicated for a beginner podcaster.
Ready for a MULTI-CAMERA SETUP? Watch this video to achieve that fancy-shamcy 2-person video podcast look.
We used the same audio setup but we used a camera switcher called the ATEM to switch between three different cameras. And we sat in the same conversational position facing each other on either side of the table, like a Diary Of A CEO or Larry King interview-style podcast setup, which is really great.

HOW TO SET UP OBS TO CREATE MULTIPLE SCENES FROM ONE CAMERA FOR YOUR 2-PERSON VIDEO PODCAST LIVE-STREAM
Let's hop into OBS. You can download OBS for free.
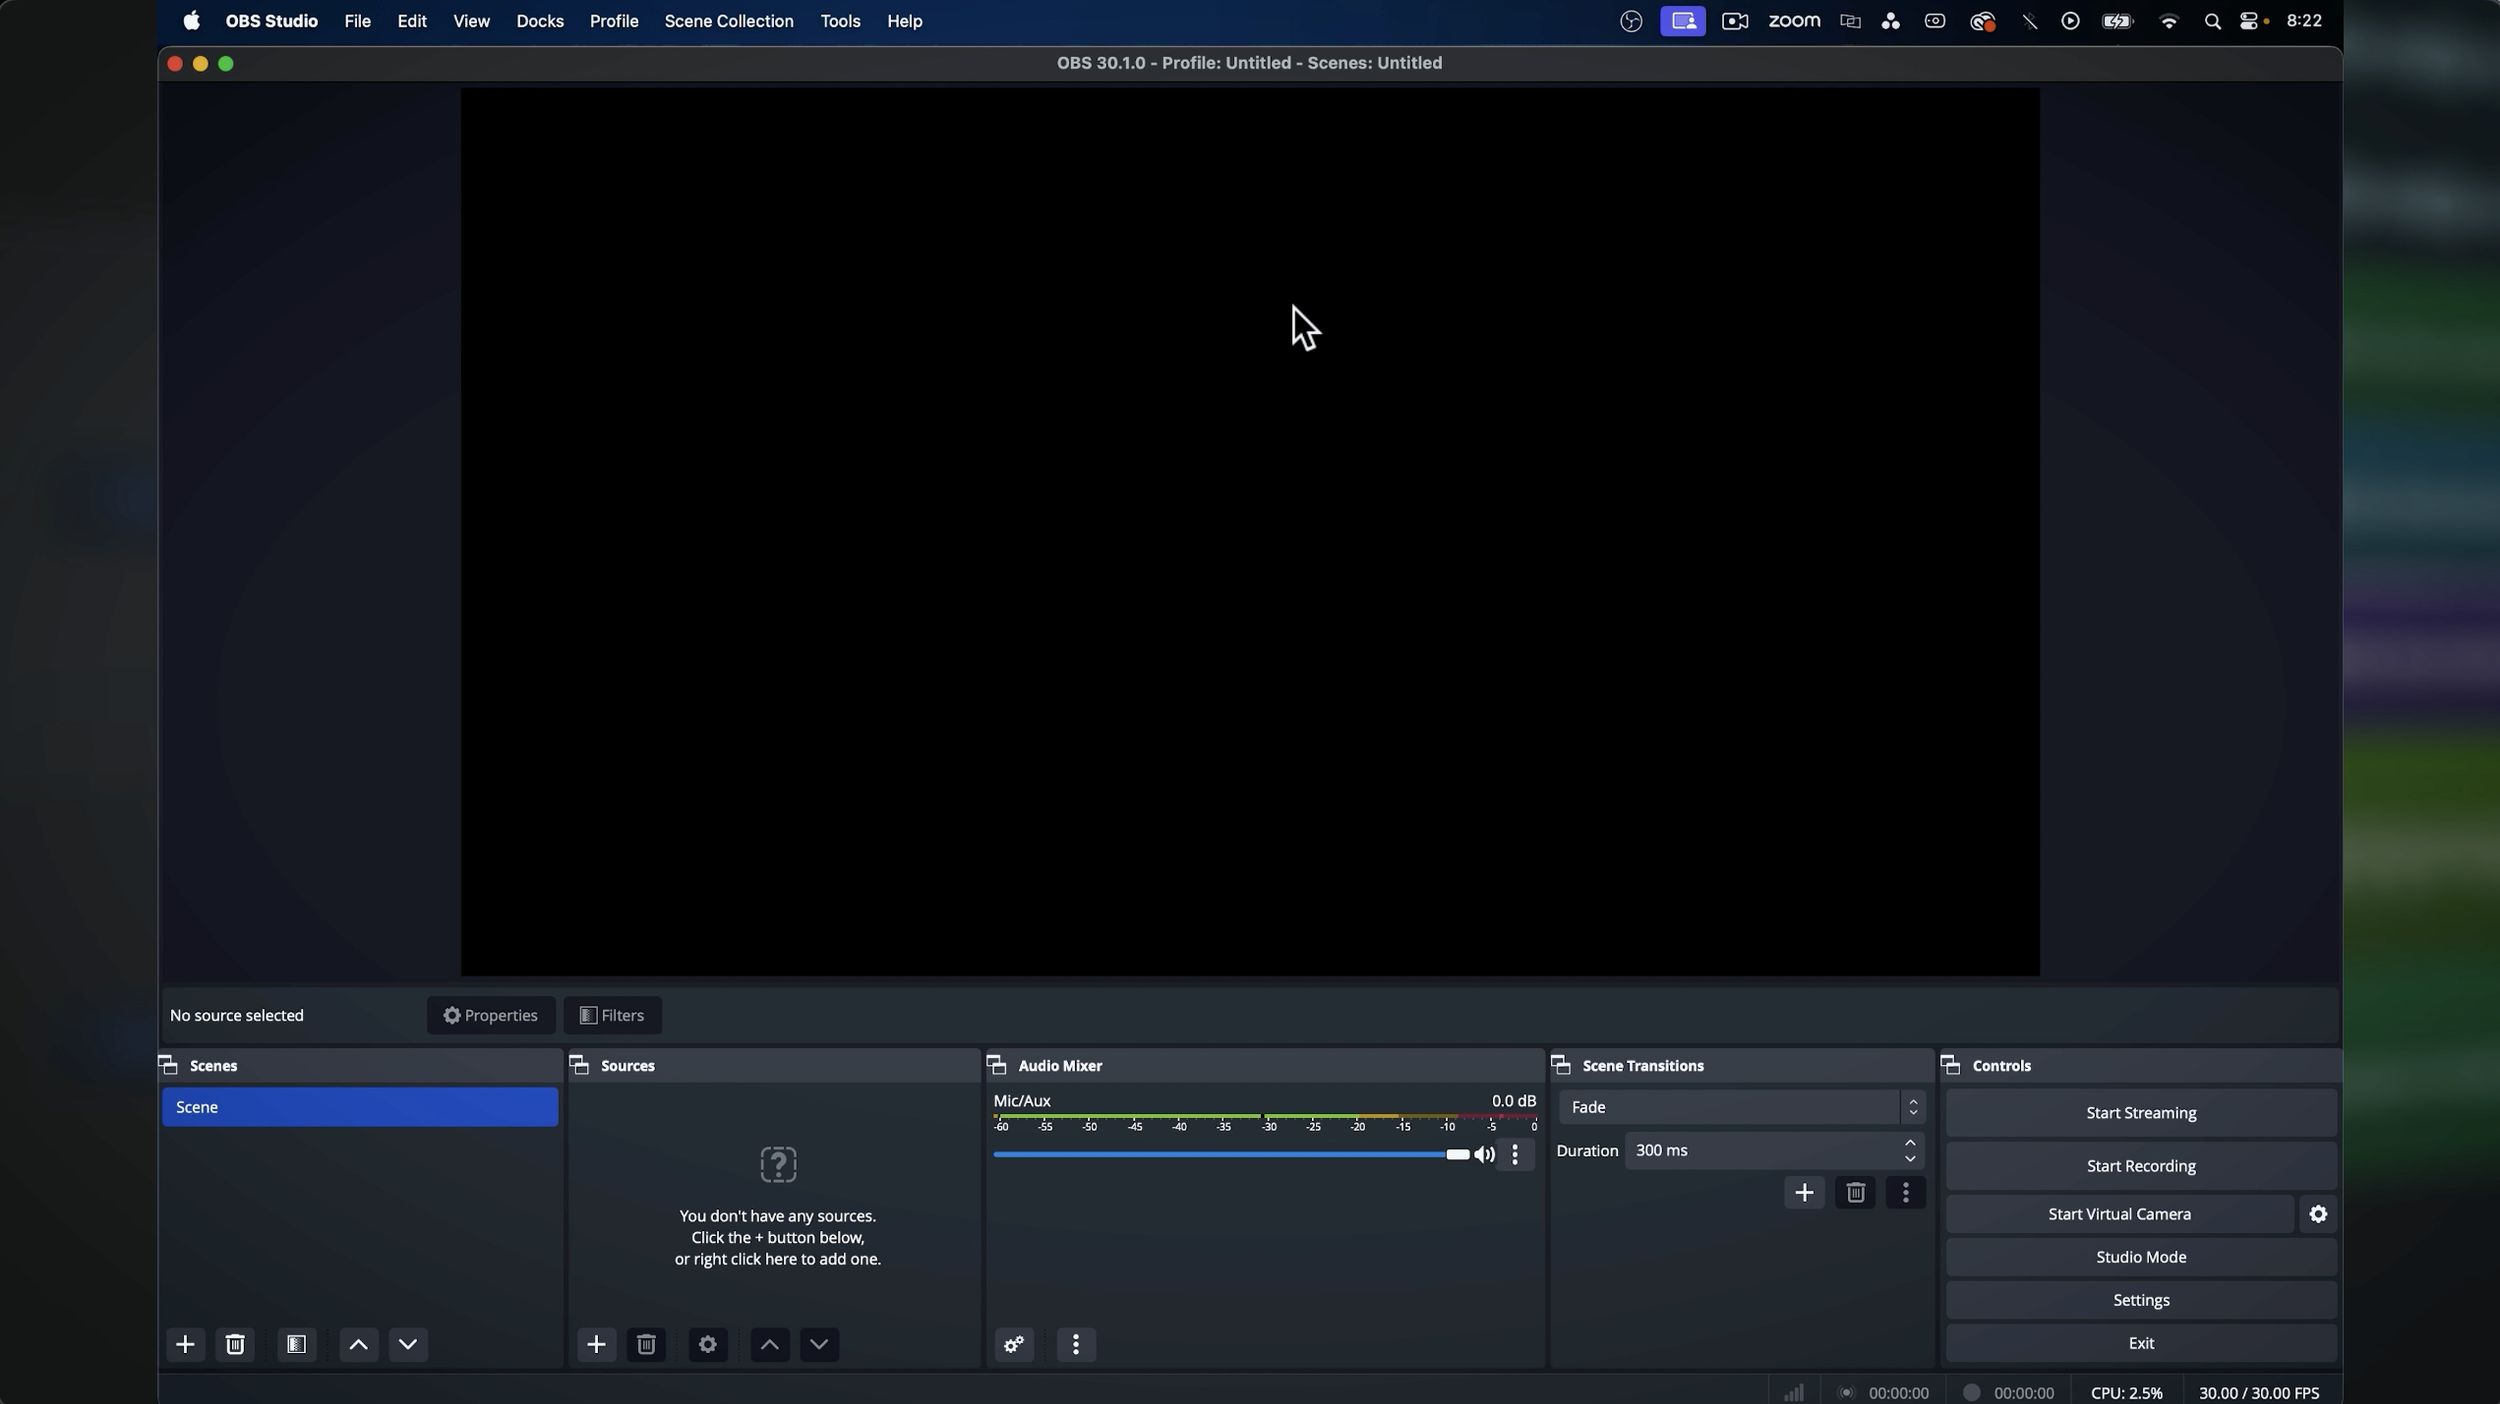
You'll notice that it's already picking up the audio the way we want it to in the audio mixer.
The power of OBS is that it allows you to turn on what's called a Virtual Camera.
This virtual camera can be used with streaming services like:
anything that recognizes a web camera (that's usually plugged into your computer)
In this case, we're going to take one wide-angle shot and we're going to make 3 different scenes:
one Veronica shot
one Studio Steve shot
one WIDE shot
And then I can easily switch between these 3 shots by pressing the ARROW KEYS which is really cool.
And then if that wasn't enough awesomeness by itself, what really makes OBS a hack is that it will also record locally onto your computer which means you can have it record insanely high-quality videos.
So this camera that's plugged into my computer, I can record really high-quality video footage directly into the hard drive in my computer.
I could even get an external hard drive, like a 5 TB hard drive. And just record for hours, really high-quality 4k video. And that's really valuable, really cool stuff because then the video and the audio that's recorded onto my computer never touches the internet. So that stuff is really pure, has all of the integrity. It doesn't have any digital artifacts or internet caca on it. It's just ready to go.
Let’s Get Scene #1 Set Up in OBS — Wide Angle:
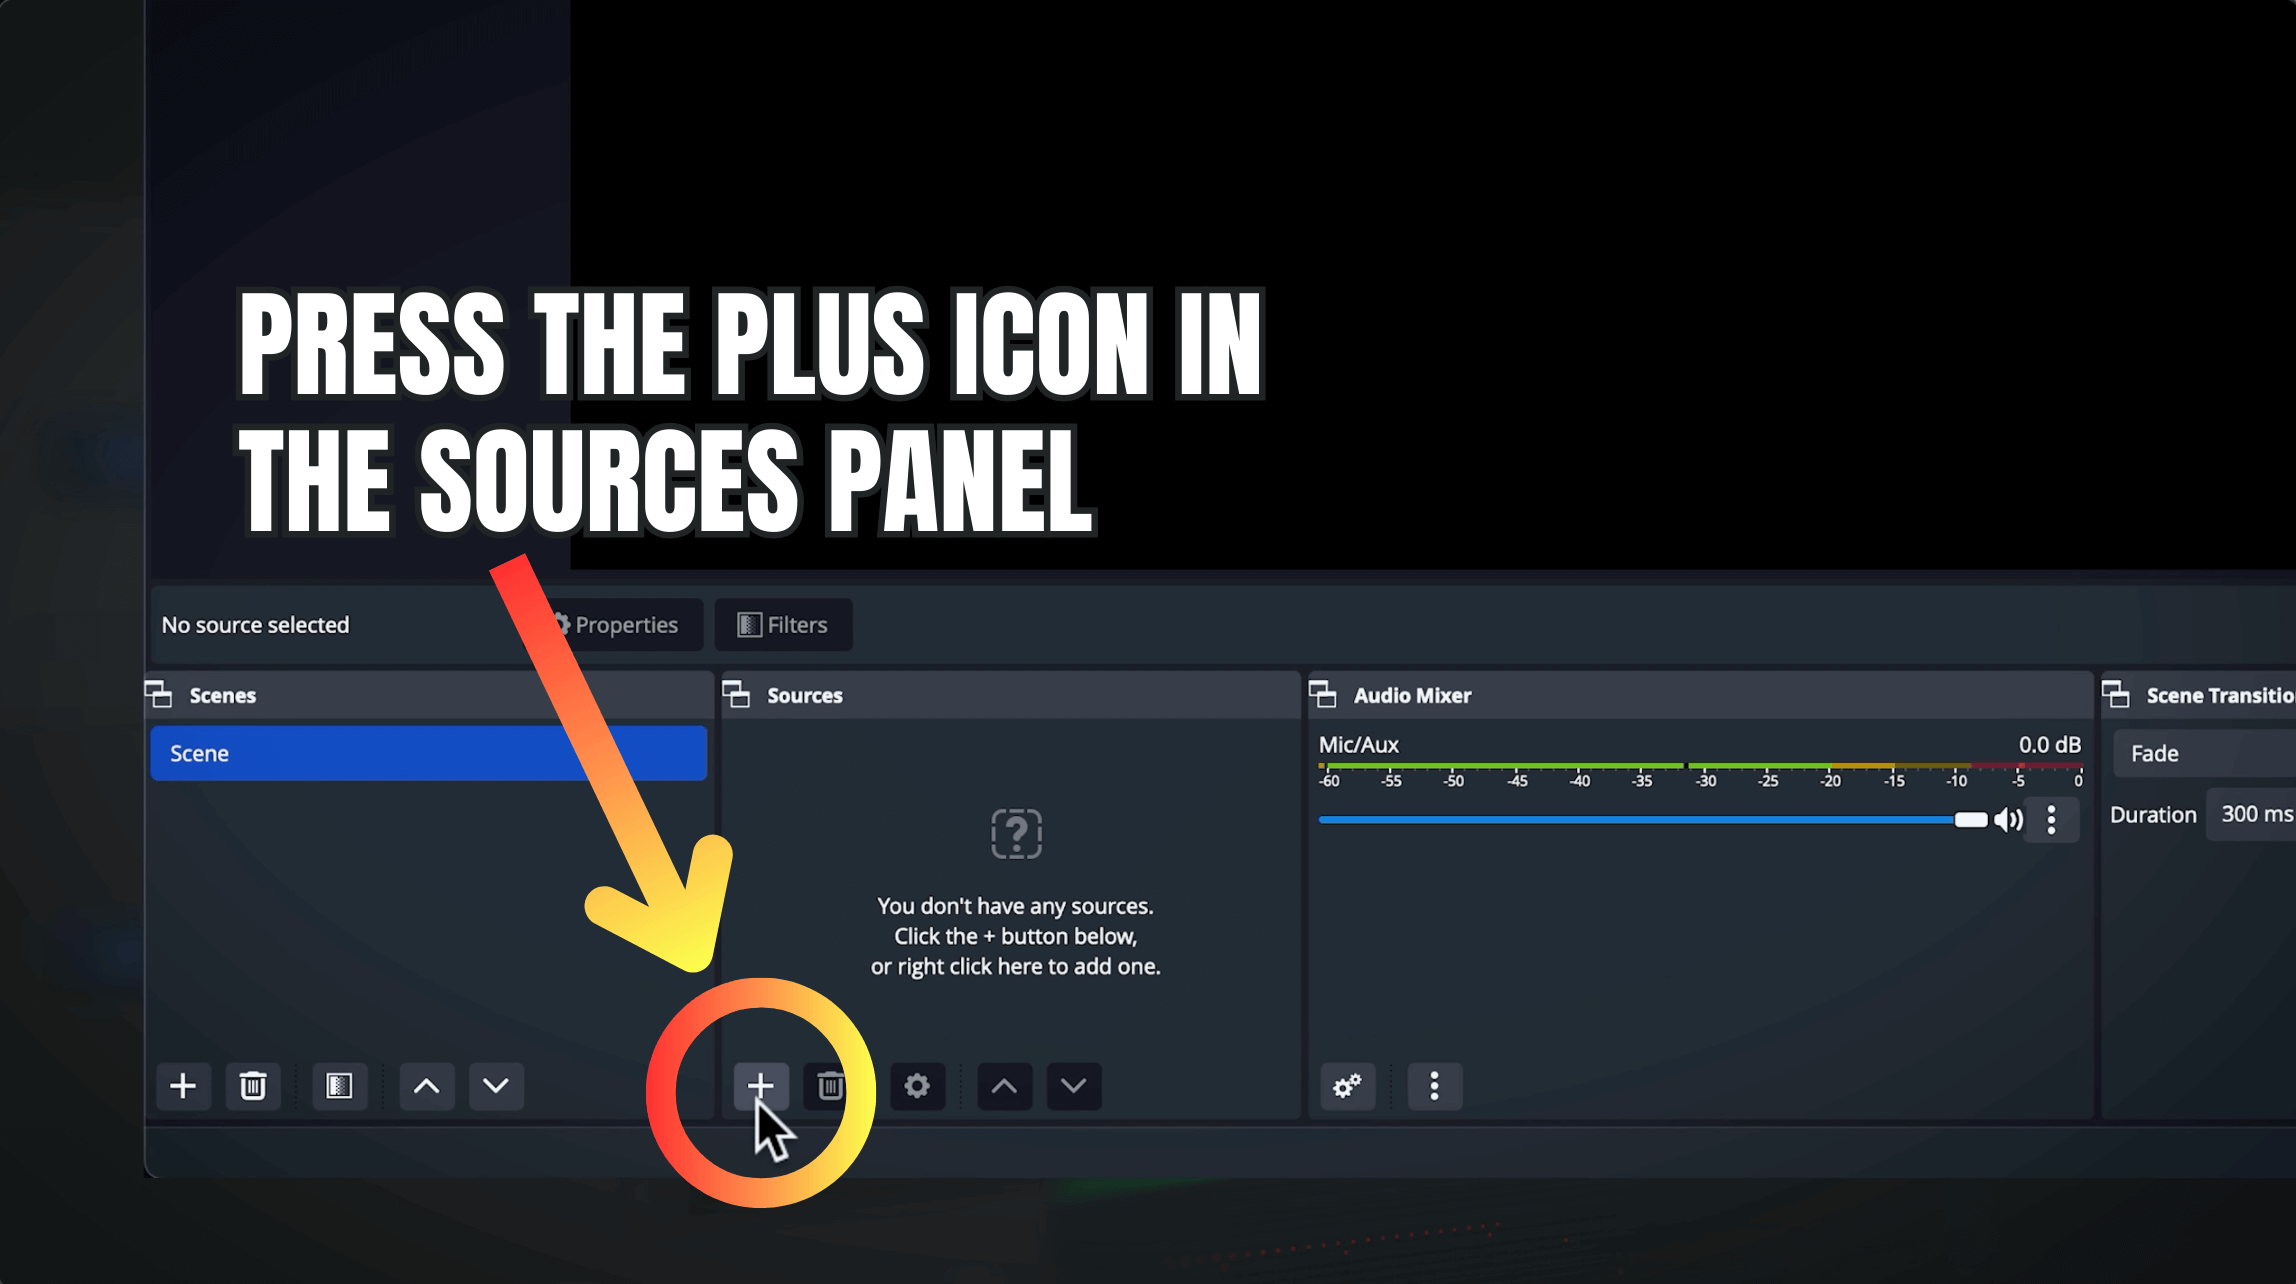
Start by creating the first scene, the wide-angle scene. In OBS Studio, go to where it says Sources and press the PLUS icon
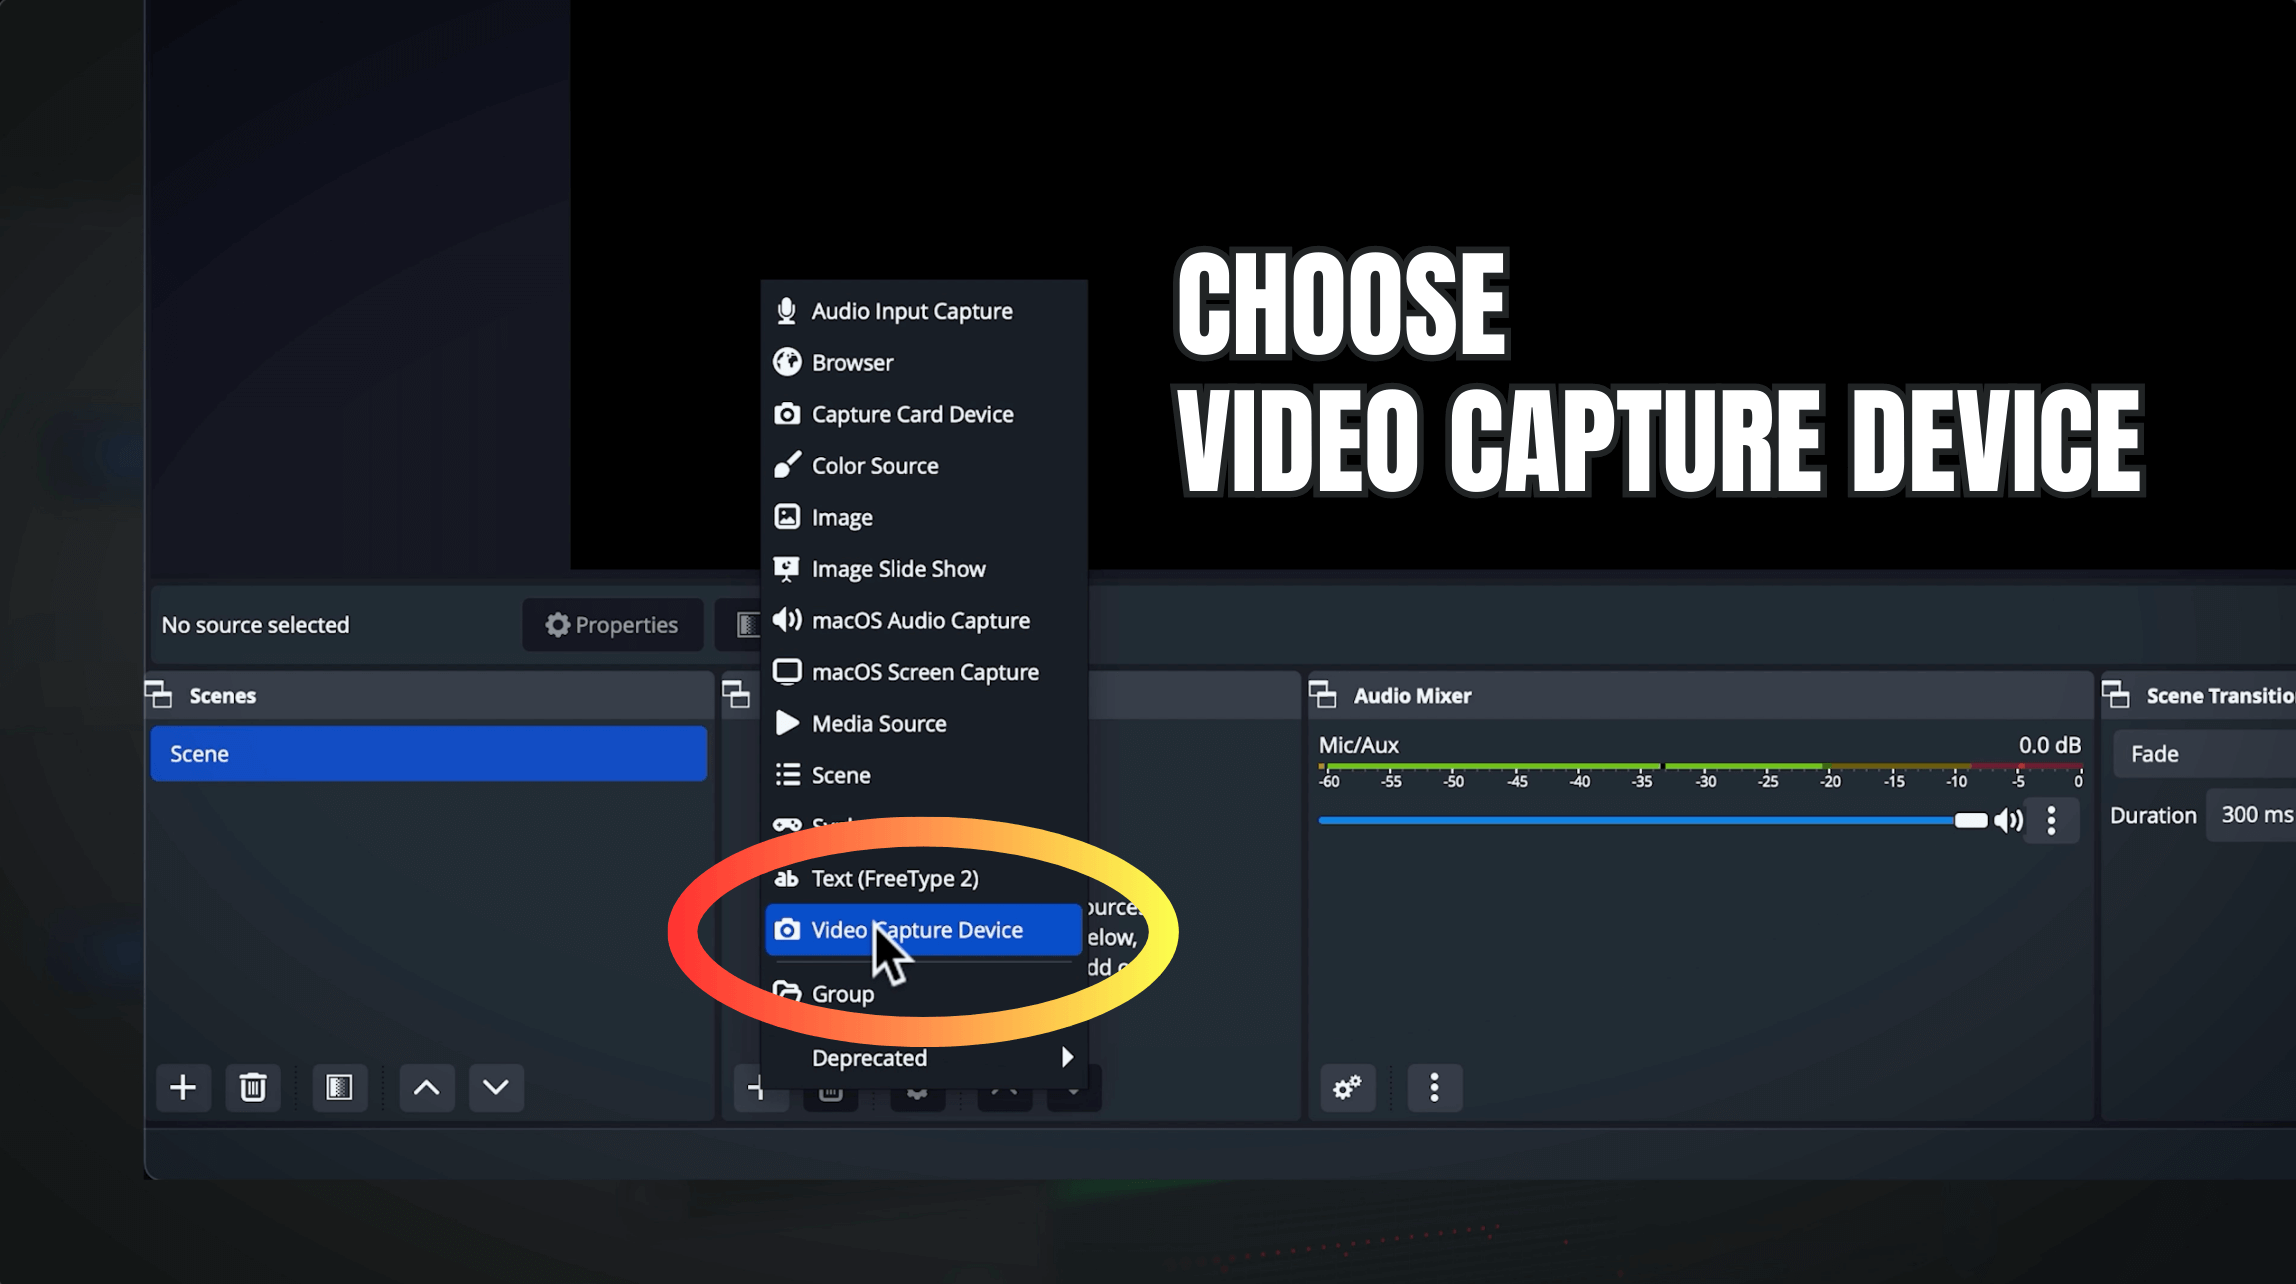
2. Choose Video Capture Device
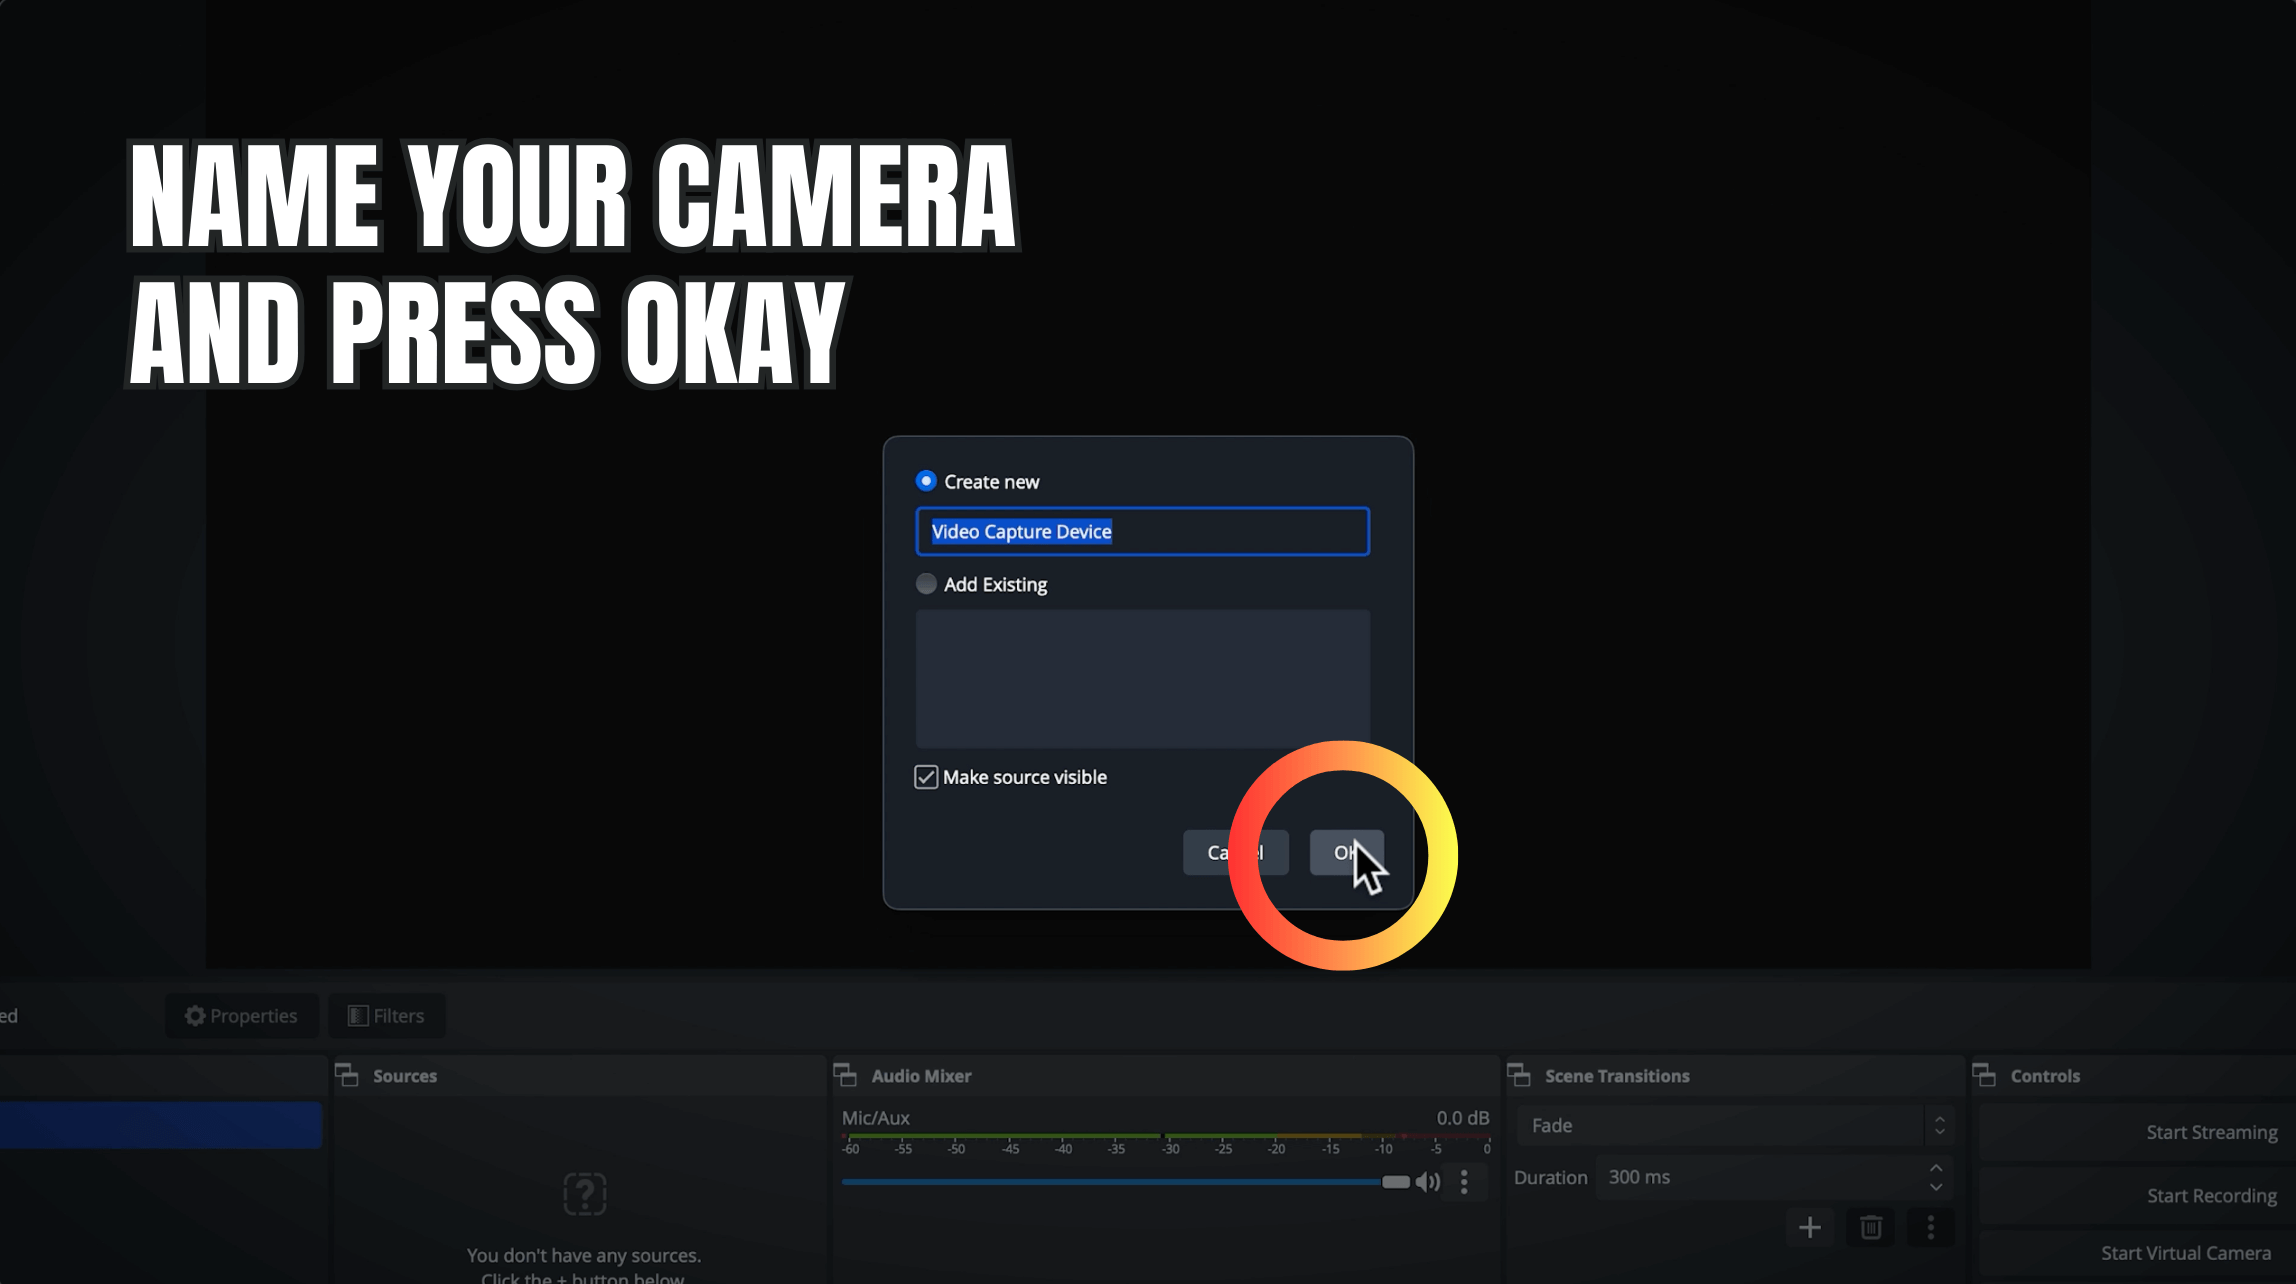
3. (Optional) Name your camera
4. Press OK
5. Now choose the device. In this case, I'm going to choose Cam Link 4K. And that's because we’re using the Cam Link 4K adapter to wirelessly connect our camera to our computer.

6. Click OK. And then look, here's the shot. This can be my first scene — the wide scene. I could even rename this scene, Wide Angle.

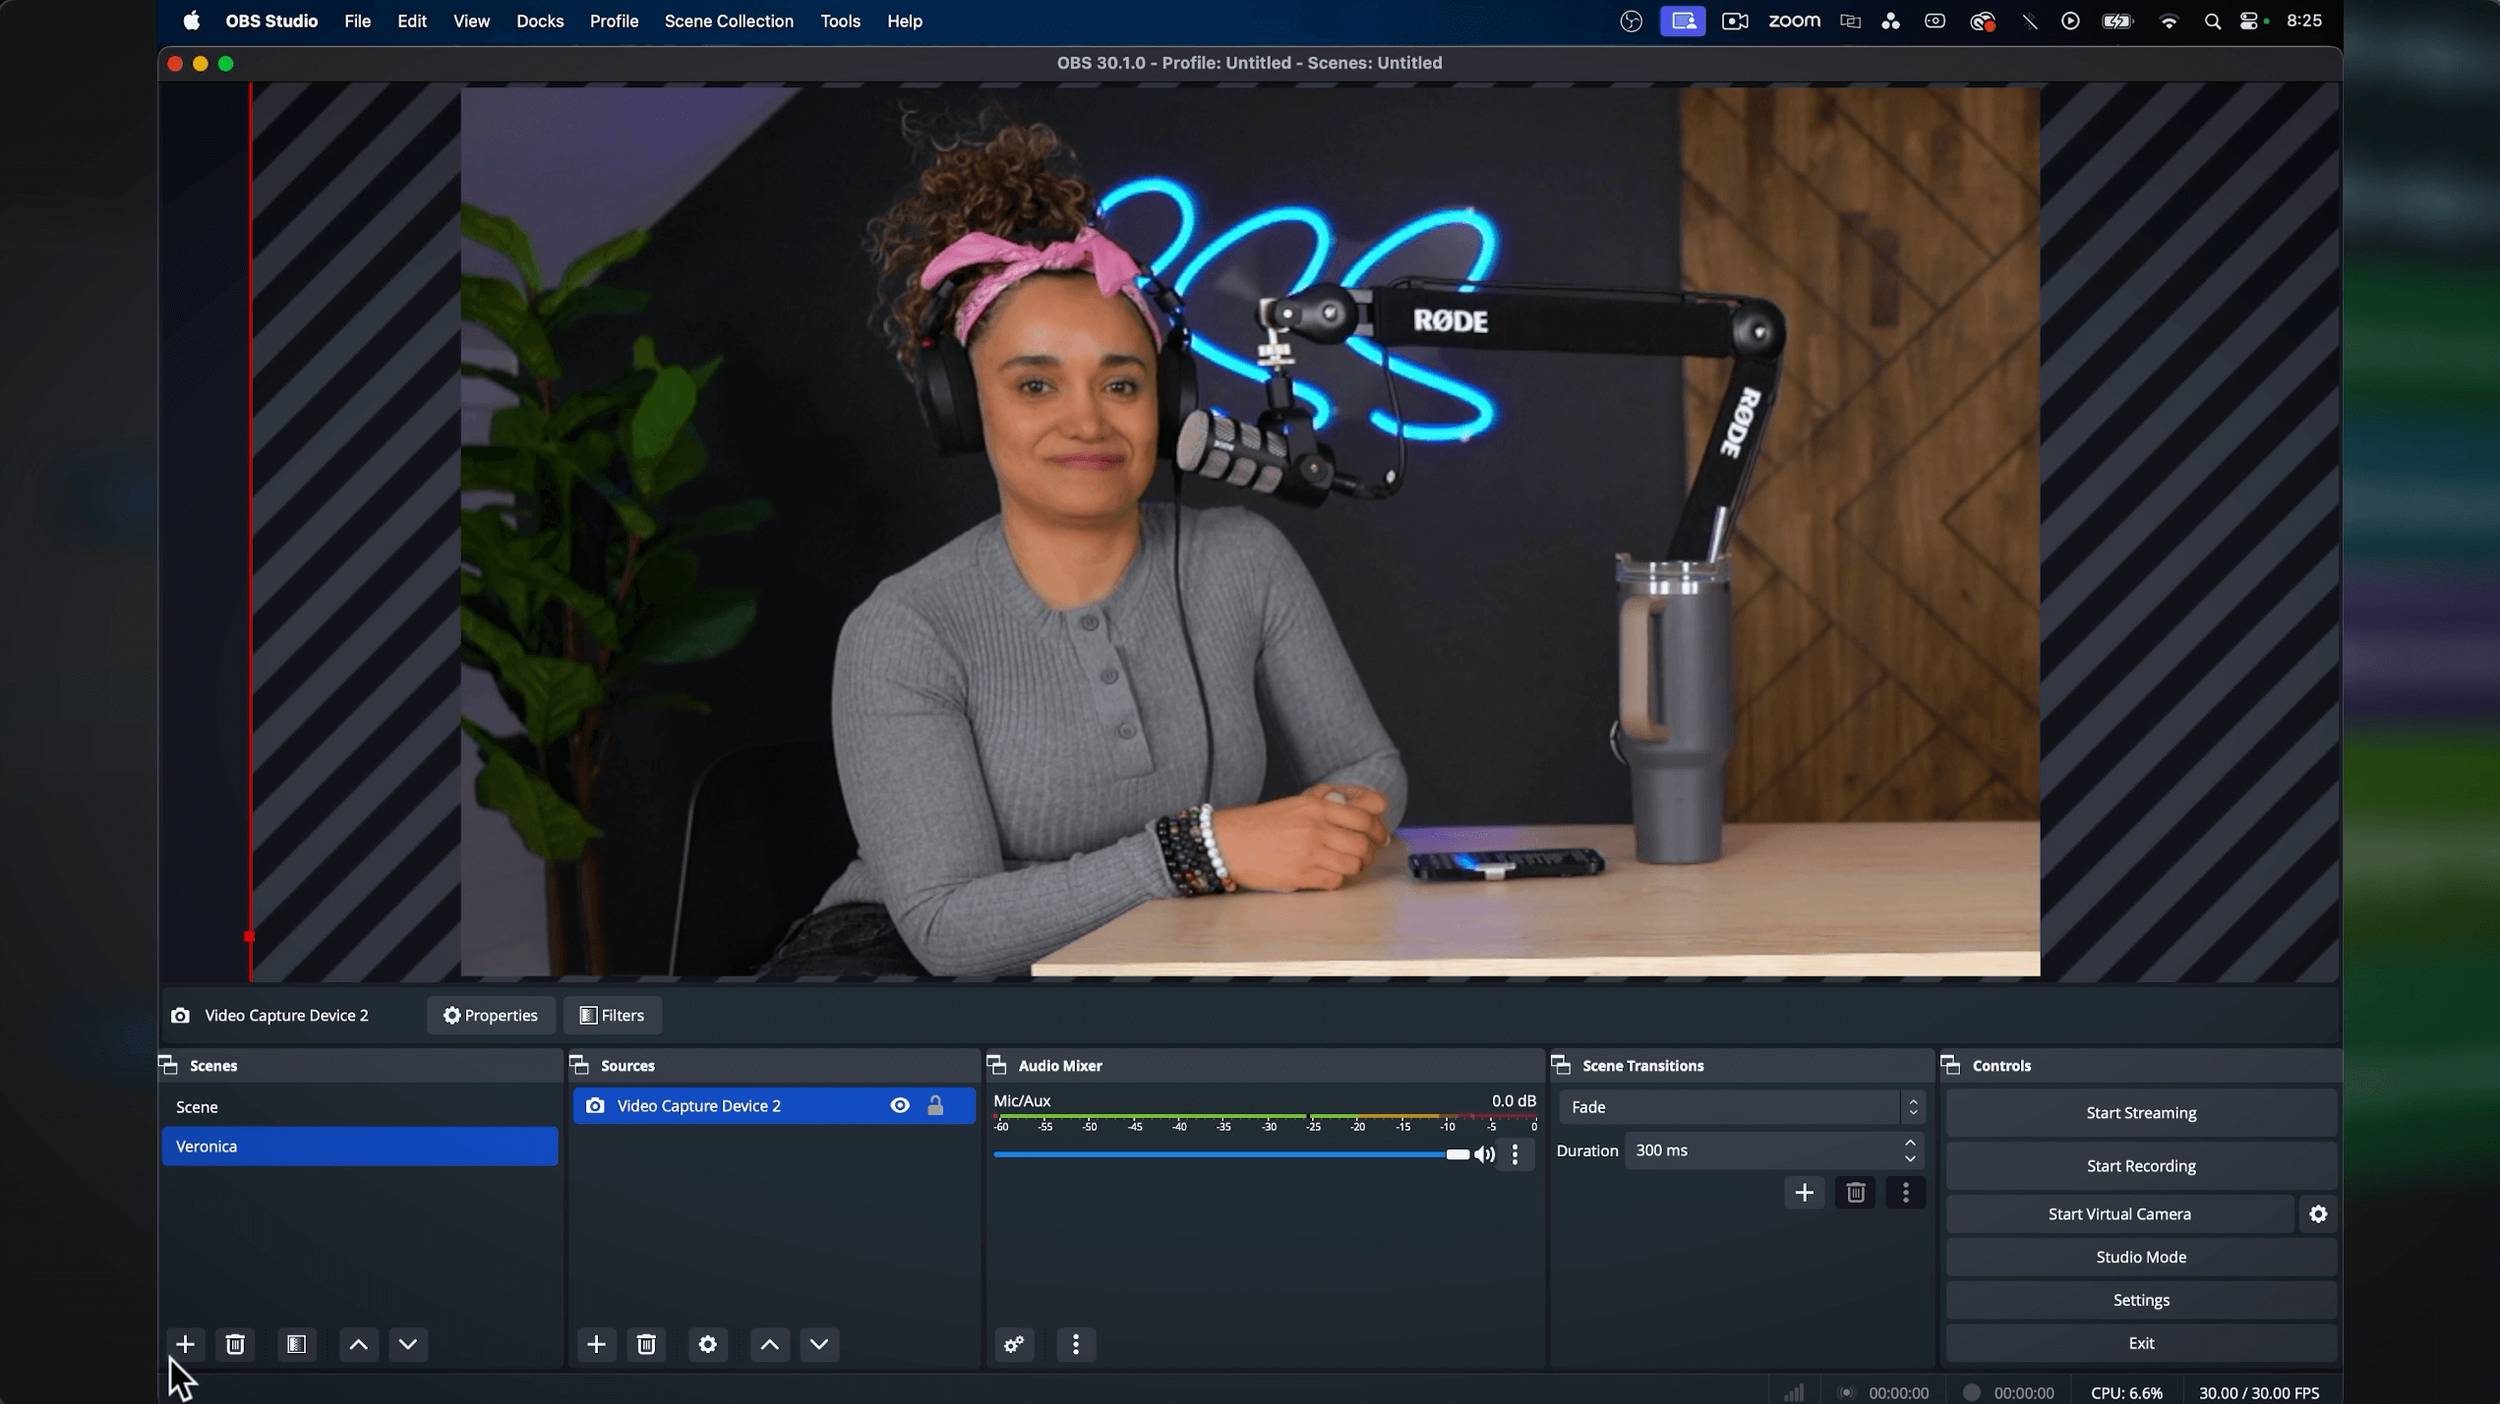
Let’s Get Scene #2 Set Up in OBS — Veronica:
To set up a new scene, go to the Scenes Panel and click the PLUS icon.
I’ll name the scene Veronica
Click OK

4. THEN REPEAT THE STEPS FOR SCENE #1
5. With the Veronica scene selected in the Scenes Panel, go to the Sources Panel, click the PLUS icon, and choose Video Capture Device
6. (Optional) Give device 2 a name
7. Press OK
8. And then from here, I'll choose that same Cam Link 4K
9. Press OK
10. This time on the scene itself, I’ll ZOOM IN until I only see Veronica, and I don't see myself at all
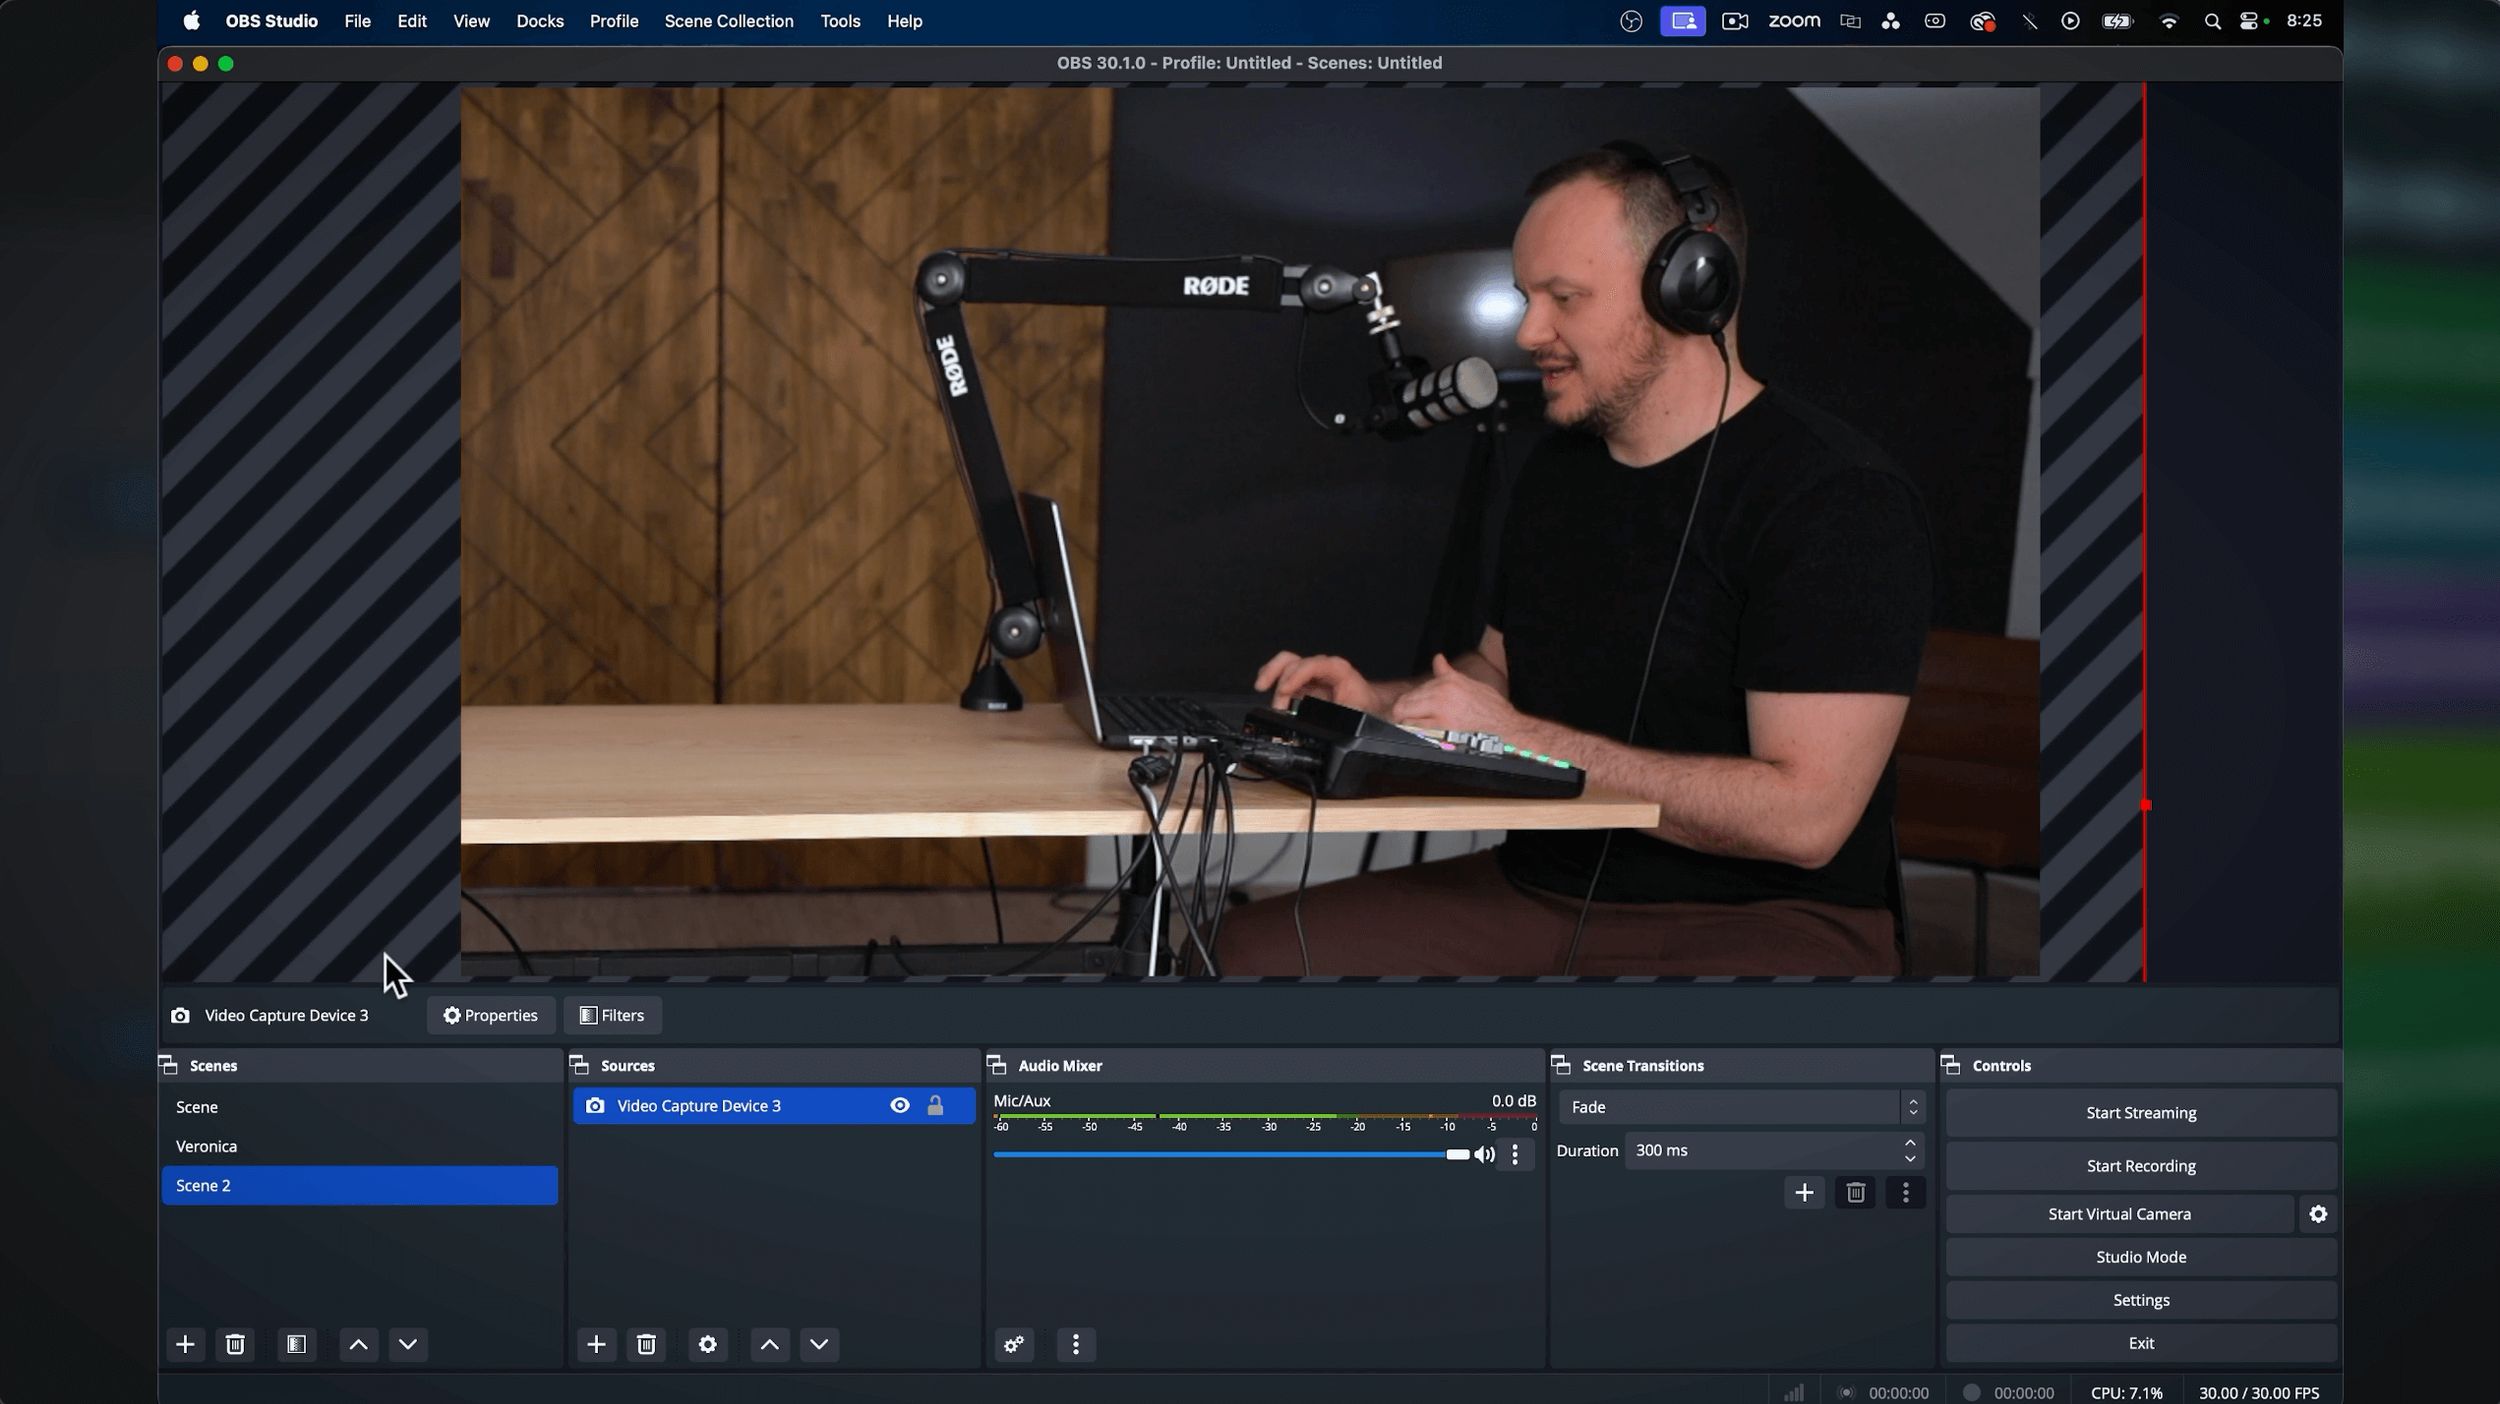
Let’s Get Scene #3 Set Up in OBS — Studio Steve:
REPEAT THE STEPS AGAIN
To set up a third scene, go to the Scenes Panel and click the PLUS icon.
I’ll name the scene Studio Steve
Click OK
With the Studio Steve scene selected in the Scenes Panel, go to the Sources Panel, click the PLUS icon, and choose Video Capture Device
(Optional) Give device 3 a name
Press OK
And then from here, I'll choose that same Cam Link 4K
Press OK
Just like we did for Veronica’s scene, I’ll ZOOM IN until I only see myself in the scene, and I don't see Veronica at all
So now, you can press the arrow button to switch back and forth between the 3 scenes.
Let’s Finish Setting Up OBS:
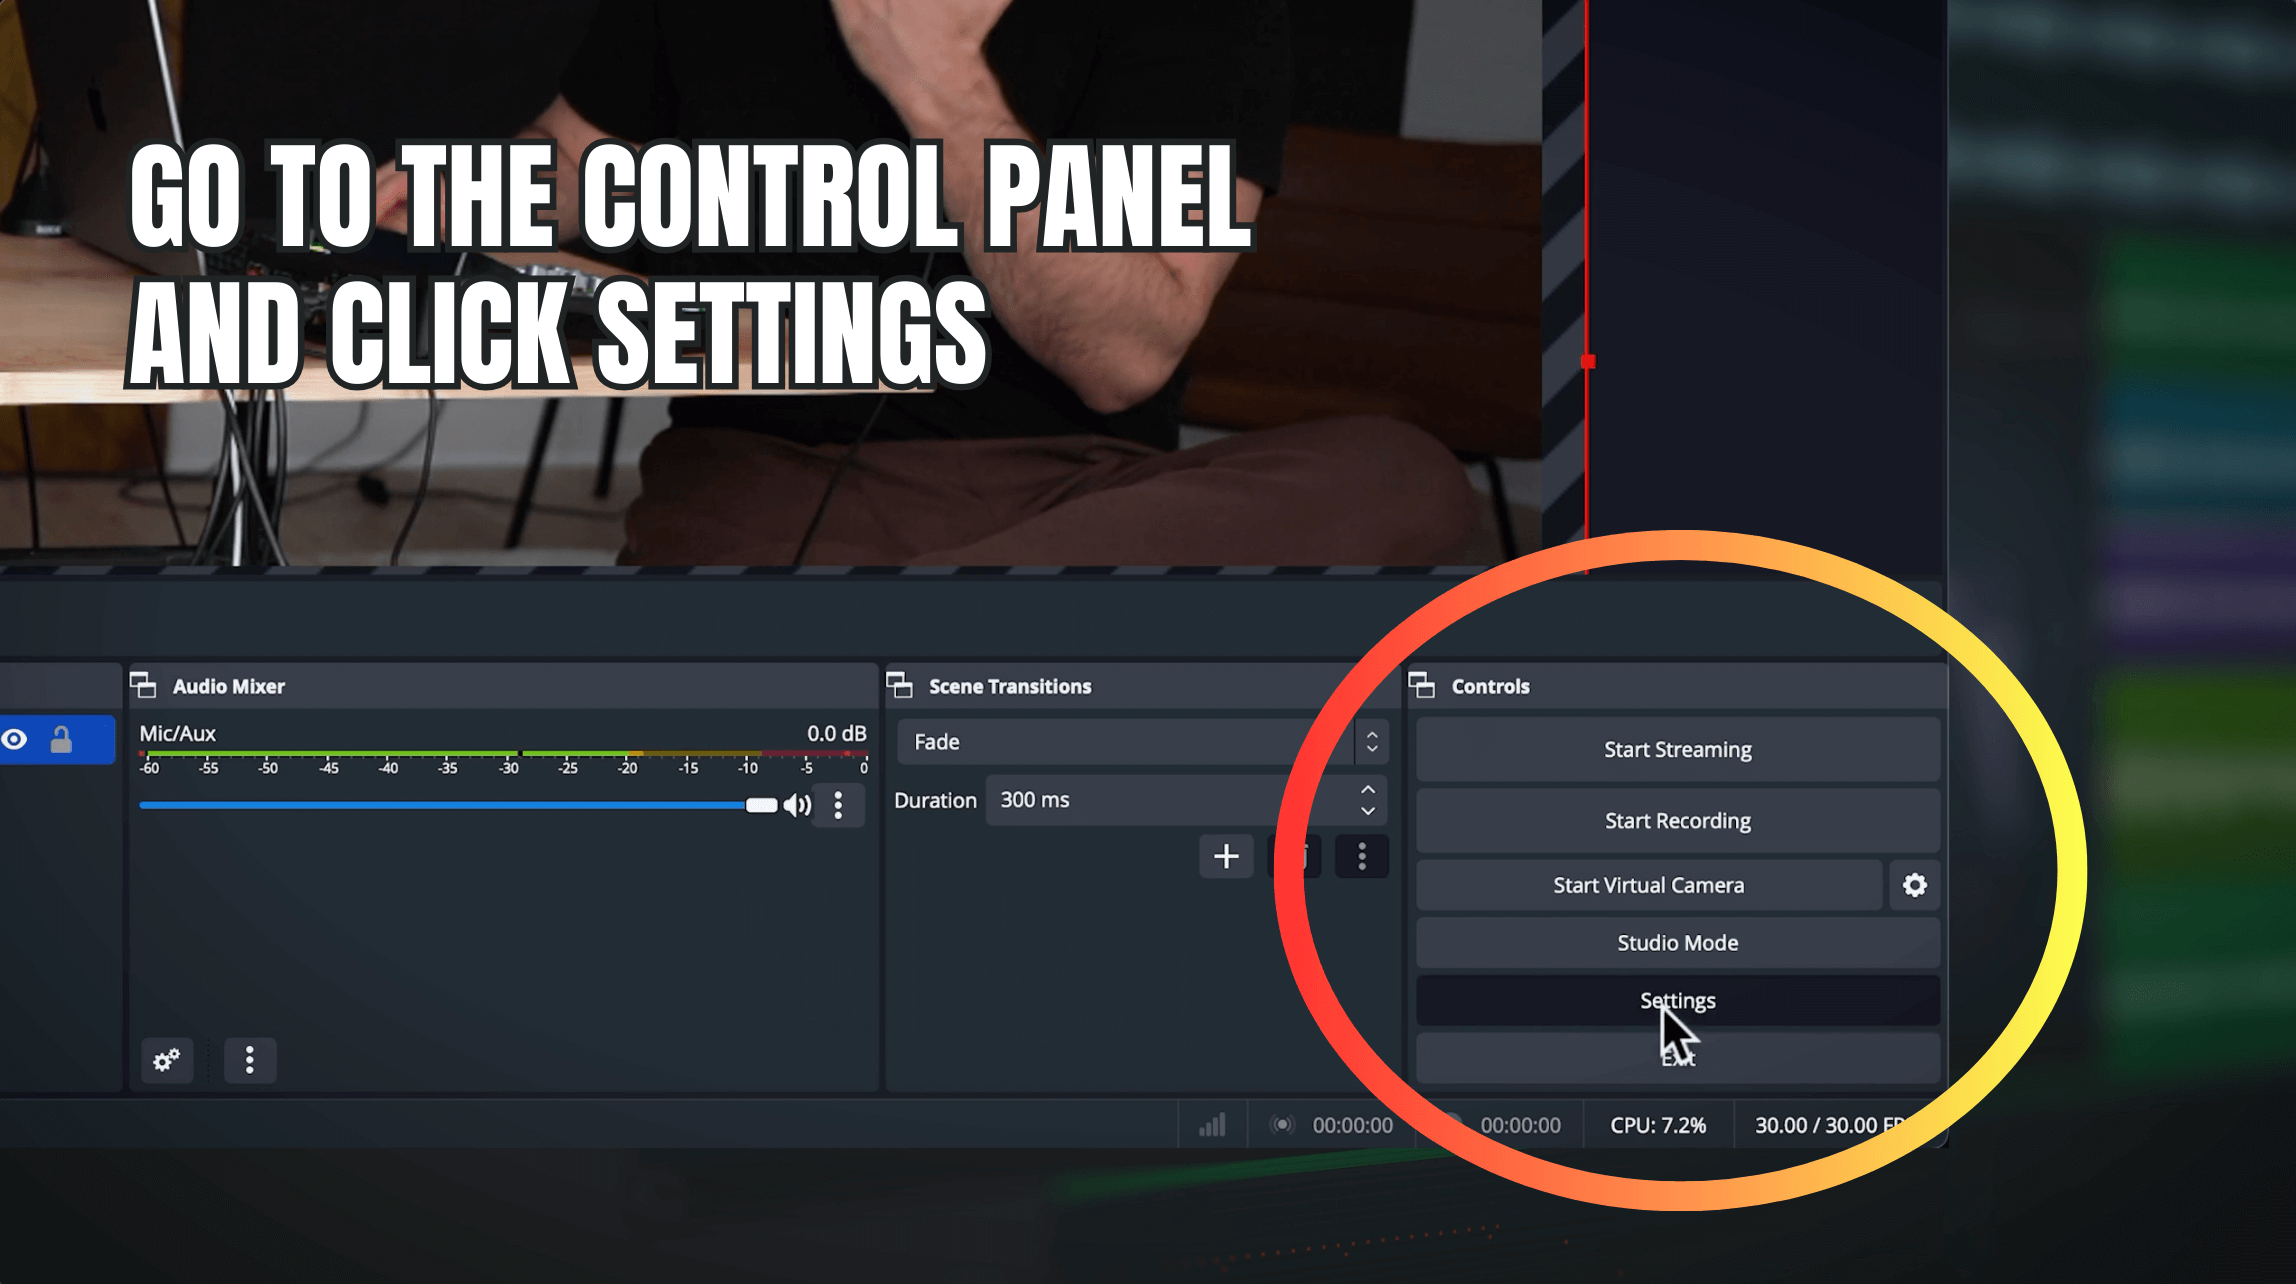
So now in the Controls Panel, click on Settings
2. From settings, click on Output
3. Go to the Recording section
4. Choose a Recording Path. Decide where you want to save your recordings. I've already set up a folder that I named OBS Recordings. You can create a folder on your internal hard drive or an external hard drive that you have plugged into your computer.
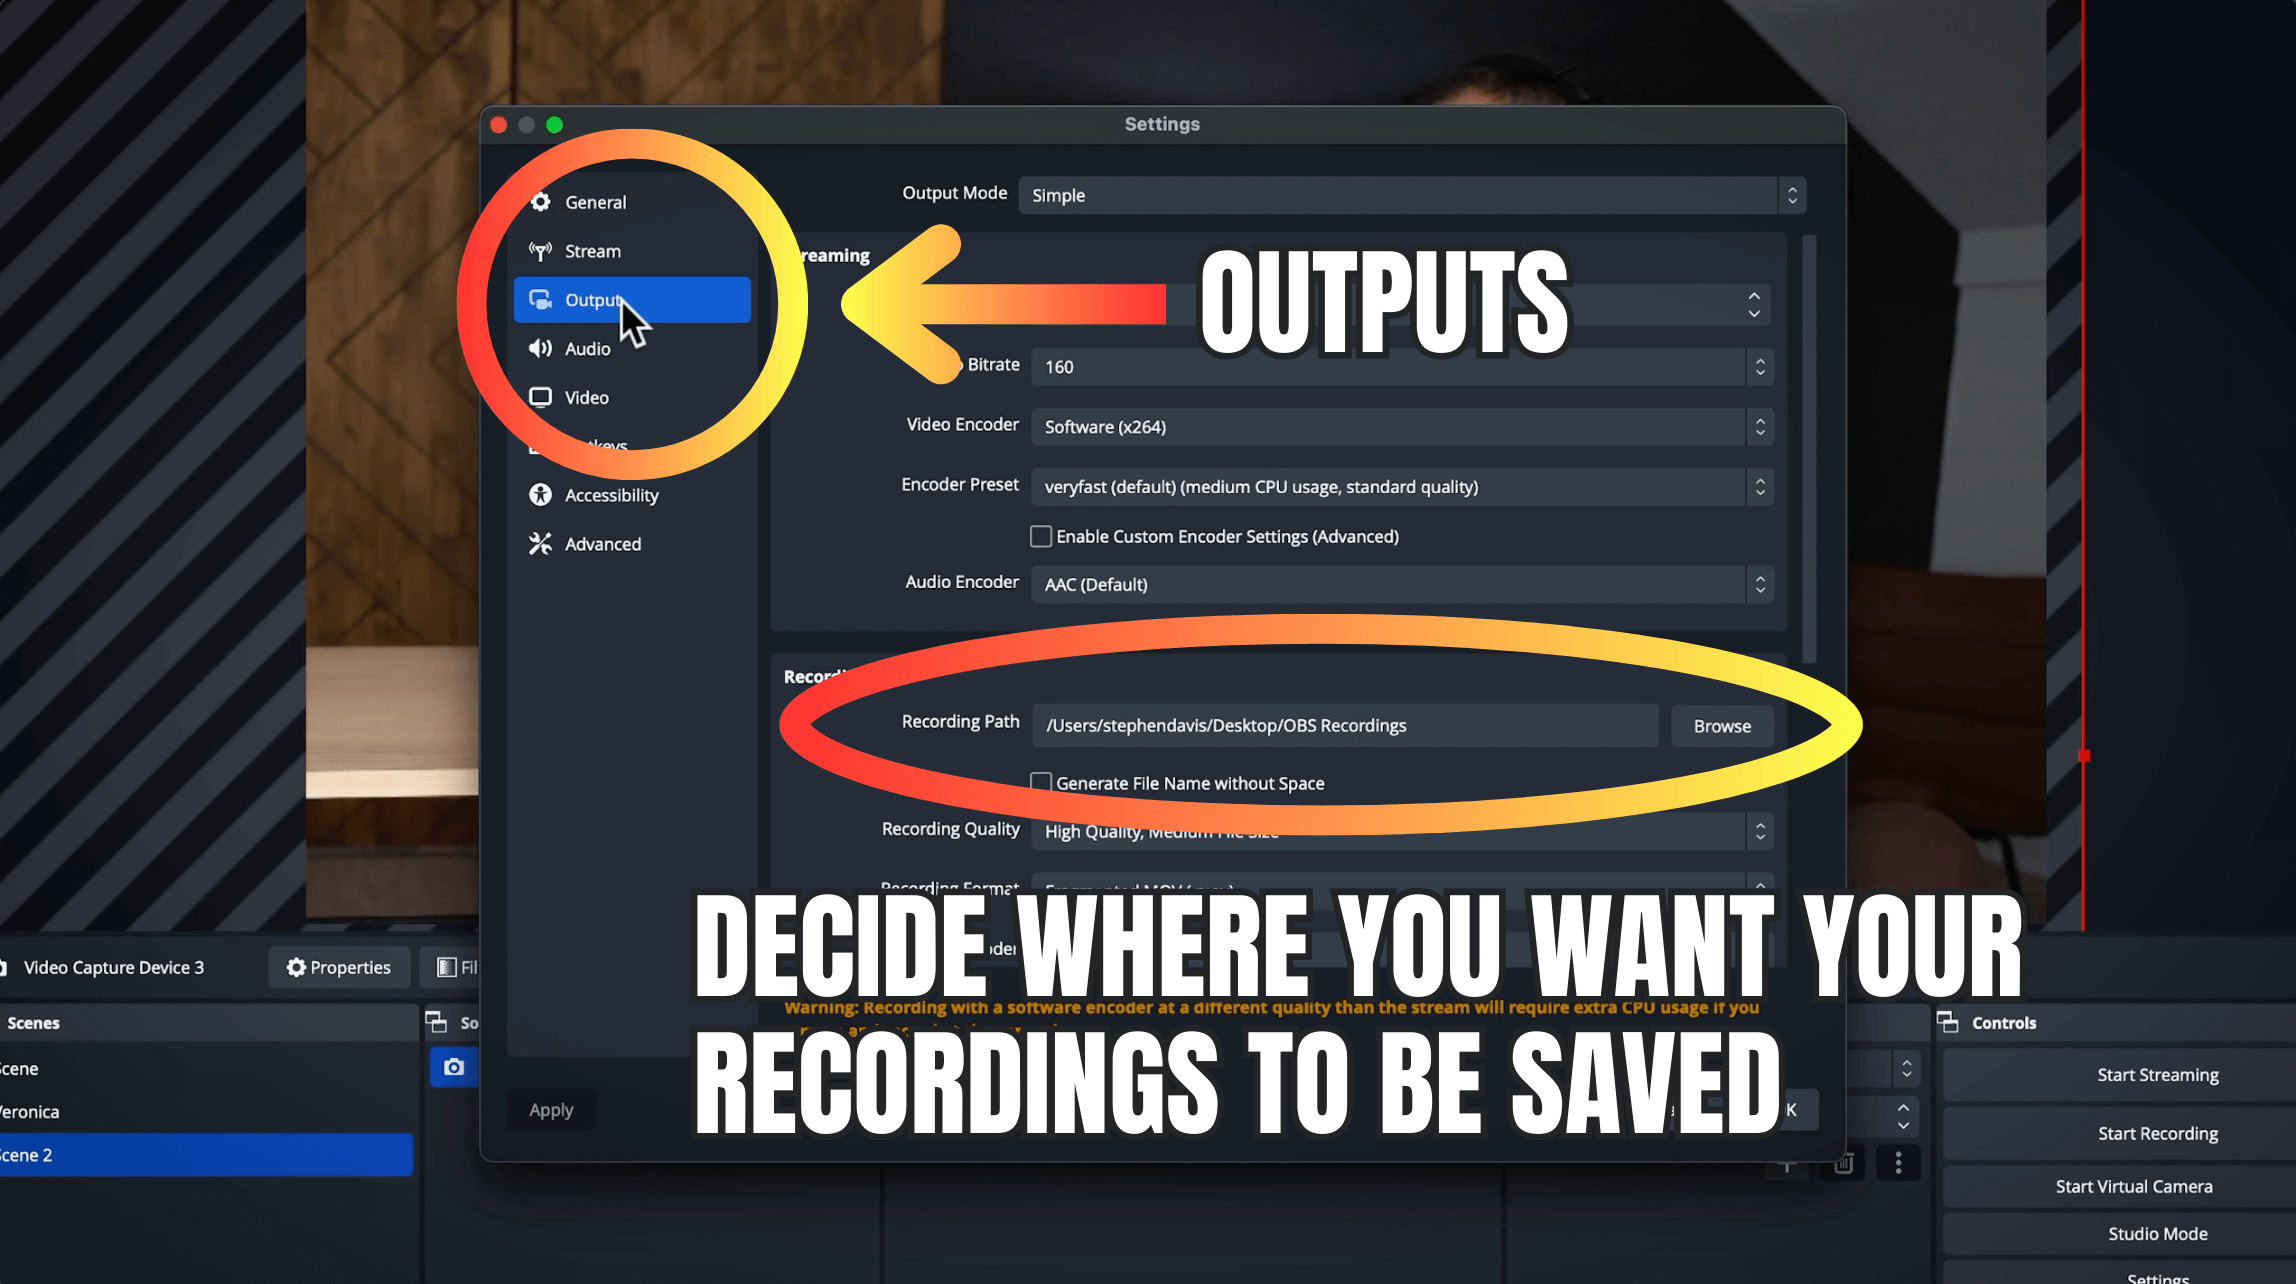
5. Choose the recording quality. I have mine set at High Quality, Medium File Size, because I think that's fine. But look, they have Indistinguishable Quality, which is a large file size, and Lossless Quality, which means there won't be any quality loss. It's going to be what's coming out of the camera, and that's a tremendously large file size. But hey, if you've got a nice fat hard drive hooked up to your computer, then why not just do a tremendously large file size?
6. Click OK. And then this is good to record.

7. Go to the Control Panel. Press Start Recording to start recording.

8. Then you can record the RODECaster DUO into Reaper or you can even set up the audio here to record the DUO in StreamYard as well. But I like to use Reaper to get the multi-track recording. I'm going to use Reaper anyway to do the post-production and the editing. So however you want to do that, you have all that control.
HOW TO SET UP STREAMYARD IN OBS
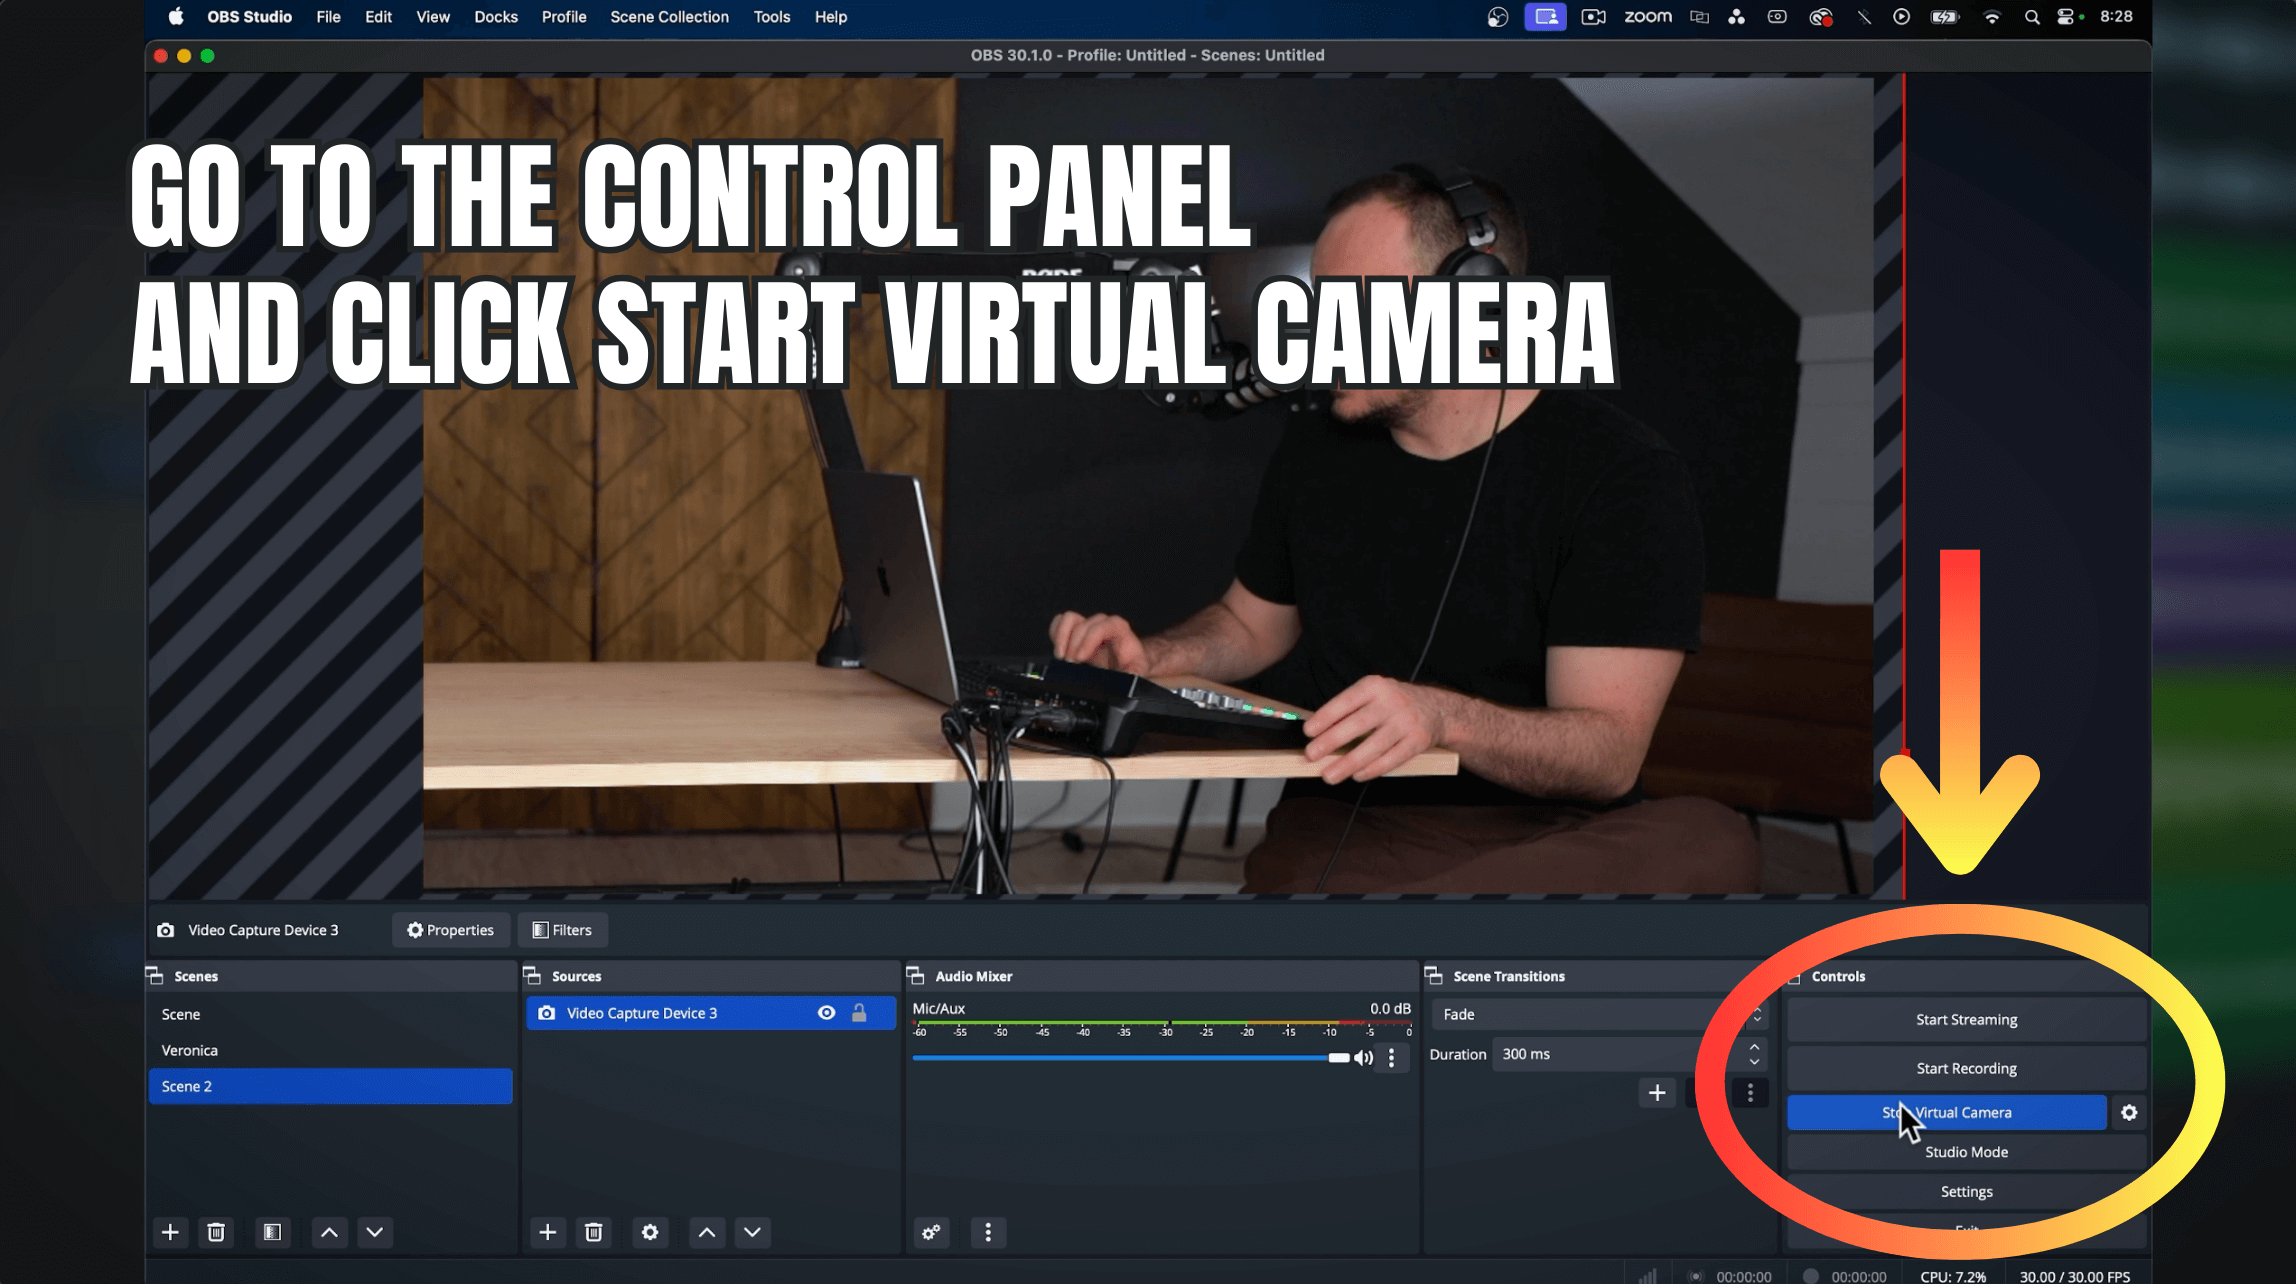
Go to the Control Panel. Click Start Virtual Camera — this is really cool
2. Open StreamYard (because it’s what we’re using to live stream) in the Google Chrome web browser
3. Click the Create Button
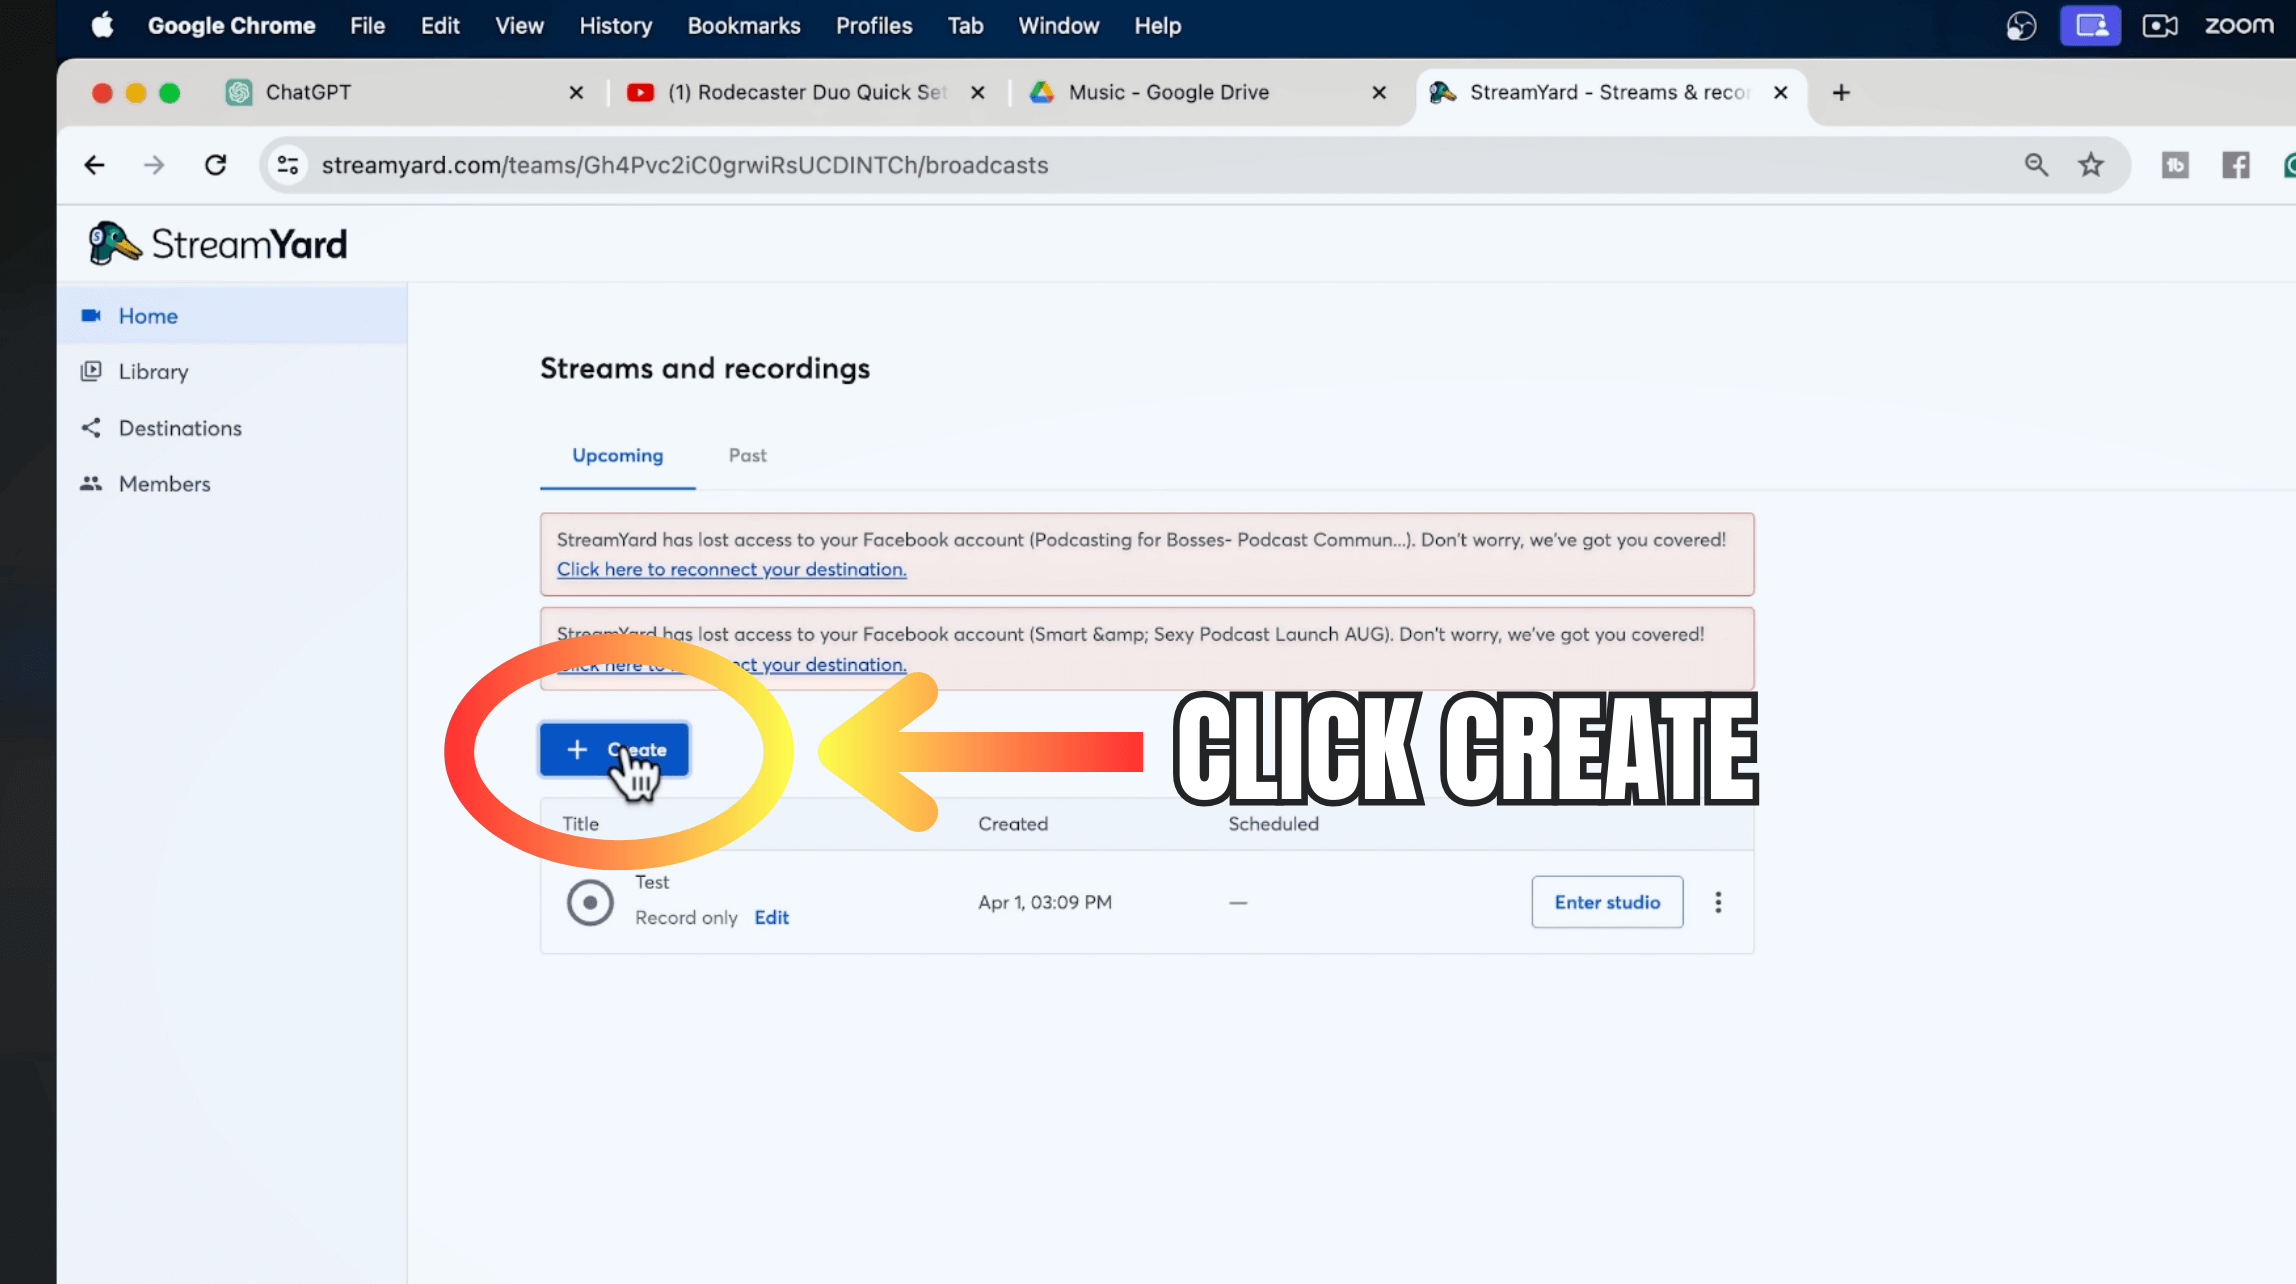
4. Select Live Stream. I'll just do a test recording for demonstration purposes

5. Give it a Title and then click Create Recording

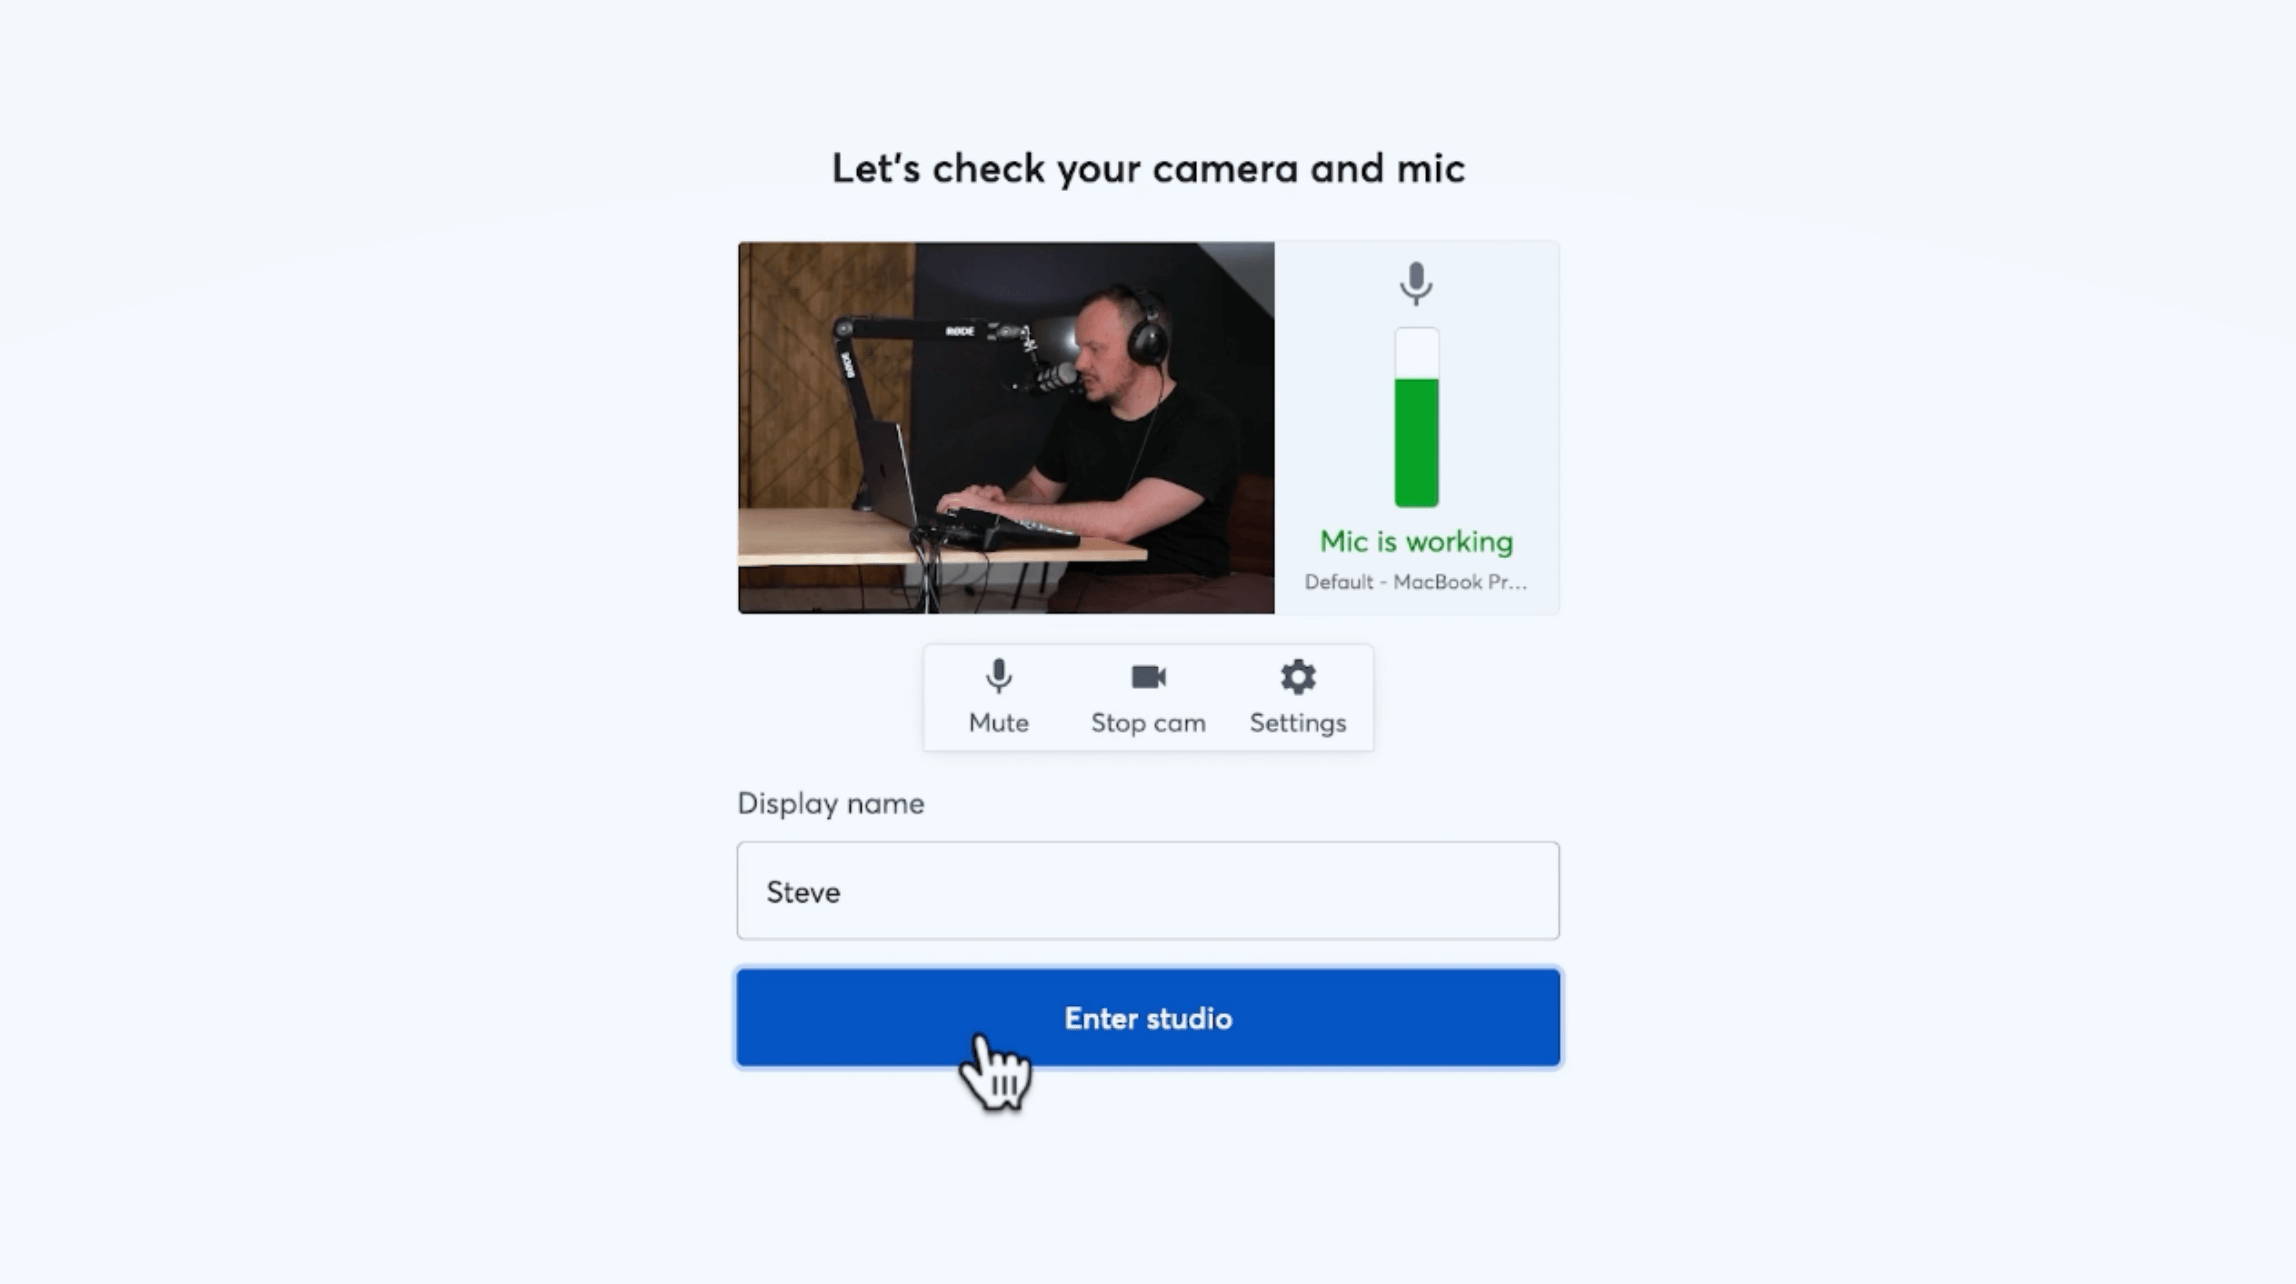
6. And here we are. Go ahead and click Enter Studio
7. Click Add to stage

8. So now I'm in the StreamYard studio

9. You can have both StreamYard and OBS open. If you have multiple monitors, you can do some fun things.
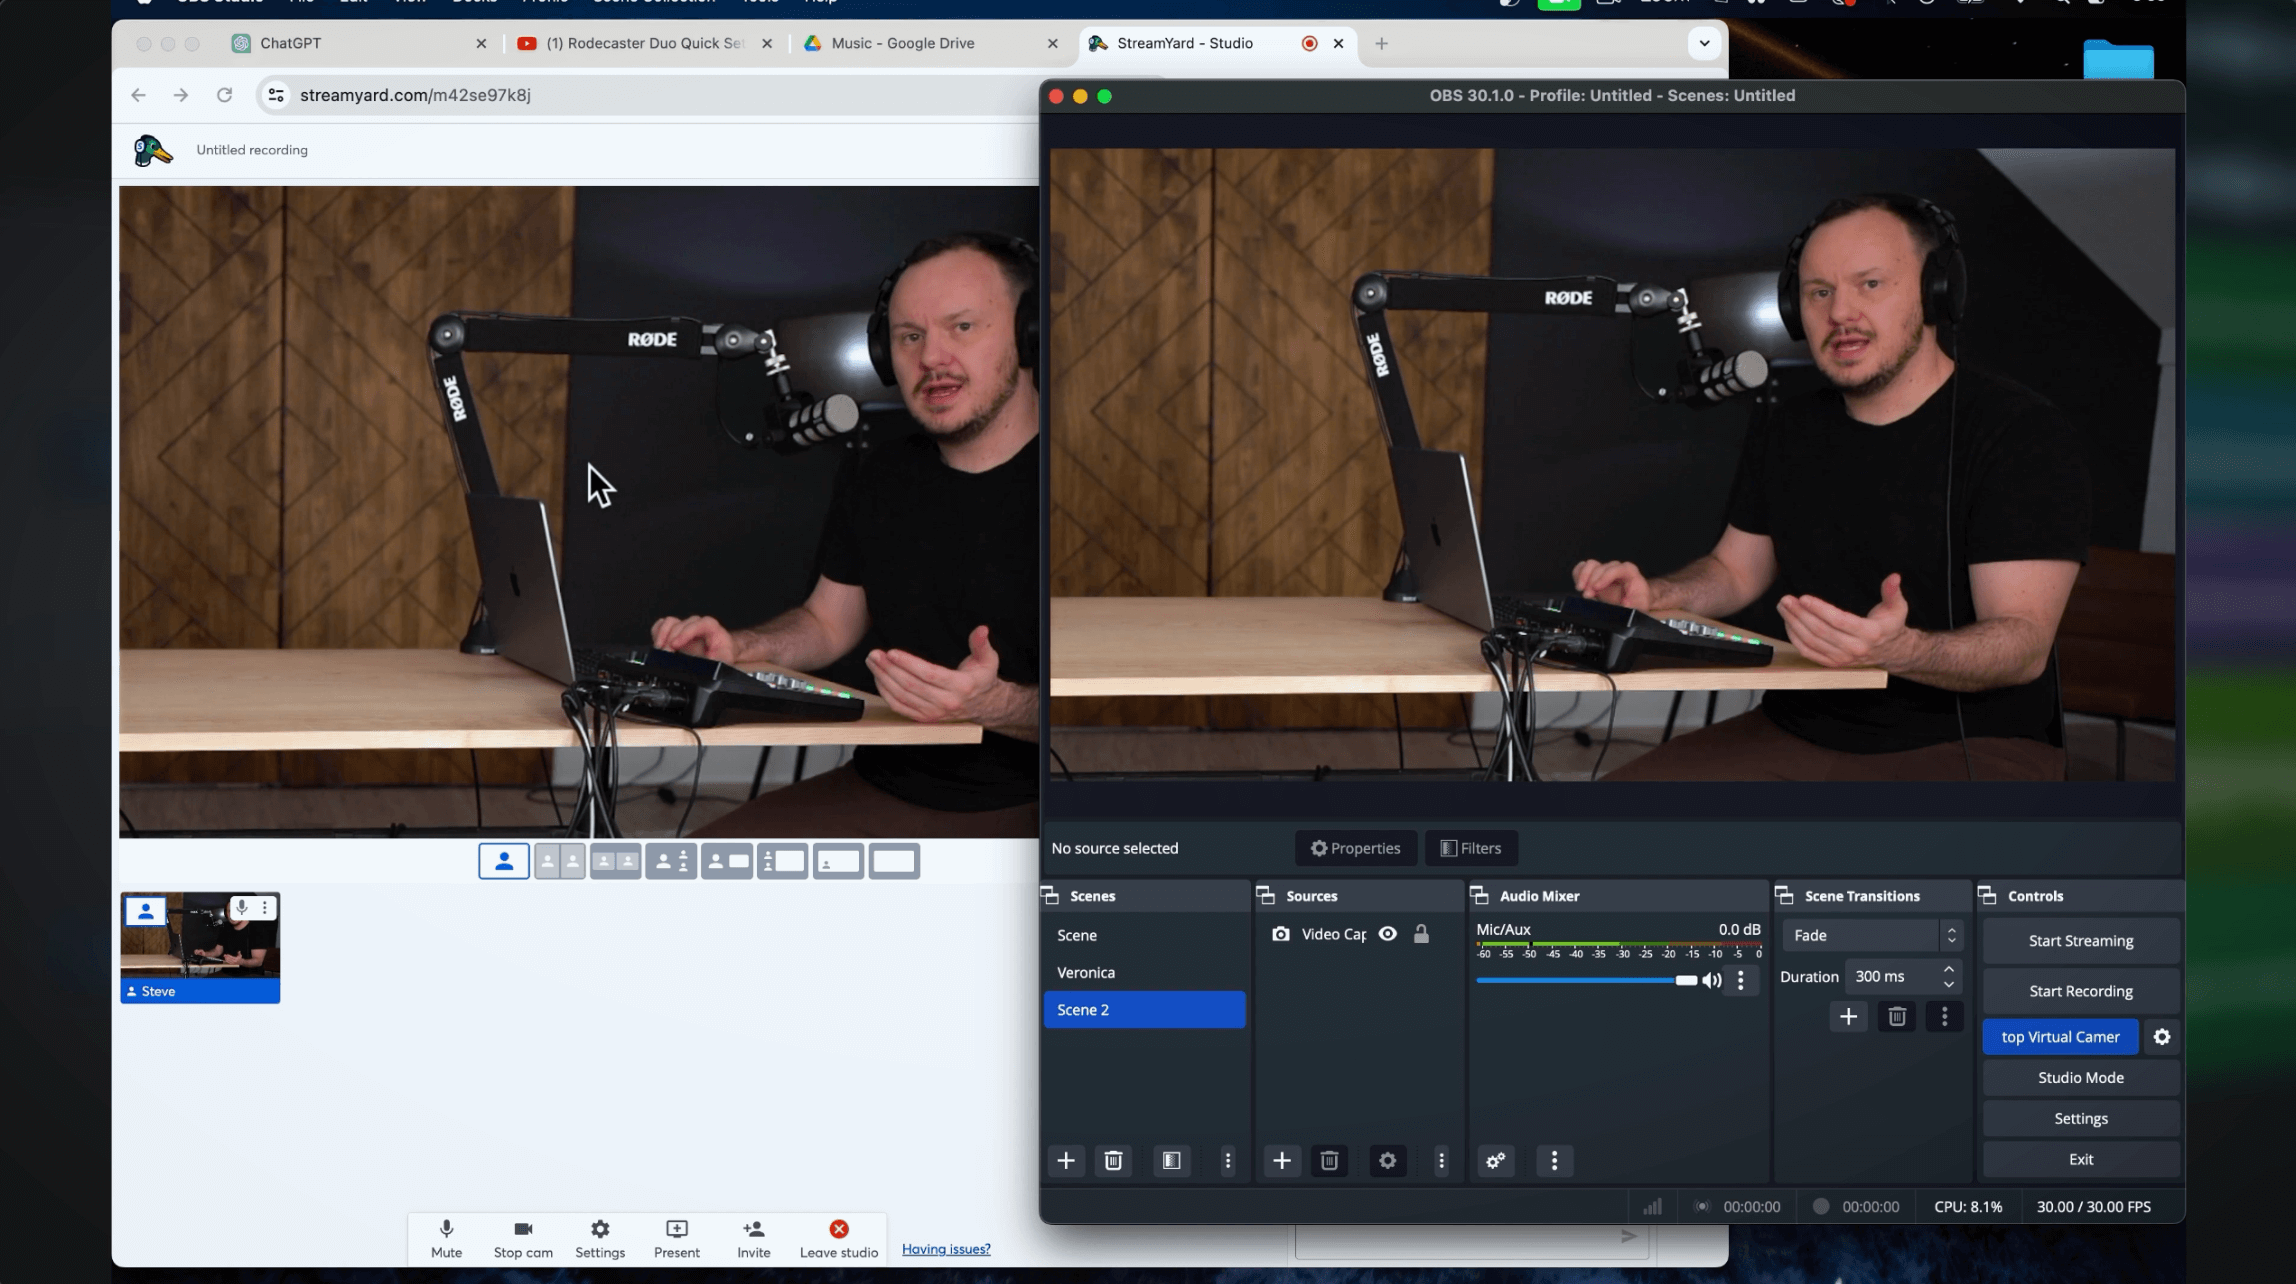
10. You can see that StreamYard is picking up OBS just like it would if it were a webcam. So now in OBS, when I do the switch, it switches in StreamYard too. You'll notice there are also Scene Transitions here. So if you don’t like having a little bit of a FADE, you could just have it CUT instead. Maybe the cut is a little cleaner. I kind of like the fade.

And there you have it.
WATCH THIS VIDEO OR READ THE POST ABOVE:
Use this 2 Person Video Podcast and Live Stream Setup (BEGINNERS)
We put all of this to the test when we went live on our YouTube channel for our podcast Content Jefe. You can go check out the episode to see what the RODECaster Duo sounds like in a live stream. We had a lot of fun with our new setup! You can be the judge and see how it looks.
If you want to record your video podcast from two separate locations, we made this video right here where we show you the solution that we use to connect remotely, how to do it step by step, and the results that you get after. Go watch it now.
Key Takeaways
A professional-quality 2-person video podcast and live stream setup can seem daunting, so that’s why we created this guide and boiled the steps down to the essentials. We wanted to make it as easy as possible to start live streaming your video podcast (even if you’re a beginner).
In this guide, we walked you through:
the intricacies of setting up the RODECaster Duo
mastering the art of recording and live streaming simultaneously
creative hacks to elevate your production quality
There’s no question that the RODECaster Duo is the king of audio interfaces in the niche of video podcast live streaming — it is tailor-made for streamers and video podcasters alike.
While its default settings excel in live streaming scenarios, mastering its multi-track recording capabilities unlocks the option to take post-production to the next level. From multi-track recording for seamless editing to adding custom sound effects with ease, the RODECaster Duo empowers creators like you to craft content of the highest caliber.
Additionally, you learned how to utilize the dynamic capabilities of OBS Studio, and how to transform a single-camera setup into a dynamic 3-scene professional production. With OBS, you can effortlessly switch between scenes, create captivating visuals, and record high-quality footage directly to your computer — all while live streaming to your audience.
It’s all so cool what you have the power to do with this setup!
But remember: whether you're just starting out with a single camera or ready to dive into multi-camera setups, the key is to begin simply and gradually add complexity as you grow more comfortable.
